
Here's what's been happening in Odyssey v2.1...
Released: 4/19/2024
Version 2024.05
New Functionality: Ability to copy workflow paths from one product to another
We are excited to introduce significant improvements to workflow path management, making it easier and more intuitive to manage workflow paths across different products within your printshop.
-
New Access Screen:
-
Initial View: When you open a product that does not contain any workflow paths, you will now be greeted with a new screen presenting two options:
- Create a new workflow path: Begin a workflow path from scratch tailored to your product's specific needs.
- Copy workflow path from another product: Leverage existing workflow paths from other products to save time and maintain consistency.
-
Initial View: When you open a product that does not contain any workflow paths, you will now be greeted with a new screen presenting two options:
-
Copy workflow path(s) from another product
- Navigation and Selection: Clicking the 'Copy workflow path from another product' button reveals a table listing products that already have workflow paths. You can easily filter this list by product name to find what you need quickly.
- Workflow Path Selection: After selecting a product, its associated named workflow path(s) will display. By default, the first path is selected, but you can adjust this as needed.
-
Bulk Actions:
- The top line per product named '# workflow paths' allows a user to select all workflow paths belonging to said product that need to be copied.
-
Copying Workflow Paths (product already has workflow path(s):
-
Within the Same Product: For products already containing workflow path(s), a new 'Copy workflow path' button enhances your ability to replicate selected paths directly within the same product.
- The copies will be automatically named using the original workflow path name followed by a sequential number to ensure unique identification.
-
To Another Product: Alternatively, you can choose to copy selected paths to different products via the 'Copy to another product' button
- This brings up a streamlined selection process in a modal dialogue, which allows for filtering by product name, category, or account.
-
Within the Same Product: For products already containing workflow path(s), a new 'Copy workflow path' button enhances your ability to replicate selected paths directly within the same product.
-
Error Handling and Alerts:
- Should an issue arise during the copying process, an alert will inform you immediately, providing guidance on how to resolve the specific problem.
Released: 4/2/2024
Version 2024.04
New Functionality: One job ticket for multiple jobs per order
- Within the Jobs > Pending, In Progress, or Completed screens, upon selecting the job ticket button, if the order contains more than one job, there will appear a drop-down
- Within this drop-down, there is the ability to download a single job ticket from any job belonging to that order or download all job tickets for all jobs in the order
- Selecting 'Download all job tickets' will download a single PDF file, containing all job tickets from all jobs in the order
- Within the job workflow screen, the same drop-down will be present upon selecting the 'Job ticket' button
New Functionality: Setting a unique printing device per workflow path
Product specs screen
- Within the 'Product specs' screen, there is a message in the 'Printing options' section saying "These are the default printing options for this product".
- This message indicates that unless the 'Printing options' are detached for any workflow path for the product, the 'Printing options' will be the devices indicated within 'Product specs'
Workflow path specs screen
- Within the 'Printing options' section, there is a message saying "Printing option(s) attached to product. Any changes made on the printing option(s) will update the whole product. Detach your printing option(s) to only update this subsection."
- This message indicates the 'Printing options' are the same that was set within 'Product specs'
- After this message, the button 'Detach printing options' allows the printer to have unique printing options for the specific workflow path
- Upon selecting the 'Detach printing options' button, Odyssey will use those set printing options for that specific workflow path each time the workflow path is chosen/used
- Printing options are therefore detached from 'Product specs' upon selecting the 'Detach printing options' button
- The message will change to say "Printing option(s) detached from product. Any changes made on the printing option(s) will only update this subsection."
- The printer is also able to select different printing options per subsection per workflow path
Released: 3/27/2024
Version 2024.04
Updated Functionality: Commission Rates
- Logged in Odyssey users are no longer able to change their own commission rate
- Commission rates can only be adjusted by employees that are set as a Admin Access > Accounts > Employees checkbox checked within the website's Control Center > Accounts > Employee List > Edit > Admin Access Details
Released: 3/12/2024
Version 2024.03
New Functionality: Sales Reps & Commission Reports
"Printshop workflow" menu
- There is a new selection under “Staff and workload” called “Sales reps”
Sales reps within "Printshop employees"
- There is a new role called “Sales Representative” that can be assigned to printshop employees
- If the employee has the “Sales Representative” checkbox, there is an icon in the employee's card in order to quickly determine the employees that have this designation
Printshop employee's "Sales reps" screen
- In this screen, there is a summary of the sales reps, the assigned customer(s), the assigned commission rate, and commissions ($)
- There is a filter called "By sales rep or customer" to the left of "Commissions range"
- If the printer starts typing in this field, there will be suggestions for sales reps, companies, branches and contacts.
- The “Commissions range” filter defaults to the current month
- The “Show log for past assignations” toggle is turned 'off' by default.
- When the “Show log for past assignations” toggle is turned on, the “Commissions range” filter will be disabled (grayed out) and for each sales rep, all the customers that were assigned to the sales rep will appear with the 'Effective dates' they were assigned.
- The “Consider only paid invoices” toggle is turned 'on' by default and is intended to consider only paid invoices in the commissions total.
- By default, there is one line per sales rep
- If there is more than one customer assigned to a sales rep, the last column will show a down-arrow icon
- Selecting this icon will reveal the full list of customers assigned to the sales rep
- Each line that has a customer assigned to a sales rep, there are two buttons: A blue 'edit' and red 'delete' button
- Selecting the blue 'edit' button will open a modal where the printer can edit the 'Commission rate', the 'Effective dates', and if the commission includes the shipping costs.
- Selecting the red 'delete' button will present a pop-up modal, asking the printer to confirm if they would like to remove the sales rep for the named customer
- The “Register sales rep” button opens a modal that lists all printshop employees that have not yet been assigned a sales rep
- Selecting the green 'plus' button to the right of the employee’s name will assign the employee the “Sales representative” role.
- The “Assign to a contact” button will open the "Assign sales rep" modal
- This modal allow the printers to search for a sales rep, assign the sales rep to a company, branch, or contact, set the 'Effective dates' and 'Commission rate' and indicate whether or not to include shipping costs as part of the commission
- The “View report” button will redirect the printer to the “Commissions report” screen.
- Clicking on a sales rep's name will redirect the printer to the "<Sales rep> commissions log" screen
Commissions report
- The "Commissions report" screen will show a report of the commissions generated by sales reps based on a date range as well as additional toggles made available
- “Date range” filter is set to the past 30 days by default
- The “Show only paid invoices” toggle is turned 'off' by default
- The “Select sales rep” filter is to be used to generate a commissions report just for a specific sales rep
- The “Run report for all sales rep” toggled to 'on' will disable the “Select sales rep" filter
- The “Show detailed version” toggle will be enabled when there is no sales rep selected in the “Select sales rep” filter
- When the "Show detailed version" is toggled 'on', the report will show all the invoices with additional details related to the commissions for every sales rep.
- When the “Show detailed version” toggle is 'off', the report will show only the sales reps with their average commission rate along with the total commissions according to the “Date range” filter.
- When a sales rep is selected in the “Select sales rep” filter, the “Show detailed version” toggle will be turned 'on' and disabled due to the report is created with details for that specific sales rep
- The blue “Run report” button will run the commission report according to the filters and selections made on the screen
- Two buttons will appear to download the report as a PDF or CSV
Sales rep commissions log
- The "<Sale rep name> commissions log" screen will show a log of the commissions generated by the customers assigned to the sales rep in the selected "Date range"
- By default, the “Date range” filter will default to the current month
- The “Show only paid invoices” toggle is turned 'off' by default
- This toggle is to be used if needing to consider only paid invoices in the commissions total.
- The “Filter” input will filter customers based on the text entered in that field
- The “Assign to a contact” button will open a "Assign sales rep" modal
- Inside the modal, users can assign a sales representative to a customer, set effective dates, specify commission rates, and define whether commissions include shipping costs.
For each listed customer, there will be a button located at the end of the row, allowing users to navigate to the "Sales rep commissions for <customer>" screen.
Sales rep commissions for customers
- This screen will display a log of the commissions generated for sales rep by customer assigned within a specified date range.
- By default, the “Date range” filter will encompass the last month.
- The “Show only paid invoices” toggle is turned 'off' by default and will only include paid invoices in the total commissions when turned 'on'
- The “Filter” input will apply a filter to the invoice number based on user input
- Selecting the “Update” button will refresh the report to ensure the most recent data is presented
User menu: Sales Rep > Commissions log
- For employees with the "Sales representative" role, a new section will be added to the "User" menu titled "Sales Rep."
- Within this section, there will be an option labeled "Commissions log"
- This option allows users to access their own commissions log.
- This log will offer the same functionality as that available to administrators, with the exception of the "Assign to a contact" button.
Released: 2/29/2024
Version 2024.02
Updated Functionality: Ability to consider height and thickness from a detached job workflow
- When a job workflow is detached within 'Pending Jobs', there is the ability to turn 'on' the 'Consider height and thickness on the calculation’ toggle with a resource's 'Saved calculations' section
- This turned on toggle will tell Odyssey to automatically calculate how many of that resources are needed based on the number of sheets, the height of the resource, which is more commonly a box, and the thickness per sheet
Released: 2/22/2024
Version 2024.02
Updated Functionality: Branches are now considered 'Subsections'
- When needing to add/edit a workflow path with multiple parts, those parts are now called 'Subsections' instead of 'Branches'
- This is most prominently seen in the 'Workflow path specs' screen
- Subsections are considered the different parts of a product.
- For example when creating a booklet, the cover and interior pages could be made simultaneously; two subsections are required. These two subsections are merged into what is known as a ‘Consolidated subsection’.
- If a workflow path has only one subsection, the 'Folding options' will appear below 'Trim size(s) and paper transformation'
- When a workflow path has two or more subsections, there is a tab called 'Consolidated subsection' and the 'Folding options' will appear in this tab
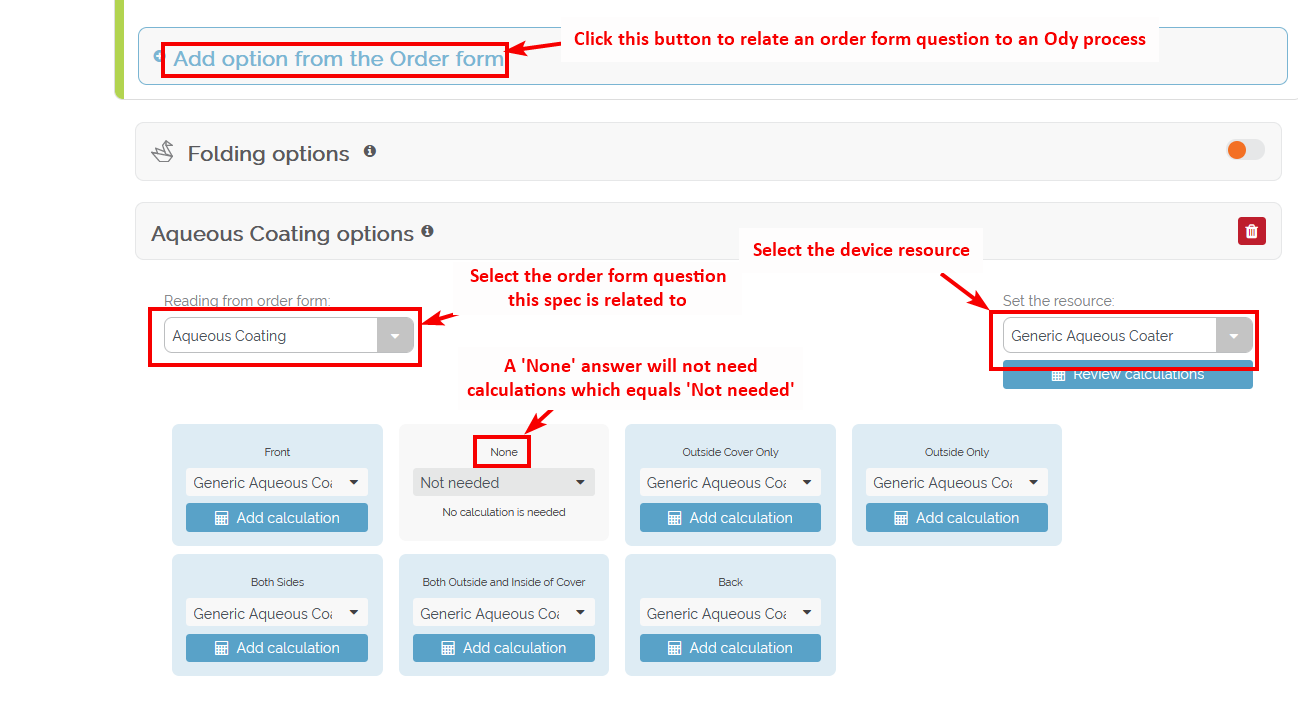
Updated Functionality: Mapping an order form question to an Odyssey process
- The newly renamed button called 'Pair order form questions with the Odyssey process' allows a printer to add an Odyssey process based on additional order form questions such as Hole Drilling, Shrinkwrapping, Binding, and more
- Upon selecting this button, the printer will be able to select a process as well as the subsection the process is to belong to under the 'Placement' column
New Functionality: Ability to add 'Conditions' when using 'Pair order form questions with the Odyssey process' button
Workflow path: Custom specs calculations with conditions
- When adding a calculation as a result of using the 'Pair order form questions with the Odyssey process' button, the printer can add a condition for when the calculation should be applied
- The calculations and conditions can be added on the 'Workflow path specs' screen as the workflow path is being created or can be added/edited within the workflow path itself
Jobs Pending: Using workflow path with custom spec with conditions
- When a job is pending is opened with a workflow path that has custom specs with calculations and conditions and the conditions do not apply to the job, the device will be shown but there will be a message that says 'Calculations do not apply'
- When a pending job is open with a workflow path that has custom specs with calculations and conditions and the conditions apply for the job, the device and the calculations will be present
- When a job workflow is detached, the calculation may be changed to apply in the case the calculation was not applicable prior to the job workflow being detached
Estimates: Using workflow path with custom spec with conditions
- When an estimate is open with a workflow path that has custom specs with calculations and conditions and the conditions to not apply to the estimate, the device will be shown but there will be a message that says 'Calculations do not apply'
- When an estimate is open with a workflow path that has custom specs with calculations and conditions and the conditions apply for the estimate, the device and the calculations will be present
- When the estimate workflow is detached, the calculation may be changed to apply in the case the calculation was not applicable prior to the estimate workflow being detached
Workflow path: Custom specs calculations for lift
- When adding a calculation for a custom spec to a device that is to be used for the 'Hole Making' process and the device has a defined lift, there is a toggle called 'Consider lift and thickness on the calculation'
- This toggle tells Odyssey to take into consideration the lift of the drilling device and the thickness of the sheets in the calculations
- The calculations and conditions can be added when the workflow path is being created as part of the 'Workflow path specs' screen or can be added/edited within the workflow path itself
- During workflow path testing, the drilling device as part of the custom spec process will consider the lift of the device and the thickness of the paper used to calculate the number of drills needed and the cost related to this calculation
Jobs pending: Using workflow path with custom spec calculations for lift
- When a Pending job is open with a workflow path that has custom spec calculations using the 'Consider lift and thickness on the calculation' toggle, the number of drills will be calculated based on the lift of the hole making device and the thickness of the sheets
Estimate: Using workflow path with custom spec calculations for lift
- When an estimate is open with a workflow path that has custom spec calculations using the 'Consider lift and thickness on the calculation' toggle, the number of drills will be calculated based on the lift of the hole making device and the thickness of the sheets
New Functionality: Job Specs show on Job Tickets
- There is a new section within a job ticket called 'Production specs'
- This section contains the printing technology, paper choice, folding options, printing option, and trim size
- Only jobs that contain a workflow path will have this new section
- When the job workflow is one of the workflow paths for the product and it has not been detached from the job, the job ticket will present the workflow path specs in the 'Production specs' section
- If the job workflow is detached, the updated job specs are presented in the 'Production specs' section
- If the workflow has more than one subsection, the 'Production specs' for each subsection are presented
- If the job workflow hasn't yet been detached and it has custom specs, the custom specs are also presented in the job ticket
New Functionality: Ability to set unique trim sizes per subsection on estimates
Estimates: Subsections created from scratch
- When creating an estimate workflow from scratch, if the printer adds more then one subsection, the trim sizes are initially linked together. Meaning changing the trim size in one subsection will also change to that same trim size in the other subsections
- In the estimate specs, there is a message under 'Trimmed size' telling the printer that the trim sizes are linked between subsections
- Selecting the 'un-link them here' button will unlink the trim size from the subsections; each subsection can have it's own trimmed size
- There is a pop-up 'Confirmation' modal, asking the printer to ensure they want to unlink the trimmed sizes across subsections
- When adding new subsections, if the trim sizes are unlinked, the new subsection will also be unlinked and a trimmed size will need to be set for new subsections
Estimates: Subsections using a workflow path
- When using a workflow path from the product chosen for the estimate and the estimate workflow hasn't had it's 'Enable Edit' button selected, the calculations are same as when testing the product workflow path
- Upon selecting 'Enable Edit' within an estimate workflow with subsections, the trim sizes will remain linked if the workflow path did not have any detached trim size for any of the subsections in the product
- Upon selecting 'Enable Edit' within an estimate workflow with subsections, the trim sizes will be unlinked if the workflow path has at least one trim size detached for any of it's subsections in the product
Subsections: Different 'Trim' size
- When trim sizes are the same within subsections and the paper calculator for each subsection is configured properly, the finished size can be calculated
- If there is no folding, the finished size is the same as the trimmed size
- If there is folding, the finished size will be the same as what is presented in the 'Folding Options' modal
- When the trim sizes are different between subsections, the finished size will be 'Undetermined'
Estimate workflow: Editing subsections
- When the printer detaches an estimate workflow path with subsections, the subsections will be available to edit in the 'Review estimate specs' section of each subsection
New Functionality: Ability to select 'ACH' as a 'Receive Payment' method
- Printers now have the ability to select 'ACH Payments' within the 'Payment method' drop-down in the 'Receive payment' screen
New Functionality: Pageflex Production PDF file can be opened within Odyssey
- Printers can now download the Pageflex Production PDF file within a job's 'Files' section
Released: 1/25/2024
Version 2024.01
Updated Functionality: Improvements during workflow path testing
Workflow path testing- additional information
-
During workflow path testing, the top gray bar below the orange header now includes four new sections: Quantity, Cost, Selling price, and Per piece summary
- Quantity: Shows the printer the quantity being tested
- Cost: Shows the printer the production costs, if there are added costs, and the total cost
- Selling price: Shows the printer the profit set for the product, the selling price before markups, the dollar amount of added markups, and the selling price after markups have been considered
- Per piece summary: Shows the printer the 'Cost Per Piece' and the 'Price Per Piece'
- Upon selecting the blue 'Added Costs', a pop-up modal appears, showing the printer a list of the added product costs
- Upon selecting the blue 'Added Markups', a pop-up modal appears, showing the printer a list of markups that have been added to the product
- Within the list view of processes, Odyssey displays the total time and cost of each process
- Upon expanding a process while in the list view, Odyssey will show any process-level added calculations under the 'Process calculations' header
-
Upon expanding a process while in the list view, Odyssey will show the process requirements in a more detailed view
- Within this view, the resource type, paper dimensions, weight (paper and components), quantity, time (device only), lift (device only), if calculations are being used, and cost will be shown
-
Each resources 'Calculations' column will display whether the resource is missing, if the calculations are missing, if the resource is using default calculations, if it's using the paper calculator, if it's using default calculations, if it's using automated calculations (Yes), or if calculations are not needed (No action)
- A blue message indicates the printer can select and be taken to the location where they can review/configure the calculation
- A gray message indicates an extra action is needed before the calculation can be properly configured or else no action is needed
- The icon next to the message provides additional information: Blue indicates all that is needed had been configured or no action is needed; yellow indicates a default calculation is being used; red indicates the calculation is either missing or does not apply
-
Upon expanding a process while in the list view, Odyssey will show the 'Process result'
- This section within each process will list the resource name, quantity produced, dimensions, and the linked resource
- Odyssey also shows the number up in parentheses on the trimmed sheet in the left-hand column named 'Paper information'
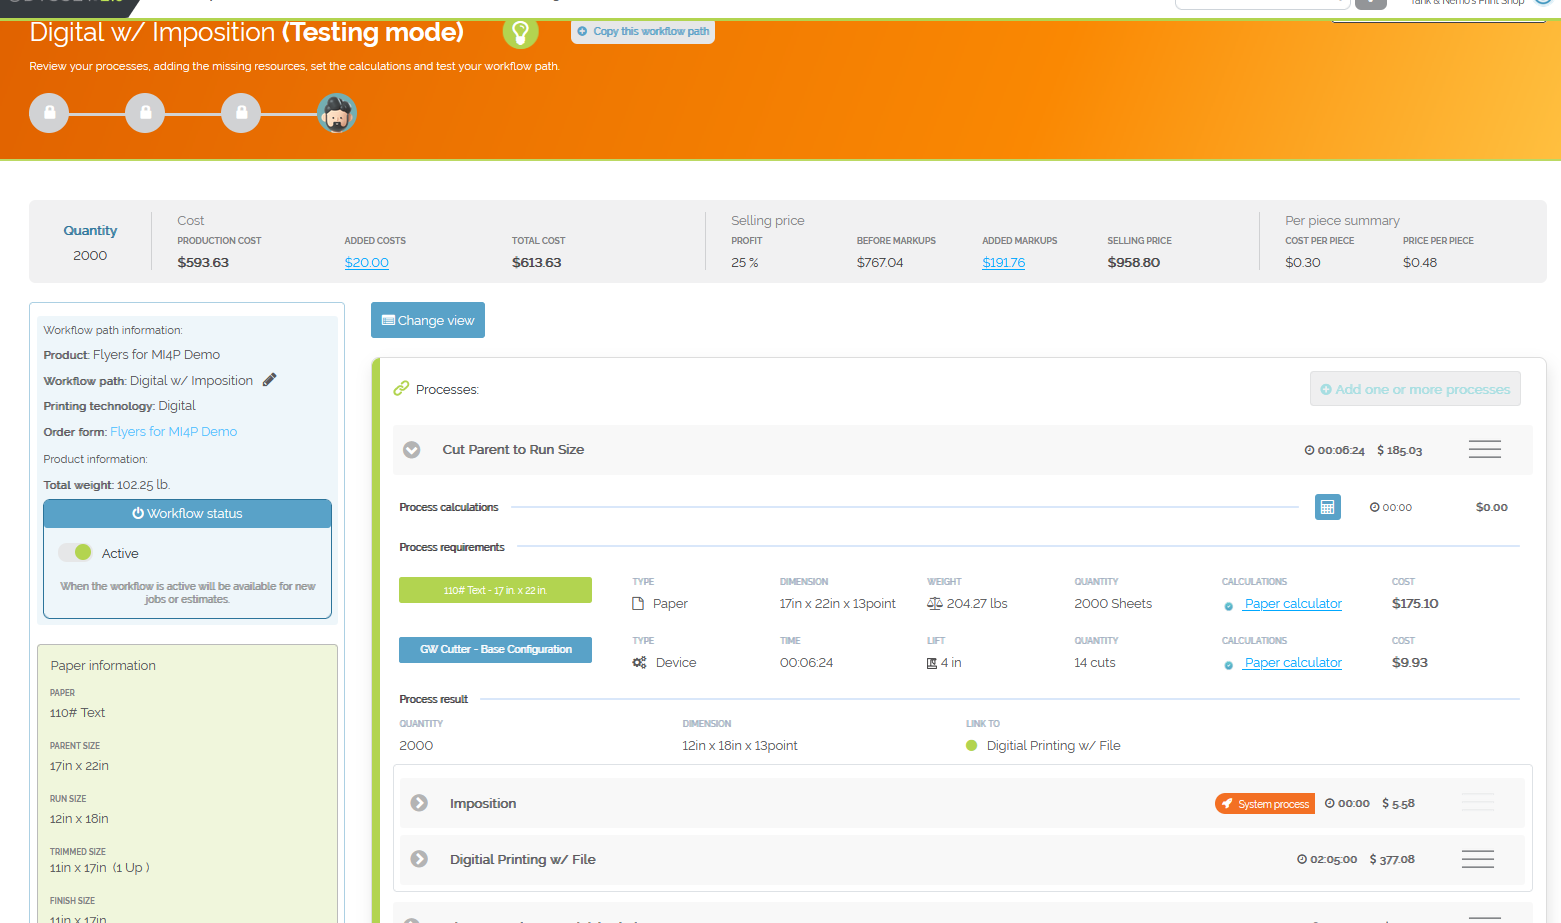
Above: Example of workflow path testing
New Functionality: Folding based on sheet size
Folding Devices
- When editing or adding a new 'Folding' device, Odyssey contains a new section called 'Accepted paper size before folding
-
There is a new section called 'Accepted paper size before folding'
- When a minimum and maximum paper size is entered, Odyssey will be able to determine the paper size range that is accepted for the folding configuration
- This information is only used to automatically select the correct configuration to use in a workflow path when the folding device has more than one configuration
- If there is only one configuration for the folding device, the 'Accepted paper size before folding' is not required to be filled out
-
There is a new switch under the 'Unit of measurement' field called 'Manage speed based on paper size'
- This tells Odyssey that the device will be based on the sheet size instead of by folds
-
When this switch is toggled to 'on', a 3rd option will appear in the 'Speed' section for each device configuration called 'Speed based on paper size'
- This option will be automatically selected and grayed out so that the printer doesn't make changes for this configuration or any other configuration for the device, which is related to the 'on' toggle for 'Manage speed based on paper size'
- Devices are not allowed to be printed and folded at the same time
Workflow paths and testing
- During workflow path creation, the printer will select a folding device to be used for the 'Folding' process
- When the folding device's switch 'Speed based on paper size' is toggled 'on', only one device is selectable for the folding process
- The concept of 'Long' or 'Short' direction is not part of the folding device if this toggle is 'on' for said folding device
- When there is only one configuration for a folding device, this configuration will be automatically selected when testing a workflow path
- The name of the configuration - Base Configuration' - is not added to the device name
- If there is more than one configuration for a folding device, Odyssey will automatically select the correct configuration according to the size of the paper to be folded
- The name of the configuration will be added to the device name in this scenario
- If Odyssey can not find a suitable configuration to be used for the workflow path testing parameters, Odyssey will not choose a folding device configuration
- In the process card view, the fold and/or sheets will be shown and a message will be presented, telling the printer "No configuration found"
- When the toggle 'Speed based on paper size' is turned 'on' for the folding device, for Odyssey calculation purposes, the number of folds will be ignored and the calculated time will based on the number of sheets to be folded
- During workflow path testing, the folding device will show the number of sheets to be folded and the number of 'folds' (the unit of measurement of the device)
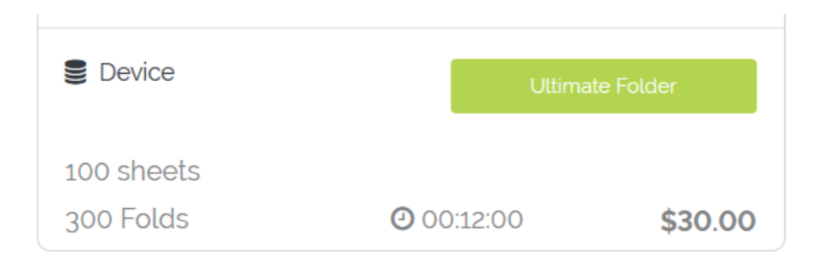
- The total cost of the device will include the cost related to the calculated time and the cost per fold (when configured)
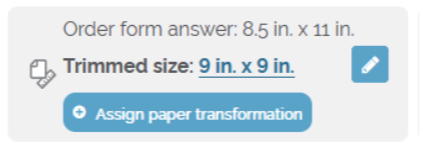
- The 'TRIMMED SIZE' drop-down menu within the 'Fold library' includes all trim sizes for the workflow path
- The printer can change the 'Trimmed Size' and review how the fold will look for each trimmed size
- The 'Trimmed Size' value represents the actual size configured instead of the answer
- In the below example, the 9in. x 9in. is the 'Trimmed Size' (the flat, unfolded size), which the answer (Final Size) is 8.5in x 11in.
- Sizes for all branches are included in this feature
- During workflow path testing with more than one branch, if the trimmed size is different for each branch, all trim sizes related to the branches will be listed in the 'TRIMMED SIZE' drop-down in the 'Fold library'
Estimates
- In estimates that use a workflow path from a product, the same behavior observed during workflow path testing will be present
- In estimates with a custom workflow, whether it was created from scratch or if the 'Enable edit' button was selected, the device plus the configuration will be manually selected by the printer
- The printer may select a folding device + configuration even if the accepted paper size prior to folding is not suitable for folding
- For estimates that contain branches, if the trim size is different for each branch, all trim sizes are shown in the 'TRIMMED SIZE' drop-down in the 'Fold library'
Job workflows
- In job workflows that use a workflow path from a product, the same behavior observed during workflow path testing will be present
- In job workflows using a custom workflow, whether they were detached from the job workflow or originated from an estimate with a custom workflow, the device plus the configuration will be manually selected by the printer
- Even if the device + configuration was manually selected, it will not be used in the job workflow if the configuration is not suitable for the sheet size needing to be folded
Released: 1/08/2024
Version 2023.08
New Functionality: Website shipping data syncs with Odyssey
Invoices & Taxes
- Upon generating an invoice, any shipping prices that are added manually to the 'Order Summary' screen in the Control Center will show up in the Odyssey invoice
-
Upon generating an invoice, any shipping prices that were automatically calculated at cart checkout will show up in the Odyssey invoice
- This is regardless if the job does or does not have a tracking number
- The invoice will show the message "No tracking numbers provided" if the jobs on the invoice do not have a tracking number added in the Control Center
- Upon generating an invoice, the taxes calculated for the shipping price are calculated according to the settings indicated in the Control Center at Accounts > Account Settings > Tax Status > Shipping is taxable
-
Shipping charges will generate their own 'Chart of Accounts' movement
-
The default account can be set in Odyssey within Accounting > Invoice settings > Default account for shipping charges
- If a default Chart of Account is not indicated for shipping charges, the 'Uncategorized Revenue' account will be used
-
The 'Memo/Description' column within the defined default account for shipping charges will indicate the invoice ID and whether or not the shipping charges were manually added to the invoice or auto-calculated
- If the shipping charge was manually added to the invoice, the 'Memo/Description' column will have a unique ID (Example: Invoice INV-99 - Shipping Charge #1557736)
- If the shipping charge was auto-calculated, the 'Memo/Description' column will indicate 'Shipping Charge autocalculated'
- Only shipping charges greater than $0.00 will create an account movement
-
The default account can be set in Odyssey within Accounting > Invoice settings > Default account for shipping charges
Adjusting Shipping Price in Control Center
- When the printer adjusts an order's shipping price in the Control Center, the following rules will be taken into account:
- If the shipping price was auto-calculated and the printer manually edits the order's shipping price, the auto-calculated shipping price will remain even if tracking numbers are added
- If the shipping price was not auto-calculated and the printer manually edits the order's shipping price, this manually added shipping price will remain until a tracking number is added
- If the shipping price was not auto-calculated and a tracking number is added, the order's shipping price will be the total of all the tracking number's shipping charges. This price will remain until the order's shipping price is manually changed
- If a job had a recorded shipping price, and the order's shipping price is manually adjusted, all of the shipping charges for the job(s) will adjust to $0 and only the first job will indicate what the overall order shipping charge is
Edit Invoice view: Shipping Information section
- A new section called 'Shipping information' has been added to the bottom of invoices
- The information shows includes the Control Center's Job ID, the Date shipping, Quantity, Tracking number, Account, and Shipping charge
- The account can only be changed for shipping chargers greater than $0.00.
- If the shipping charge is $0.00, the drop-down to select an account will be blocked
- The shipping charges for each job is shown
- Shipping charges for each job match the shipping information shown for each job in the Control Center
- The invoice's total shipping price is the total of each job's shipping charge
- If a job is taxable, the tax will be applied to the job's shipping charge
- The invoice total 'Amount Due' includes the 'Shipping price' total
- The shipping charges are calculated according to the order's shipping method that was selected at cart checkout, which will dictate if the shipping price was auto-calculated or not
- There are five different methods a shipping price is applied depending on the shipping method chosen at cart checkout:
- Per Order: The total shipping price for the order as a whole will be applied to only the first job on the invoice
- Per Job: The total shipping price is equally divided among the order's jobs and each job will show it's shipping charge on the invoice
- Per Pound: Each job's weight is auto-calculated and a cost is applied based on this per pound calculation
- Pick Up: When a job is going to be picked up at the printer's location, a shipping charge is not assessed to the order
- A shipping charge can be added in the Control Center if desired
- Not calculated: A shipping charge was not assessed at cart checkout but can be manually added in the Control Center
- For the shipping method types of 'Per Order', 'Per Item', and 'Per Pound', regardless of how many tracking numbers are registered, the shipping charge will only apply to the first job in the order when viewing the Odyssey invoice
- Example: Consider a printbuyer that had two jobs in an order. Let's say the total shipping price was $20, meaning each job's shipping charge is $10. If each job had to be separately shipped:
- A printer can include tracking numbers for both jobs in the same shipping charge (for one of the jobs). In this case, Odyssey's invoice will only show '1' record with a shipping charge of $10
- A printer can add a tracking number for each job separately. In this case, Odyssey will only record the first shipping charge of $10; the other job in the invoice will show a $0.00 shipping charge
- Example: Consider a printbuyer that had two jobs in an order. Let's say the total shipping price was $20, meaning each job's shipping charge is $10. If each job had to be separately shipped:
- Shipping charges can be edited in the invoice
- When this occurs, two account movements will be recorded: One as a decrease for the previous account indicated and the other movement as an increase for the new account indicated
- The account movement's 'Memo/Description' column will show as example "Invoice INV-101 Shipping Charge 1557736" where 1557736 is a unique Odyssey ID for that specific shipping charge
- When this occurs, two account movements will be recorded: One as a decrease for the previous account indicated and the other movement as an increase for the new account indicated
- Shipping charge taxes are affected when the shipping address is changed
- If the updated shipping address has a different tax rate, shipping charge taxes will be recalculated, which will cause an account movement for this adjustment in sales tax
- If a job has been invoiced and then shipping charges are adjusted for the job in the Control Center, the printer must open and edit the job's invoice to see the updated shipping charges
Job Workflow
- When viewing a job's workflow, there is a new section called Shipping Information'
- The 'Shipping Information' section contains a link with the total shipping charge
- Upon clicking on this line, a 'Shipping Information' pop-up modal appears, showing a log of the shipping information for the job.
Released: 12/18/2023
Version 2023.08
Updated Functionality: Updating order forms continues Odyssey connections
-
Editing answers on an order form do not affect Odyssey workflow paths
- If an order form answer has been selected on the 'Select order form conditions' screen in Odyssey and then a question's answer is edited in any capacity in the website, the order form answer continues to be selected as a valid condition for the workflow path
- If the printer has an Odyssey calculation set in a workflowpath based on an order form answer and the question's answer is edited in any capacity in the website, Odyssey can still identify the answer and keep the calculation that was previously set up
- Deleting an answer from an order form will not disrupt the workflow path or pricing that is showing to the printbuyer
Released: 12/08/2023
Version 2023.07
Updated Functionality: Multiple jobs on one invoice
- On the 'Invoices to generate' screen, there is a new toggle called 'See only completed orders'
- This toggle shows just that: Only orders in which all jobs are 'Completed'
- Any orders that have jobs 'In Progress' are not shown
- The default for this toggle is to be 'off' meaning all orders regardless of their job's status, are shown
- There is a new column called 'Jobs'
- There are two statuses for the jobs: All jobs completed or Some jobs in progress
- 'All jobs completed' mean refers to all jobs with the order are 'Completed
- 'Some jobs in progress' refers to at least one job in the order is still 'In Progress'
- The circle with a number signifies the number of jobs in the order
- Upon clicking the circle, a side-bar pops-up to show the printer more information about each job within the order
- Upon generating an invoice using the green 'Generate Invoice' button for a job that has the status 'Some jobs in progress', the printer will receive a pop-up modal
- This modal is asking the printer if they would like to invoice only the completed jobs, to invoice all jobs (regardless if they are completed or not) or to cancel creating the invoice
- Upon selecting an order that has the status 'Some jobs in progress', the 'Generate invoice' button changes to a drop-down, which contains the same two options as in the pop-up modal: 'Invoice all jobs' or 'Invoice only completed jobs'
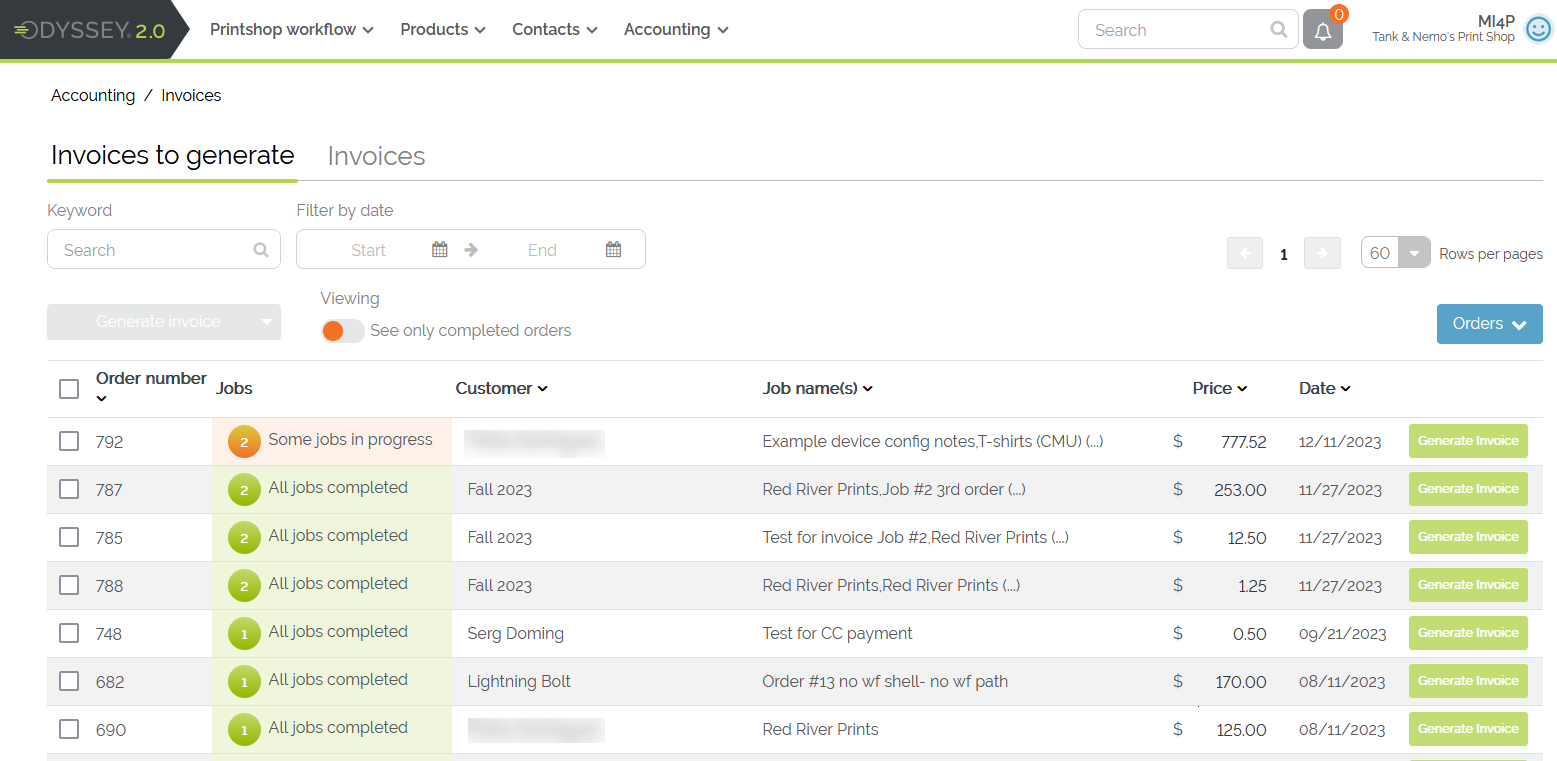
Updated 'Invoices to generate' screen
Released: 12/04/2023
Version 2023.07
New Functionality: Configuration notes for the job ticket
- When editing a device, there is a new button directly below the name of the device called 'Add note'
- Selecting button opens up a modal where a note can be added about the configuration
- The 'Add note' button is available for every configuration for a device
- Upon adding a new, the button changes to say 'Review notes'
- Selecting 'Clear note' will erase all notes that have been added'
- Selecting 'Close' will not save any changes made to the note
- The note will appear in the job ticket if the configuration is used for the job
- The configuration note will show up after the job notes at the bottom of the job ticket
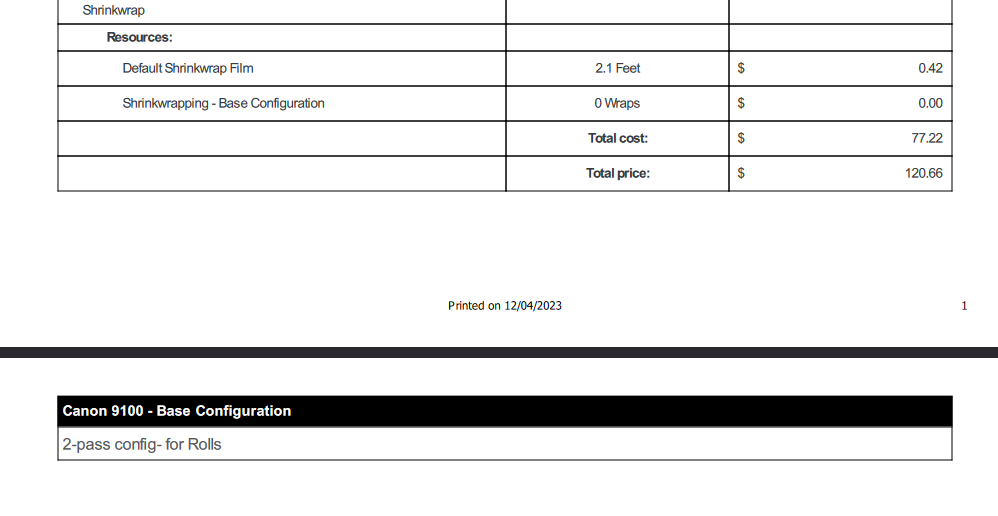
Example of the device configuration note showing up at the bottom of the job ticket
Released: 12/04/2023
Version 2023.07
New Functionality: Emailed invoices and credit memos provide additional information
- Within the list of 'Invoices' and the 'Credit memo library', there is a new column called 'Email status'
- There are 5 email statuses to indicate the status of a sent invoice or credit memo:
- If there is no icon or title, that indicate the invoice/credit memo has not been emailed
- An orange question mark with the message "No info available" is due to invoices/credit memos were sent before this updated functionality has been released
- An orange question mark and the message "Pending info" indicates the email has not been sent by the email messaging system and is queued and waiting to be sent
- Immediately after this message, there is icon to refresh the status
- Selecting the refresh icon will show the icon as animated, waiting for a response from the email messaging system
- When the refresh icon stops moving and the message doesn't change, this indicates the email is still waiting to be sent
- A blue checkmark icon with the message "Sent" indicates the email was successfully sent without an issues
- A red 'X' icon with a specific message indicates why the email could not be sent
- This could be related to email policy issues, the sender being blocker, and other email issues reported by our email messaging system
Released: 11/06/2023
Version 2023.07
New Accounting Report: Sales Tax Report
- Odyssey now contains a 'Sales Tax Report' found under Accounting > Reports
- Once within the Sales tax report screen, a printer will simply choose the needed data range and select 'Run report'
- There is the ability to download as a PDF or CSV file
- The report will provide the necessary taxing district, gross total, non-taxable amount, taxable amount, tax rate (%), and tax amount
New Functionality: Estimates from scratch containing branches
- Odyssey provides the ability to add branches to estimates created from scratch
-
When creating an estimate and selecting the 'Start with an empty workflow' button, the printer will see the 'Add new branch' tab on the third step of creating an estimate
- Selecting 'Add new branch' allows branches, such as for a cover and interior pages of a booklet, to be added to the estimate
- Each branch will have it's own paper choice, printing options, folding options, and paper calculator
- Branches can be renamed as well as be deleted
- Processes can be added to each branch within the 'Select processes to be used for the <branch name>' modal
Released: 10/23/2023
Version 2023.07
New Functionality: Dynamic Specs (reduce the number of workflow paths)
- There is now the ability to add 'custom' specs to link a process to an order form question as part of building/editing workflow paths
- A new button called 'Add option from the Order form' within the 'Workflow path specs' screen
- This new button will show twice: As available with a product containing branches as well as part of the general specs of the order form (below 'Folding Options')
- Upon selecting this button, a pop-modal will appear to select a process to relate to a question on the order form
- Example: Selecting the 'Aqueous Coating' process will allow the printer to connect to the 'Coating' question on the order form
- This pop-up allow for searching of processes and the ability to create a new process on the fly by selecting 'Create New Process'
- Upon selecting a process, it will be added to the list of specs
- Adding additional specs from the new button includes the following:
- The name of this spec will always be the name of the process followed by 'options'
- The little ' i ' indicates this is a custom spec, selected by the printer to be added
- Ability to delete the custom spec by using the red trashcan icon
- Assigning the custom spec to read a specific order form question below 'Reading from order form'
- Ability to add a calculation for any 'Not needed' selections by selecting the 'Add calculation' button under an order form answer
- Setting the resource that will perform the duties of the added spec (under 'Set the resource')
- Adding calculations for the device by selecting 'Add calculations' under the selected device resource
- The workflow path shows 'Custom spec' in light gray next to the process name when viewing the workflow path
- Deleting the selected process in the workflow path as part of adding a custom spec will therefore delete the custom spec on the 'Workflow path specs' screen
- Example: Deleting the 'Aqueous Coating' process from the workflow path will remove the 'Aqueous Coating options' spec from the 'Workflow path specs' screen
- Deleting the custom spec from the 'Workflow path specs' screen will delete the corresponding process from the workflow path
- Example: Deleting the 'Aqueous Coating options' spec from the 'Workflow path specs' screen will delete the 'Aqueous Coating' process from the workflow path
- Having a custom spec added on the 'Workflow path specs' screen allows a printer to access it by selecting the 'Device' resource within the related process of the workflow path
Released: 9/29/2023
Version 2023.06
New Functionality: Receive payments & Credit memos at different levels
- Within Accounting > Receive payments and Accounting > Credit Memos, there is now the ability to select a company or branch in addition to the already available functionality to select a contact
- There is now the ability to search for a contact by invoice ID
- When searching for a company or branch, there is now the 'Company' and 'Branch' fields that will be filled in if a Company or Branch was selected
Invoices > Receive payment
- When searching by Company:
- The invoices under the company will be under the 'Outstanding invoices' section
- The invoices under any branches from the company will also show under the 'Outstanding invoices' section
- The invoices under any contact from the company will also show under the 'Outstanding invoices' section
- This includes any invoices under a contact that is not assigned to a branch
- When searching by Branch:
- The invoices within the branch will be under the 'Outstanding invoices' section
- The invoices under any contact from the branch will show under the 'Outstanding invoices' section
- When searching by Contact:
- Only the invoices for that contact will show under 'Outstanding invoices'
Accounting > Credit memo
- When selecting a company:
- The credit memos under the company will be shown
- The credit memos under any branches within the company will be shown
- The credit memos under any contact from the company branches will be shown
- This includes any credit memos under a contact that is not assigned to a branch
- When selecting a branch:
- The credit memos within the branch will be shown
- The credit memos under any contact from the branch will be shown
- The credit memos under the company that the branch belongs to will be shown
- When selecting a contact:
- The credit memos under the contact will be shown
- The credit memos under the branch that the contact belongs to will be shown
- The credit memos under the company that the contact belongs to will be shown
- Printers may now apply a specific amount to an invoice using the displayed 'Credit memo balance available' from the company, branch, or contact
Released: 9/25/2023
Version 2023.06
New Functionality: Accounting > Aging Report
- There is a new Accounting Report called 'Aging Report'.
- The 'as of date' is defaulted to todays date; this can be adjusted to an date as needed
- There is a toggle to show a detailed version of the report
- Upon selecting 'Run report', there is the option to download the report as a PDF or a CSV file
- Within the details version, printers will see information related to outstanding balances 30, 60, and 90+ days along with their total outstanding amount
- Printers will also find the customer name, invoice number, date, due date, age, and the open balance of each invoice in the detailed version
- The total of all open balances will show at the bottom of the report
Released: 9/18/2023
Version 2023.06
New Functionality: Job Journal
- Upon selecting a job (Pending, In Progress, or Completed), printers will now see a 'Job Journal' button to the right of the job number

- Selecting the 'Job Journal' button will produce a pop-up with a table, mimicking the 'Job Journal' tab of a job from the website's Control Center
- When an entry is made in the Job Journal in Odyssey, the entry will be reflected in that job's Job Journal on the website
- When an entry is made in the Job Journal in the Control Center, the entry will be reflected in that job's Job Journal in Odyssey
- Upon saving a Job Journal entry, there is a pop-up asking if you want to notify the customer by email
- Selecting 'View in website' will take the printer to the order for that job in the Control Center
Released: 9/1/2023
Version 2023.06
New Functionality: Changing a workflow path status to 'Active' or 'Inactive'
- Opening the product screen will show the workflow paths in a table view
- Each workflow path has its own 'Status' column to toggle to 'Active' or 'Inactive'
- Opening an 'Inactive' workflow path will show a gray banner at the top, along with '(Inactive)' next to the workflow path name
- There is also the ability to turn a workflow path 'Active' or 'Inactive' while inside the workflow path
- Toggling a workflow path to 'Inactive' will provide a pop-up, allowing the printer to continue deactivating the workflow path
- Workflow paths have the functionality to be excluded when creating a new estimate or being used for jobs
- Inactive workflow paths will not appear in the list of workflow paths to be selected when creating an estimate
- Inactive workflow paths are not available to open a job
Released: 9/1/2023
Version 2023.05
New Functionality: Virtual Devices
Resources > Device list screen
- The 'Resources' and 'Templates' tabs have been separated into their own respective tabs
- The total number of 'Resources' and 'Templates' are shown with a number in parentheses within each tab
- The data shown in each tab is showing a table view
- The columns are as follows:
- Device name
- Tags
- Cost
- Device Type
- Cost per unit
- Hourly rate
- Status
- Cost log
- To edit a resource, select the name of the resource in the ' Device name' column
- The 'Cost log' column shows the more recent date the cost for the resource was updated
- Selecting the date in the 'Cost log' column will open a cost log tab for the device
- The date, cost, quantity, hourly rate, virtual config, and employee is shown in the 'Cost log' screen
- Hovering over the 'Tags' icon will show a printer the tags that are assigned to the device
- There is now the ability to search for a device via either it's device name or the 'type' (Digital, Offset, etc)
Cost log screen
- The previous cost modal has been updated to include a new 'Cost log' screen
- This new cost log screen is in a table format
- The cost log screen includes the new 'Virtual config' column
- Any column in the cost log screen can be reordered
Add/Edit device screen
- When adding or editing a device resource, the general attributes for the device are on the left-hand column under the 'Device name'; the various configurations are in the middle of the screen
- General attributes include:
- Device name (required)
- Device type
- Unit of measurement (required)
- Tags
- Account (for cost)
- Thickness conditions
- Odyssey will display a unique icon that represents the following device types:
- Conventional Printing
- Cutting
- Digital Printing
- Folding
- All selected device types will display when the 'Device type' drop-down is closed
- When adding a new device, the 'Conditions that affect efficiency' is grayed out until the device is saved
- Upon saving the device and selecting 'Add thickness conditions', a pop-up modal appears allowing thickness intervals to be added
- Within this modal, if a user makes a change but does not save and attempts to close the modal, a warning pop-up prompts the printer to 'Discard changes' or 'Keep editing'
- Selecting 'Keep editing' will take the printer back to the 'Thickness table' modal
- Within the 'Thickness table' modal, there are three fields:
- Min. thickness (points): This is an inclusive initial of the interval
- Max. thickness (points): This is not inclusive final of the interval
- Reduce speed (%): This indicates the percentage of the device's speed that will be reduced
- Example:
- Consider a Min. thickness of 5 pts, a Max. thickness 10 pts with a 40% reduction in device speed. In this example, a paper between 5 and 10 points will be considered for this interval. The speed of the device will be reduced by 40%. This means the device will operate at 60% of its capacity.
- Within the 'Thickness table' modal, printers can leave the 'Min. thickness (points)' or 'Max. thickness (points)' blanke but not both at the same time.
- Only one condition can leave the 'Min. thickness (points)' field empty
- Only one condition can leave the 'Max. thickness (points)' field empty
- The 'Base Configuration' section includes the following:
- Attributes
- Run size limits (printing devices only)
- Cost
- Setup time (minutes)
- Speed
- The first configuration for a device is always called 'Base Configuration'
- The 'Base Confirguation' allows for the 'Attributes' and 'Setup time' settings to be saved for the device as a whole
- Attributes change depending on the device's 'type'
- If the saved device is under the 'Cutting' device type, the 'Attributes' will show a 'Lift' and the unit (in or cm)
- If the saved device is under the 'Conventional Printing' type, the 'Attributes' will show a 'Number of ink units' field
- Selecting a 'Digital Printing' device type allows a printer to define a cost for 'Black and white' and 'Full color' separately
- Within the 'Speed' section, printers can choose between a 'Fixed speed' or 'Variable speed'
- When a printer inputs valid values and selects 'Preview', a speed graph will be displayed, representing the device's performance over time
- When needing to add a new configuration for a device, select the 'Add new configuration' tab at the top of the screen
- Upon adding a new configuration, printers will need to fill in all of the fields they will need
- Additional configurations can be renamed by selecting the pencil icon at the top next to the configuration name while within the configuration
- Printers can delete a configuration by selecting the trash can icon to the right of a configuration name while within the configuration
Workflow paths 'Printing options' section
- Within the 'Workflow path specs' > 'Printing options' section of a workflow path, there is now the 'Color combination selected' drop-down to assign the correct color combo for each printing option
- Selecting the blue button within the 'Color combination selected' will take the printer to the 'Color combination library'
- Upon selecting a color combination and selecting 'Save', the printer can then see the button title updated to the color combination that was selected
- Within the 'Color combination library' screen, the option named 'One -Color' will apply to black and white costs; the option named 'Full-Color' will apply to full color costs
- If the printer selects 'Custom option', an additional section is displayed at the bottom of the screen (this can be considered 'advanced options' for the 'Custom option')
- The printer can define if they want the custom options to be applicable only on the front or on both sides
- The printer can decide the percentage of printed sheets for each color option
- This can be based on an order form question or the printer can split the percentage using custom values
- The custom values must add up to 100%
Odyssey utilizing device configurations
- For workflow path testing or a job, if the device has two or more configurations, Odyssey will automatically choose the most convenient configuration
- Most configurations are automatically chosen based on the 'Run size limits'
- If a configuration does not match with a paper calculator's 'Run Size', said configuration will not be chosen/used
- If the printer does not indicate the 'Run size limits' for a device's configuration, said configuration will be used as the last option in automatically choosing a configuration
- If no device configuration is compatible, the device will not be used/chosen
- Within a workflow path, a printer may directly set a device configuration other than 'printing' device types
- Example: If a printer has more than one configuration for a 'Folding' device type, the printer may set a specific configuration for the folding resource for the folding process
- When a workflow path is used for a job, upon printers detaching the workflow path from the job, users can manually adjust the device configuration that was set.
- This update will not affect future jobs since the job workflow was detached
Estimates and Jobs 'Printing technology' screen
- When selecting the printing technology for an estimate from scratch, printers can manually set any device configuration for the 'Printing Options' for the estimate
- Within a job workflow, printers can change the configuration for any device in any process, assuming there is more than one configuration saved for the device
- Selecting the 'Review job specs' blue button allows for this change to be saved, specific to only the job workflow
Released: 8/18/2023
Version 2023.05
New Functionality: Sending Invoices and Credit Memos by Email
- Printers can now send an Odyssey invoice to a customer directly from Odyssey
- Invoices can be emailed by one of two methods:
- Selecting the drop-down menu and selecting 'Send' next to an individual invoice in the 'Invoices' tab
- Editing an invoice then selecting 'Save and send' in the lower-right of the 'Edit invoice' screen
- The email address can be edited prior to sending it
- Printers can send more than one invoice at a time by selecting the invoices from the 'Invoices' list and then selecting 'Send' under 'Batch actions'
- For any invoices that do not have an email, fill in the customer's email address under the 'Email' column'
- There is an orange exclamation point to the left of an invoice ID in the 'Emails to be sent' section if an invoice does not have an email address as part of the customer
- An envelope icon will appear in the 'Invoices' list if an Invoice was emailed to the customer
- There is a hover over the envelope icon that says "This invoice has already been emailed"
- Printers can now send an Odyssey credit memo to a customer directly from Odyssey
- Credit memos can be emailed by one of two methods:
- Selecting the drop-down menu and selecting 'Send' next to an individual credit memo from within the Credit Memo Library
- Editing a credit memo then selecting 'Save and send' in the lower-right of the 'Edit credit memo' screen
- The email address can be edited prior to sending it
- Printers can send more than one credit memo at a time by selecting the credit memos from the 'Credit memo library' list and then selecting 'Send' under 'Batch actions'
- For any credit memos that do not have an email, fill in the customer's email address under the 'Email' column'
- There is an orange exclamation point to the left of a credit memo ID in the 'Emails to be sent' section if a credit memo does not have an email address as part of the customer
- An envelope icon will appear in the 'Credit Memo Library' list if a credit memo was emailed to the customer
- There is a hover over the envelope icon that says "This credit memo has already been emailed"
Released: 7/26/2023
Version 2023.05
New Functionality: Navigation Bar, Ominsearch, and more
- Odyssey's top navigation bar has been improved, with the following tabs available: Printshop workflow, Products, Contacts, and Accounting
- The omnisearch in the upper-right next to the alert bell has an updated look and feel
- When the results of the omnisearch show 'See more..', a list will be presented to easily view the entire search results
- The printer's log-in menu has changed:
- The printer's employee image is now present
- The menu now includes Tasks (Production staff only), Time zone, and a confirmation modal if the printer modifies the initial order number
- The alert bell has a new look and feel
- The various errors and warnings that can show up in Odyssey will stay on the screen until the printer closes them by selecting the 'x'
- The various 'Sucess' and 'Informational' alerts will automatically disappear from the screen after 5 seconds
Improvements: Receive Payments
- After a customer has been selected in the 'Receive payment' screen, a message will appear in blue in the upper-right if the customer has a credit memo balance available as well as the amount available to apply
- There have been visual improvements to the bottom gray bar to more clearly define the 'Amount to apply' and the 'Amount to credit'
- When selecting an invoice under 'Outstanding invoices', Odyssey will try to cover the open balance of the selected invoice based on the 'Amount received' and any select credit memos
- If a printer selects the checkbox in the upper-left within 'Outstanding invoices', Odyssey will attempt to pay as many invoices as possible with the 'Amount received' along with using the selected 'Credits' towards the invoices
Released: 6/26/2023
Version 2023.05
New Functionality: Company data
- Companies now have the following additional fields: Email, Mobile phone, and Phone
- When adding or editing a company in Odyssey, these three fields are optional to be filled in
- When viewing a list of companies under Contacts > Companies, selecting the 'eye' icon will reveal a circle to appear next to the pencil icon
- The 'Mobile phone' field was added to contacts
Released: 6/20/2023
Version 2023.04
New Functionality: Statements
- Under Accounting > Statements will take a user to Odyssey Statements
- One of three statement types can be created: Balance Forward, Transaction, and Open
Within a 'Balance Forward' statement type:
- The 'Total due' is shown in the upper-right below the date
- The dollar amount columns include 'Amount' and 'Balance'
- The table at the bottom of the statement shows the total amount as its current and at 1-30 days, 31-60 days, 61-90 days, and over 90 days due
Within a 'Transaction' statement type:
- The dollar amount columns include 'Charges' and 'Payments'
- The total of charges and payments is shown at the bottom of the list of transactions within the selected date range
- Payments and credit memos are a negative 'Amount' and decrease the 'Balance'
- The 'Total amount' is calculated with the total amount of invoices, credit memos, and received payments
Within an 'Open' statement type:
- The 'Total due' is shown in the upper-right below the date
- The dollar amount columns include 'Amount' and 'Open amount'
- All open transactions are shown
- Invoices are positive amounts; credit memos and payments are negative amounts
- The 'Open amount' is calculated with the open amount of invoices, credit memos, and payments
- The table at the bottom of the open statement shows the open amount as its current and at 1-30 days, 31-60 days, 61-90 days, and over 90 days due
New Functionality: Detach printing options from the Product
- While creating or editing a workflow path, there is a button called 'Detach paper choices' within the 'Paper choices' section of the 'Workflow path specs' screen
- Selecting this button will allow the 'Paper choices' for the workflow path to be independent of the 'Product specs'
- Example of this function being used: A booklet order form that has the option to choose 'Self Cover' as an answer, meaning the cover of the book will use the same paper as the interior pages
Improvements: Branches in job workflows & estimates
- Selecting 'Enable edit' within an estimate with branches allows the printer to edit estimates created using a workflow path that had branches
- Selecting 'Detach & edit' within a job workflow will allow the printer to edit a job workflow with branches
Released: 5/02/2023
Version 2023.03
New Functionality: Processing 'Pending' jobs without a workflow path
-
In the 'Pending Jobs' list, clicking the workflow button for a job that does not have an associated workflow path now opens a slightly different view as any other job that has an associated workflow path
- The main difference is that there is no workflow to display.
- On the top of this screen, the printer will find the job number, options chat, add job notes, review files submitted with the job, and open the job ticket
- Customer information and the various job information fields such as Quantity, Selling Price, and more are also found at the top
- The bottom portion of this screen will notify the printer that they may choose an existing workflow path or create a new workflow path
- The job information fields of 'Cost', 'Profit', and 'Product Cost' will say 'Undetermined' and a hover tooltip will mention that cost/profit cannot be determined at this time
-
The 'Start job' button is now located below the job number.
- Selecting 'Start job' changes the job status to 'In Progress' and the button label will change to 'Complete'
-
A new 'Invoice job' button has been added next to 'Start job'
- This button allows a printer to generate an invoice while keeping the job's existing job status or the printer may invoice and complete the job
- Selecting 'Invoice and keep existing status' will invoice the job while keeping its existing status
- Selecting 'Invoice and complete job' changes the job's status to 'Completed' and moves a printer to the list of invoices
- Upon invoicing the job, that 'Invoice job' button changes to displaying "This job already has an invoice"
-
Up to three workflow paths associated with the product are displayed to choose from
- Odyssey offers the printer to view all available workflow paths
- This option will open a pop-up window with the full list of workflow paths arranged by columns for the workflow path name and the printing technology type; both columns are sortable.
- There is also a search filter to search within the 'Name' column
- Odyssey offers the printer to view all available workflow paths
- Selecting 'Create new workflow path' takes a printer to the first step of creating a workflow path.
- The second step 'Select order form conditions' has the order form answers pre-selected and highlighted in yellow
- Selecting an existing workflow path will take the printer to the second step, with the order form's answers pre-selected and highlighted in yellow of what will be added to the workflow path
Improvements: Override a 'Pending' job workflow
- Updates have been made to a pending job's workflow screen to have the same look and feel as an estimate
- Upon initially entering a job workflow, all edits are disabled and changes are not allowed
- Printers will need to select the 'Detach & edit' button to make changes to the job workflow
- Once a job workflow has been detached from the product workflow, the name of the detached workflow path becomes 'Workflow for Jo {job name}'
Released: 3/23/2023
Version 2023.01
Improvements: Workflow Card View
- When viewing processes in the 'card' view (using the 'Change view' button), there is a new design for more clarity on the calculations that are shown
- The 'header' of each card is the name of the process
- Directly below the process name are buttons: Notes, Calculations, Edit, and Delete
- To the right of the buttons is the total time Odyssey is calculating that the process will take to complete
- Directly below the buttons is the 'Result': The outcome of running the process, which includes the quantity, the type of resources being produced, and the link that the 'Result' is connected to, which will be a 'Requirement' of a subsequent process
- Note: The last process of a workflow will not have a link as part of the 'Result'
- Below the 'Result' are the 'Requirements': The needed resources in order for this process to successfully finish
- Each requirement shows the resource being used and its dimensions, quantity, weight, time, and cost
- If the 'Requirement' is part of a link to another process, link information will be presented
- If a resource does not have any calculations added to it, a tooltip will appear notifying the printer that a calculation needs to be added.
- A similar tooltip will appear when a resource is using a default calculation
- If a process is a 'system' process, such as Folding, Offset Plate Making, there will be an orange tag called 'System process' to the right of the process name
Improvements: Creating Workflow Paths
- Upon clicking 'Create new workflow path' within the product screen, a new blue header section will guide the printer through the four steps involved in creating a workflow path.
- Within the top blue section, the printer will find the title for the screen with a description and a navigation component with circles.
- As the printer continues through the process steps of creating a workflow path, the circles are unlocked; upon each step being completed, the circle icon will turn a light blue
- While hovering over an unlocked circle, a tooltip will reveal information related to the screen if the circle is clicked on
- In the second step 'Select order form conditions', the printer will find a left vertical component with information related to the workflow path: the product the workflow path is associated with, the workflow path name, the printing technology being used, and a link to the order form.
- The printer can edit the workflow path name from this component by selecting the pencil icon to the right of 'Workflow path'
-
When the printer clicks on an existing workflow path from the product screen, Odyssey will take the printer to the list view of the workflow path.
- Printers still have the ability to go to the path specs screen and update options for this workflow path from the navigation component in the top blue section.
- When testing the workflow path, the 'Total weight' is shown in the left vertical component
Improvements: Paper Calculator
-
When adding the 'Top' margin, if all other margins are empty and a printer clicks into any other margin, they are automatically filled with the same value.
- Bottom, Left, and Right margins can still be adjusted as needed
- Bottom, Left, and Right margins can still be adjusted as needed
-
When adjusting the 'Gutter', the printer does not need to click the 'Preview' button to update the view
- The 'Gutter' will be automatically updated after clicking any other part of the screen.
- The 'Margins' and 'Gutters' are shown in a slightly different configuration, while also the 'Center' button was made more prominent
Pop-up Notifications
-
All pop-up notifications are shown in the left part of the screen
- This was done so as to not hide command buttons such as 'Save' or 'Continue'
Released: 2/28/2023
Version 2022.24
Improvements to 'My Resources'
- Within Printshop > My Resources, there is the ability to 'star' favorite resource groups so they show up at the top each time 'My Resources' is accessed
- The 'Paper' resource group has been updated
- Papers without a cost show 'Add a cost' in the 'Cost' column
- A new resource group called 'Printing Plate' has been added for purposes of offset printing
Improvements to Offset Printing: Plates
- When adding a resource to the 'Printing Plate' resource group, there is an attribute called 'Number of impressions this plate can make'
- This attribute will determine the number of impressions the plate is valid for and aids in calculating the total number of plates used on a job
- The devices used in the offset plate-making process, sometimes referred to as an 'Imagesetter', will have 'Image Setting' as the 'Device type (Process group)'
- The new 'Offset Plate Making' process within the 'Image Setting' group includes a 'Printing Plate' and a 'Device' as process requirements be default; they can not be edited except to assign default resources to the process requirements
- When adding processes to a workflow path or estimate workflow, the 'Offset Plat Making' process will be added automatically if using offset printing technology
- The total number of printing plates used is calculated by the sum of the number of colors used on the front and back, also considering the number of impressions a plate can make before it needs to be changed.
- If 'Work and turn / Work and tumble' is selected during workflow path/estimate workflow setup, the number of colors for the front and back is the same for both sides.
- Therefore the same printing plate can be used for both front and back, reducing the total amount of plates in half
Version 2022.23
Improvements to Invoices
- Within Accounting > Invoices, there are now two tabs: 'Invoices to generate' and 'Invoices'
- Within the 'Invoices to generate' tab:
- There are two search filters: The first is a general search for any word within the Customer, Product, or Job column; the second filter is 'Filter by date', with the ability to add a beginning and end date for the filter
- The ability to use pagination in the upper-right, along with the ability to switch between 20, 40, or 60 rows per page
- A printer can navigate between the 'Jobs' view or the 'Orders' view by selecting the blue button below the 'Rows per pages' in the upper-right
- Within the Invoices to generate > Jobs view:
- Selecting at least one job's checkbox will enable the 'Generate invoice' button
- Printers may select other jobs from the same order (if there is more than one job) so that all jobs from the order are included in the invoice
- Selecting 'Generate invoice' will automatically generate the invoice for the selected job(s) and send it to the 'Invoices' tab
- Each header title (Job number, Order number, Customer..and so forth) has an arrow to the right, allowing the user to sort numerically/alphabetically
- The very top-left checkbox is grayed out until the printer selects any single job from the list of jobs available to invoice
- Selecting at least one job's checkbox will enable the 'Generate invoice' button
- Within the Invoices to generate > Orders view:
- The purpose here is to be able to select an order and then ALL jobs within the order can be invoiced
- To select ALL orders in this tab, select the checkbox in the upper-left next to 'Order number'
- The 'Price' column is the total price of the order, which may include multiple jobs
- Selecting the green 'Generate Invoice' button will automatically generate the invoice for that order
- Selecting any one order within the 'Jobs' column will display a sidebar on the right-side of the screen, showing with all jobs contained within the selected order
- This is the option to invoice any 'Completed' job within this sidebar using the 'You can invoice this job!' icon
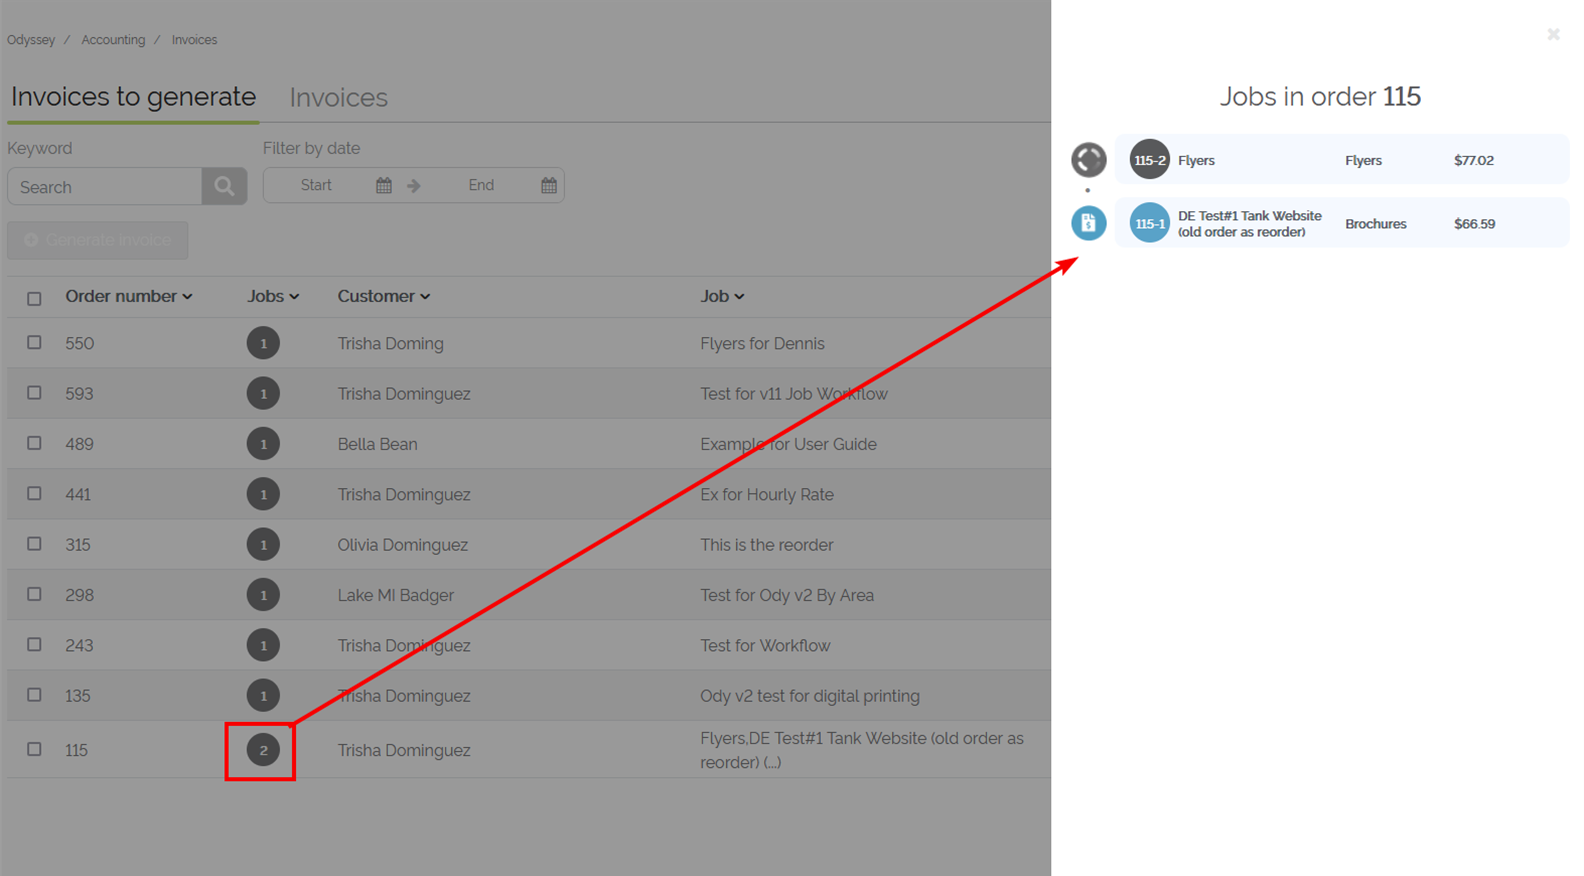
Example of selecting an order with more than one job, with one of those jobs not yet completed
- Within the 'Invoices' tab:
- Printers will see a list of generated invoices
- There are three search filters:
- The first is a general search for any word or number within the ID or Customer column
- The second filter named 'Status' allows a user to filter by 'All', 'Open' (not paid upon) or 'Paid' invoices
- The third filter is 'Filter by date', with the ability to add a beginning and end date for when invoices have been created
- The ability to use pagination in the upper-right, along with the ability to switch between 20, 40, or 60 rows per page
- Upon selecting one or more invoices, the 'Batch actions' button is enabled, allowing a printer to print the selected invoices all at once
- Each header title (ID, Date, Customer..and so forth) has an arrow to the right, allowing the user to sort numerically/alphabetically
- The 'ID' column indicated the invoice ID number, which is automatically generated by Odyssey when the invoice is generated
- The last column with the blue 'Print' button allows the printer to print each invoice individually
- A downloadable PDF will be generated
- Selecting the drop-down arrow to the right of 'Print' allows a printer to select 'Edit' to edit the invoice
Creating a new invoice
- Selecting the 'Create invoice' tab within 'Invoices' allows a printer to generate a new invoice from scratch
- The printer can fill out the Customer, Order Date, Purchase Order # (optional), Terms, and Due Date
- The printer can select from a list of saved billing addresses or add a new billing address
- The pencil icon allows for editing of the billing address only for this invoice
- The printer can select from a list of saved shipping addresses or add a new shipping address
- The pencil icon allows for editing of the shipping address only for this invoice
- The printer can add as many line items as needed within the 'Items' section
- Product column: Select from the list of products (order forms)
- Description column: Add details or a note about the product being invoiced
- Rate column: Specify the rate or price per unit of the product or service being invoiced
- Amount column: This will automatically calculate based on the quantity and rate
- A printer may apply a discount to the created invoice to the right of 'Discount'
- There is the option to add a message on the invoice under 'Additional invoice information'
Invoice Settings
- Selecting Settings > Invoice allows a printer to customize the information that will be visible on all generated invoices
Additional Invoice features
- In order for an Odyssey user to have Accounting access, they will need the 'Accountant' role as found within 'My Employees'
- All Control Center 'Admin Access' users will inherit the same access as the 'Accountant' role, even if they were not granted the 'Accountant' role in Odyssey
Version 2022.22
Improvements to post-production process calculations
- When needing to add/edit post-production calculations of a resource within a workflow path or estimate workflow, the calculations screen now shows the following:
- The complete list of existing calculations, including the resource the calculation, has been applied to, the required quantity, the resource used to calculate the required quantity, if there is a condition applied to the calculations as well as the edit and delete buttons
- When needing to add a new calculation:
- There is an input more clearly defined of the quantity needed for this calculation (such as 1 box needed)
- There is a toggle (gear icon) for the option of using an order form question as a quantity instead of the ‘Quantity’ question
- There is an input more clearly defined of the final quantity based on the resource (such as for every 500 business cards)
- There is an input more clearly defined of the quantity needed for this calculation (such as 1 box needed)
- If needing to add a condition to the calculation, this has been updated to better guide a printer through when the condition should take effect
- For example, if you only want Odyssey to use a 'BC Card- 500 Box' when the Quantity = 500, the condition would look like this: When Quantity = 500
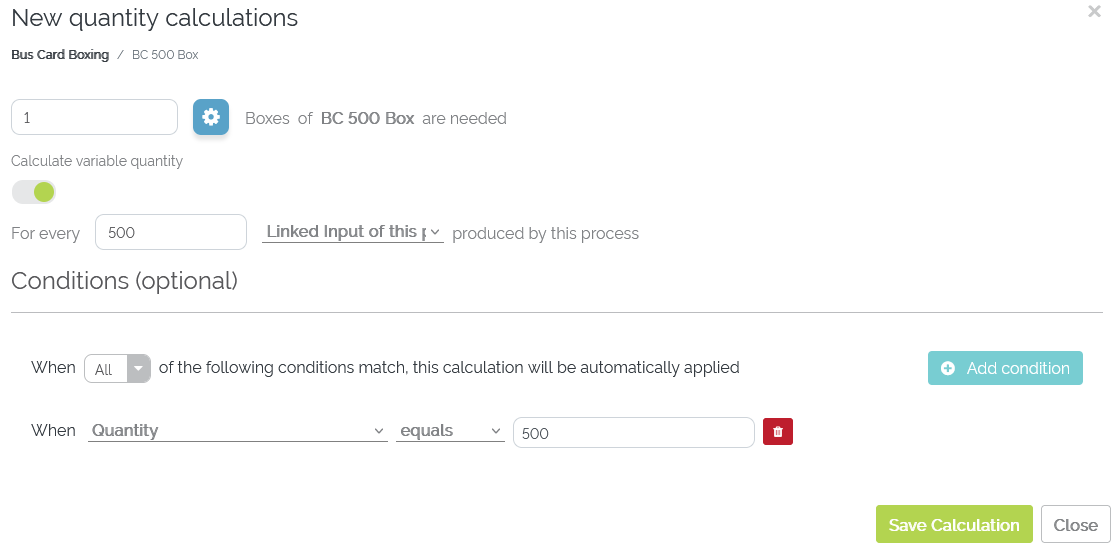
Example of adding a post-production calculation with a condition
Improvements to offset printing calculations- Offset Printing resources
- Within 'Conventional printing' resources as the device type, there is a new input field labeled 'Number of ink units'
- This allows the printer to set how many colors per impression the device can handle
- By default, the 'Conventional Printing' device type has the 'Resource unit of measurement' set to 'Impressions', which can be changed if desired
Improvements to offset printing calculations- workflow paths/estimate workflows
- When creating a new workflow path for a product and selecting 'Offset' as the printing technology to use for the path, Odyssey will automatically know that an offset printing process must be used
- The 'Printing options' of the path specs will map automatically by default to the answers of the 'Color Options' question on the order form
- If Odyssey couldn't find an order form question labeled 'Color Options' (or similar), Odyssey will default to 'Predefined option'
- Each of the mapped 'Printing options' selections has the following:
- A drop-down to set the offset press resource to be used
- If there isn't an offset press selected in the drop-down, all other options for that printing option are grayed out until an offset press is set
- Ability to set the number of colors for the front page and back page (if needed)
- By knowing the number of colors needed, Odyssey will automatically calculate how many impressions are needed for the front page and the back page by dividing the 'Number of colors' by the 'Number of ink units' the selected offset press has
- When the 'Work and turn / Work and tumble' checkbox isselected, the back page 'Number of colors' is not used and instead, Odyssey will copy the front page configuration.
- Also, the number of colors used on the front and back page will be the same and will also equal the number of exposed plates needed
- When the 'Work and turn / Work and tumble' checkbox is not selected, the total number of exposed media (exposed plates) used will be the total of the front page and the back page number of colors.
- A drop-down to set the offset press resource to be used
- Printers will not be able to add a digital printing process to an offset workflow path/estimate workflow
- When creating an estimate and selecting 'Offset' as the printing technology, the same approach is used with regard to the 'Printing options' section
Improvements to 'Notes' for a Company, Branch, or Contact
- Printers have the ability to add multiple notes as needed
- If only one note has been added, Odyssey will simply show this as 'Review 1 note'
- If more than one note has been added, Odyssey will show 'Review x notes' where x = the number of notes that have been added
- Upon selecting 'Review x notes', a modal will pop open to view all notes
- If this is the first note to be added, the title will be 'New note'
- Select 'Save note' to save the new note; if the printer exists the modal without saving, the info will be in the modal upon opening it again but will be lost if the user exits the screen completely
- This is a search feature to search by the note 'Title'
- The button 'Add note' allows the printer to add a new note only when at least one existing note has been saved
- There is no character limitation when adding notes
- After selecting a note to review, the date, time, and author of the note is shown at the top above the title of the note
- Notes are sorted by the last modified date
Example of the Notes modal
Released: 1/21/2023
Version 2022.21
Improvements to Omnisearch
- Printers may now search for a company, branch, or contact's phone, email, and mobile phone in Odyssey's omnisearch
- Printer's may also use the omnisearch to search for tags that were added to companies or contacts
- Related to companies: A list of companies will display for the searched tag
- When searching for a resource's tag, the tag in the omnisearch will include the header ‘Resources tags’
Improvements to Estimates: Requested, Waiting For Response, Rejected
- A search bar is now available to search within these columns: Customer, Company, Estimate Name, and Product Name
- Within each row of an estimate, there is now one button: ‘Build workflow’ if the estimate workflow has not yet been built or ‘Go to workflow’ if the estimate workflow has been created
- Pagination has been added with the three estimate tabs, defaulting to show 20 estimates (rows)
- The following columns are now sort-able: Customer, Company, Estimate Name, Product Name, and Date Added
Improvements to Estimates: Select a customer screen
- The interaction of selecting or creating a customer has been updated
- Customers are presented in a list, showing each customer's name, email, phone, company, and branch within the list
- Select a customer by clicking on their name, photo, or the radio button found at the beginning of the row
- When selecting a company in the ‘Company’ drop-down, only the contacts belonging to that company are shown and also, the ‘Branch’ drop-down will be enabled to choose a branch to further filter the list of contacts belonging to the selected branch
- Pagination has been added allowing for 20, 40, or 60 customers to show per page
- Using the ‘search’ feature allows a printer to search by name, email, company, or branch
- Select ‘Create new customer’ to create a new customer that is not yet in the printer's list of customers
- The ‘Select a contact’ list can be sorted ascending or descending order
Improvements to Estimates: Estimate Information screen
- Printers may now quickly add up to three quantities in the ‘Product Information’ section
- Each quantity will be it's own copy of the estimate
- Each copy of the estimate will have its own tab in Step 3 'Workflow details' of creating an estimate and as their own tabs when viewing the estimate ticket screen
Improvements to Estimates: Estimate workflow screen
- Each estimate copy (second and third quantities) can be customized individually
- When selecting the ‘Create a copy’ tab, the ‘Add quantity as a copy for this estimate’ pop-up will allow the printer to create the additional two quantities before exiting the modal
- To delete an estimate quantity, select the trash can icon to the right of the estimate tab name
- A pop-up modal will ensure the printer still wants to proceed to delete the copy of the estimate
- The 3-dot menu has been replaced with the options contained in that menu are now found on the main estimate workflow screen
- This includes edit quantity, adjust the selling price, notes, create a copy tab, and the estimate job ticket
- The customer information is found in the upper-right of the estimate along with the ‘Reject’ and ‘Accept’ buttons
- Upon selecting ‘Reject’, there is a pop-up modal allowing the printer to confirm their decision and provide more information
Improvements to Estimates: Estimate ticket screen
- The estimate ticket screen is now found by selecting ‘Print / Send’ from within the estimate workflow
- The layout of this screen has been updated to match the rest of Odyssey in terms of font, color, and the look and feel
- Up to three different estimate quantities have their own tabs
- The customer information is shown on the left side of each estimate quantity
- Printers may ‘Reject estimate’ or ‘Approve by customer' in this screen as well
- Approving the estimate will send the estimate as a ‘Pending Job’
- Selecting ‘Print ticket’ will product a PDF of the estimate job ticket
Released: 12/22/2022
Version 2022.20
A new section titled ‘Tasks’ can be found within Printshop > CRM
- Tasks refer to the individual processes of a job
- The ‘Tasks’ section of the CRM has 3 tabs:
- Individual Tasks- this tab will allow for different functionality and view depending if the employee is assigned the ‘Production Staff’ role or not
- Work in Progress- this tab allows the printer to review the progress for scheduled tasks, open up the job to see all tasks (processes) for that job, be taken directly to the job, and more
-
Unassigned-this tab comprises of all tasks that have not been assigned to a printshop employee, regardless if they have been scheduled or not
- A task can be marked as finished, scheduled, and re-scheduled from this tab
Production Staff Role
- A new role as found under Printshop > Employees called ‘Production Staff’ allows for additional access related to the ‘Tasks’ section in the CRM
- Printshop employees with the ‘Production Staff’ role have control over the progress of their assigned tasks, remove themselves from assigned tasks at any time, view upcoming tasks assigned to them, and view/assign unassigned tasks
- The number to the right of the ‘Individual tasks’ tab references the number of tasks due today, if a task is ‘Unassigned’ but still due today
- Three columns are present, Today, Upcoming, and Unassigned
- Overdue tasks show in the ‘Today’ column as a light blue outline
- Tasks in the ‘Unassigned’ column have not been assigned or scheduled
- Tasks in the ‘Upcoming’ column are tasks scheduled within the next 7 days
- Overdue tasks show in the ‘Today’ column as a light blue outline
- Tasks can be scheduled, rescheduled, assigned, marked as finished, and marked as pending
- Upon task completion, it will move to the bottom of the 'Today column
- When the current day is over, completed tasks are removed from this column
- A printshop employee without the ‘Production Staff’ role can see a list of all tasks and also assign a task to any printshop employee
Tasks - 3-dot menu
- Each Task has a 3-dot menu with the following options:
- Mark as finished
- Mark as pending when completed
- Join task (when unassigned)
- Schedule
- Re-schedule if the task has already been assigned a date
- Leave task if a task is assigned to the logged-in user
Additional information related to Tasks
- When a task is completed, tasks will disappear from the tasks screens when the day is over
- Clicking on the job number will reveal a pop-up to the right of the screen which shows all processes for that job
Released: 12/02/2022
Version 2022.19
- The 'Create Workflow' button within a product is only shown if there are no prior existing workflows for said product.
- Otherwise, users will see a 'Create new path' button to continue creating paths for the product workflow
- For the 'Sizes' question, Odyssey is able to identify sizes not only with traditional measurements such as 8.5 in. x 11 in., but also common envelope size formats such as #10 or A4.
- The printer has direct access to 'View guided order forms' from the 'Products' card in the dashboard.
- The date format in the Accounting screens is now mm/dd/yyyy.
Released: 12/02/2022
Version 2022.18
Updated 'Products' screen
- The 'Products' screen has an updated look and feel.
- Clicking on the line for a particular product will present the 'Account' drop-down, 'Product specs' section as well as the 'Order Form', 'Profit settings', and 'Cost settings' tabs.
- The 'Product specs' button allows a printer to specify different specifications at a product level
- These specifications will be applied to all workflow paths within that product
- Below the solid green line within a particular product, all previously created workflow paths are available as well as the ability to create additional workflow paths using the 'Create new path' button
Digital & Offset Printing: Automated Calculations
- Odyssey's updated approach to automating calculations includes focusing first on the specs of the product and then on the process of production.
- The printer can either work on the specs at a product level, defining the specs for all the different workflow paths the product may have, or at a workflow path level, which includes being more specific for an individual workflow path.
- The printer will only have one product workflow with as many workflow paths as needed.
- Selecting the 'Product specs' button allows a printer to set the different specs for the product for digital and offset printing.
- For digital printing, the printer can set four different specs: Paper choices, Printing options, Sizes, and Folding options.
- Each of these sections will determine a specific spec at the product level.
- Example: The printer can assign an Odyssey paper to each of the 'Paper choices' order form answers
- The printer can add 'branches' to a product workflow
- Branches are a group of processes that build a specific part of the product.
- Example: Booklets that typically have a cover and pages
- Each branch can be renamed such as 'Outside Cover' and 'Inside Pages'
- In the 'Paper choices' section, Odyssey will attempt to automatically map the paper options from the order form to a paper in Odyssey.
- If Odyssey couldn't automatically determine the question on the order form that contains the paper options, the printer can use the 'Reading from order form' drop-down to assign the proper order form question to Odyssey's 'Paper choice'.
- Upon each 'Paper choice' answer being assigned to an Odyssey paper, Odyssey will automatically choose the correct paper when that answer is selected on the order form.
- If the printer doesn't have an order form question that represents the paper options, select 'Predefined paper choices' on the 'Reading from order form' drop-down,
- A printer can then add any paper needed as the paper to be used for the product
- If more than one paper is added as part of the 'Predefined paper choices', a printer can select which is to be used as the default paper in workflow paths.
- In the 'Printing options' section, Odyssey will attempt to automatically map the color options from the order form to 'Simplex' (single-sided) or 'Duplex (double-sided) in Odyssey.
- If Odyssey couldn't automatically determine the question on the order form that contains the color options, the printer can use the 'Reading from order form' drop-down to assign the proper order form question to Odyssey's 'Printing options'
- Upon each 'Printing options' answer being assigned to 'Simplex' or 'Duplex' and assigning which press to use for each option, Odyssey will automatically choose the correct printing option when that answer is selected on the order form
- A default press can be used for all printing options by setting the press in the 'Set the resource' drop-down
- If the printer doesn't have an order form question that represents the printing options, select 'Predefined option' on the 'Reading from order form' drop-down,
- A printer can select 'Simplex' or 'Duplex' the 'Printing option' to be used for the product
- In the 'Sizes' section, Odyssey will attempt to automatically map the trimmed sizes being offered on the order form to the 'Size' in Odyssey.
- If Odyssey couldn't automatically determine the question on the order form that contains the product size(s), the printer can use the 'Reading from order form' drop-down to assign the correct size question to Odyssey's 'Sizes' section
- If the printer doesn't have an order form question that represents the product sizes(s), a custom size can be set by selecting 'Custom size' from the 'Ready from order form' drop-down
- In the 'Folding options' section, toggle this to 'on' if any workflow paths will have a folding process
- Odyssey will attempt to automatically map the folding options from the order form to the 'Folding options' section in Odyssey
- If Odyssey couldn't automatically determine the question on the order form that contains the folding options, the printer can use the 'Reading from order form' drop-down where a fixed folding option can be assigned for the product
- Once the 'Folding options' have been set, the printer will be able to map each Odyssey folding option to the correct folding option order form answer
- If the product will not have any folding processes, toggle 'Folding options' to 'off'
- The printer will want to add 'Product specs' for both Digital and Offset printing as this will teach Odyssey how to behave in different, future printing scenarios.
Product workflow paths
- Within the main view of a specific product, the printer can create a new path for the existing workflow by selecting 'Create new path'.
- Provide a name to the workflow path and select which type of printing technology it will use (Digital or Offset)
- Printers will then be able to set the conditions for which the workflow path will be valid, such as Quantity, Color Options, Size, and so on.
- Upon defining conditions to be used for the workflow path, printers will be able to verify/edit the specifications for the workflow path
- The workflow path specs have the same behavior as the specs at the product level, except in the 'Size' section, printers are able to set a paper calculator for each size
- Note: Printers will only see the conditions and order form answers selected from the previous screen as valid conditions for the workflow path on the 'Specs for: <workflow path name>' screen
- According to the product specs set for the product, Odyssey will suggest the minimum processes needed: cutting, printing, and folding processes.
- Odyssey will suggest generic/system processes, which will be displayed in a vertical column on the left side of the 'Specs for: <workflow path name>' screen
- Printers will have the opportunity to add and delete processes inside the path workflow
- If a workflow path has more than one branch, Odyssey will walk the printer through a series of steps to add any missing processes for each branch as well as define the branch where all prior branches will merge into
- The workflow path specs have the same behavior as the specs at the product level, except in the 'Size' section, printers are able to set a paper calculator for each size
- Within the workflow path screen, if there is only one branch, all processes are automatically linked in the correct order
- If there is more than one branch, all processes within a branch will be automatically linked in the correct order
- The printer may drag and drop processes within a branch to quickly reorder them into the correct order
- Branches may also be renamed within this screen
- Selecting the 'Review path specs' button will allow a printer to review and/or edit the specs already set for the workflow path
Released: 9/02/2022
Version 2022.16
Offset Printing: adding additional setup times
- Offset printing devices have the ability to include the following setup times (in minutes) as part of the 'Speed Settings' for the device:
- Set up time per color
- Wash up time per color
- Press set up time
- In estimate workflows, job workflows, or while testing a workflow path, the above three setup times will be added to the time it takes for the device to print the product
- Odyssey will automatically multiple the 'Set up time per color' and the 'Wash up time per color' times the number of inks being used for the job as part of the device's calculation for the total time needed for printing a job
CRM
- Odyssey has a redesigned CRM found under Printshop > My Contacts
- Only Odyssey employees who have 'Admin Access' from the website's Control Center will have the ability to access and edit data related to companies and contacts
- The name and photo of the logged-in employee is shown in the left vertical column
- Printers may select 'Companies' or 'Contacts' in the left vertical column
CRM > Companies
- On the 'Companies' screen, the printer can perform the following tasks:
- Search using the search control.
- Add multiple keywords in the search to display more companies.
- Add a new company by selecting the 'Add new' button.
- Sort the company list ascending or descending using the Sort control icon
- Access company data by selecting the 'eye' icon
- The following tabs are visible: Contacts, Estimates, Work in progress, and Completed
- Edit company data by selecting the 'pencil' icon
- The printer may add different tags and a note to a company
- The printer may edit various fields of a company per the below screencapture:
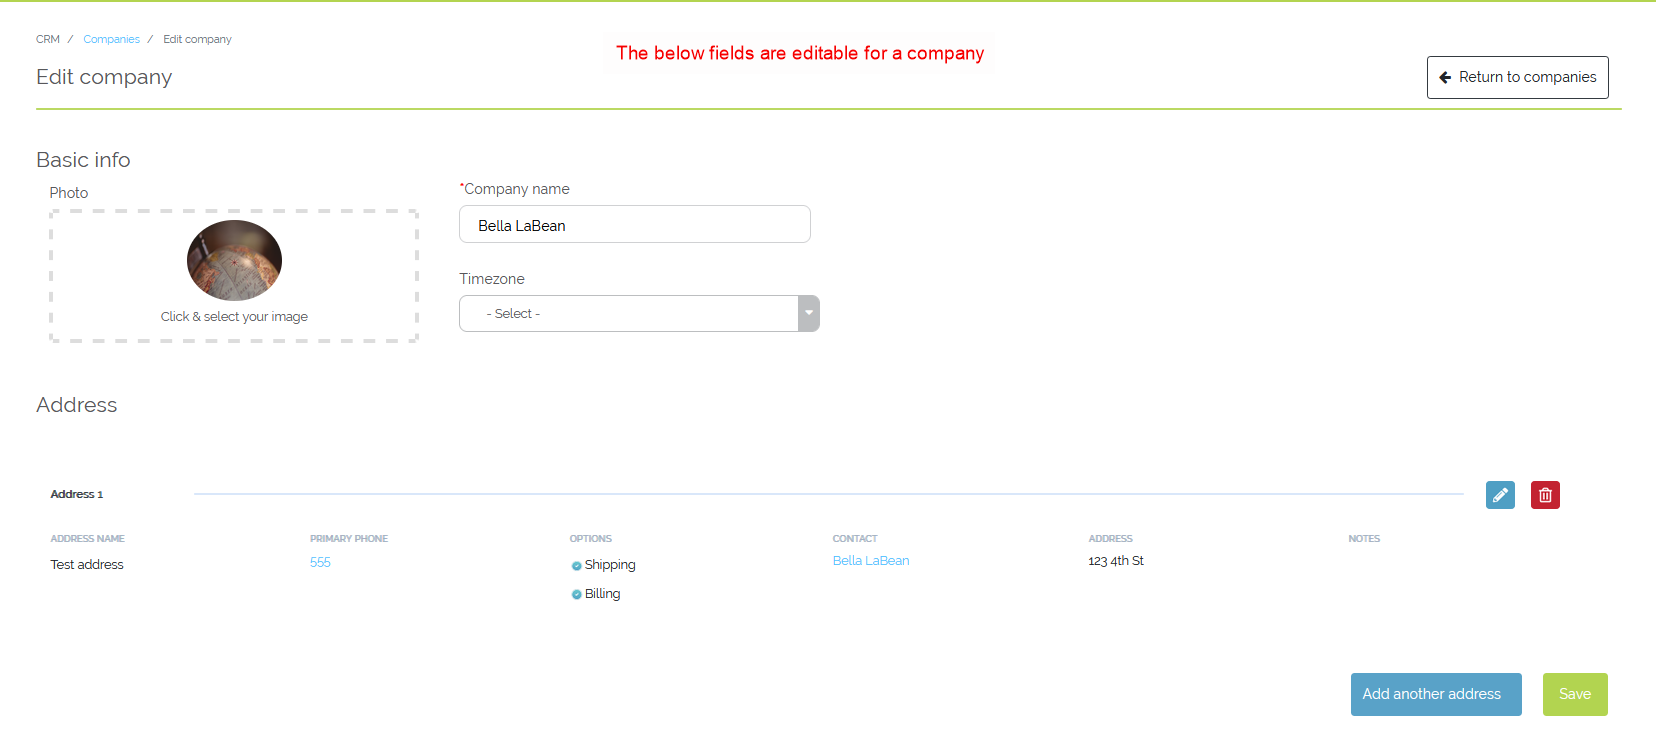
CRM > Contacts
- In the 'Contacts' screen, the printer can perform the following tasks:
- Search using the search control.
- Add multiple keywords in the search to display more contacts.
- Add a new contact by selecting the 'Add new' button.
- Sort the contact list ascending or descending using the Sort control icon
- Access contact data by selecting the 'eye' icon
- The following tabs are visible: Estimates, Work in progress, and Completed jobs
- Edit contact data by selecting the 'pencil' icon
- The printer may add different tags and a note to a contact
- The printer may edit various fields of a contact per the below screencapture:
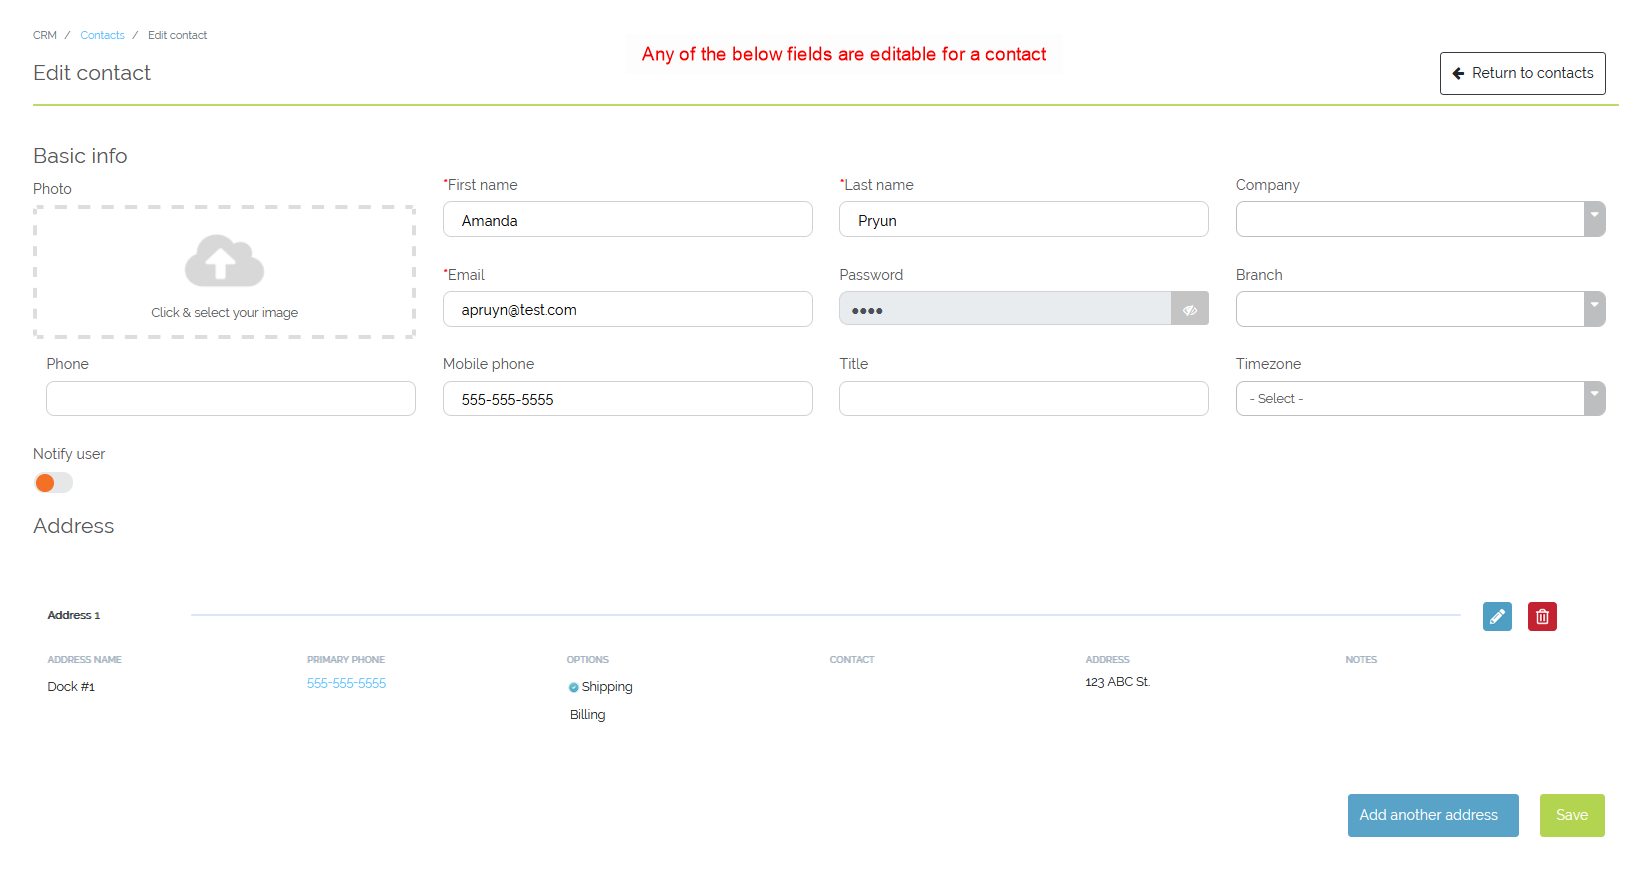
Released: 8/19/2022
Version 2022.15
- The printer has the option to upload their own custom paper CSV file with media resources; it does not need to conform to the 'Odyssey Import Template' file
- When the printer drags and drops or selects a CSV file to import, as long as the file is a CSV file with headers, it can be uploaded using a mapping tool to match the columns in the custom supplied file with the fields Odyssey 2 needs in order to upload a media resource.
- In order to access the mapping tool, the printer will select the 'Custom format' button in the modal that appears when Odyssey detects that the file is different from the 'Odyssey Import Template' file
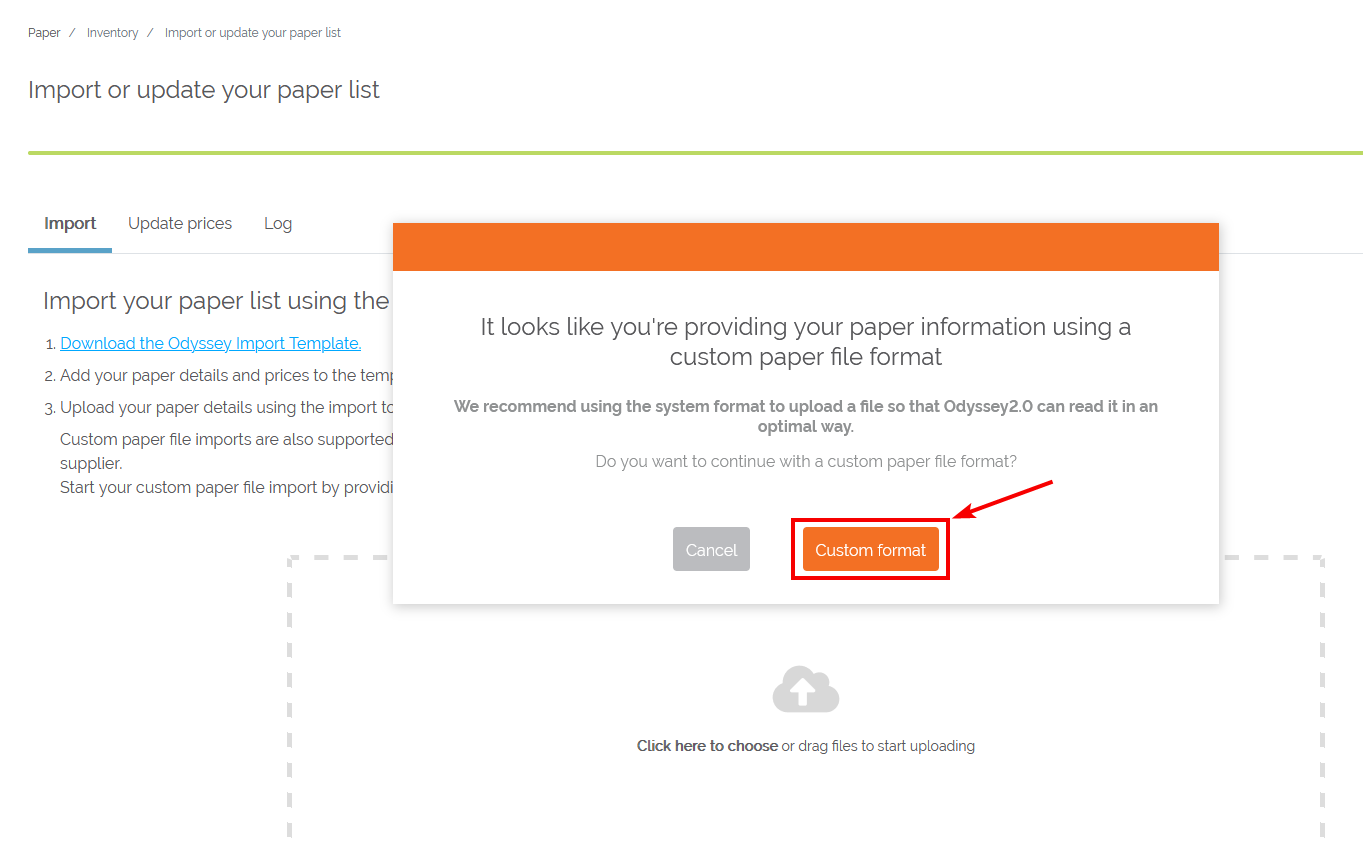
Example of the 'Custom format' button for uploading a custom paper file
- The mapping tool will show all the fields that can be used to add a media resource: Paper name, Description, Paper type, Size, Cost, Thickness, Thickness unit, Width, Width unit, Length, Length unit, Account number, Weight (gsm), and Color.
- The blue tags represent the column headers in the custom supplied file
- The tags can be dragged to the corresponding Odyssey 2 field
- The orange tags are fixed values meaning Odyssey will not accept any other values then those listed
- These fixed values are Paper type, Width unit, Length unit, and Account number
- The fields marked with the * are required
- The 'Size' field is used to determine the width and length of the paper.
- When the Size field is used, the 'Width' and 'Length' fields are not used.
- The 'Uncategorized expenses' is the default chart of account for all media resources
- The printer can use a column within their custom file to specify an account number for the media resources.
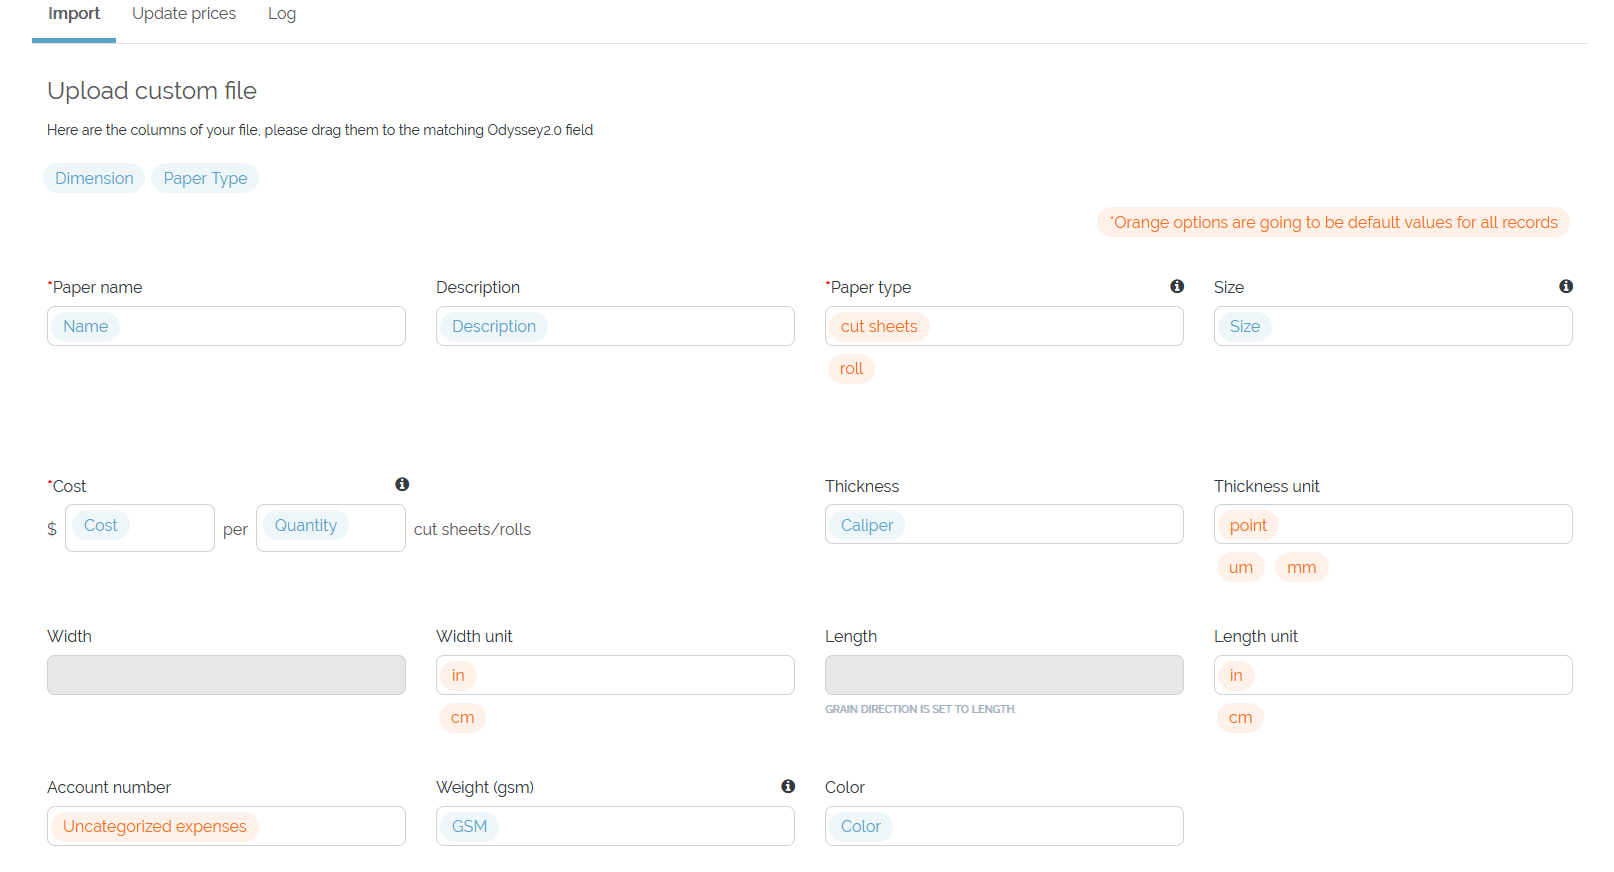
Example of assigning blue tags to Odyssey's accepted fields
- There have been numerous updates to the 'Invoices' tab
- The invoice list can be ordered by the following columns: Order Number, Jobs, Customer, and Date
- The invoice list can be filtered within a specific 'State date' and 'End date'
- The invoice list can be filtered using a keyword within the 'Filter' field
- The number of jobs included in an invoice is indicated by a colored circle to the left of the job name:
- Blue means all the jobs in the invoice are 'Completed' and the invoice has been generated
- Green means all jobs are 'Completed' but the invoice has not yet been generated
- Dark-gray means some of the jobs within the invoice are not 'Completed'
- Selecting the row of an invoice will provide a detailed status of the jobs to the right of the screen
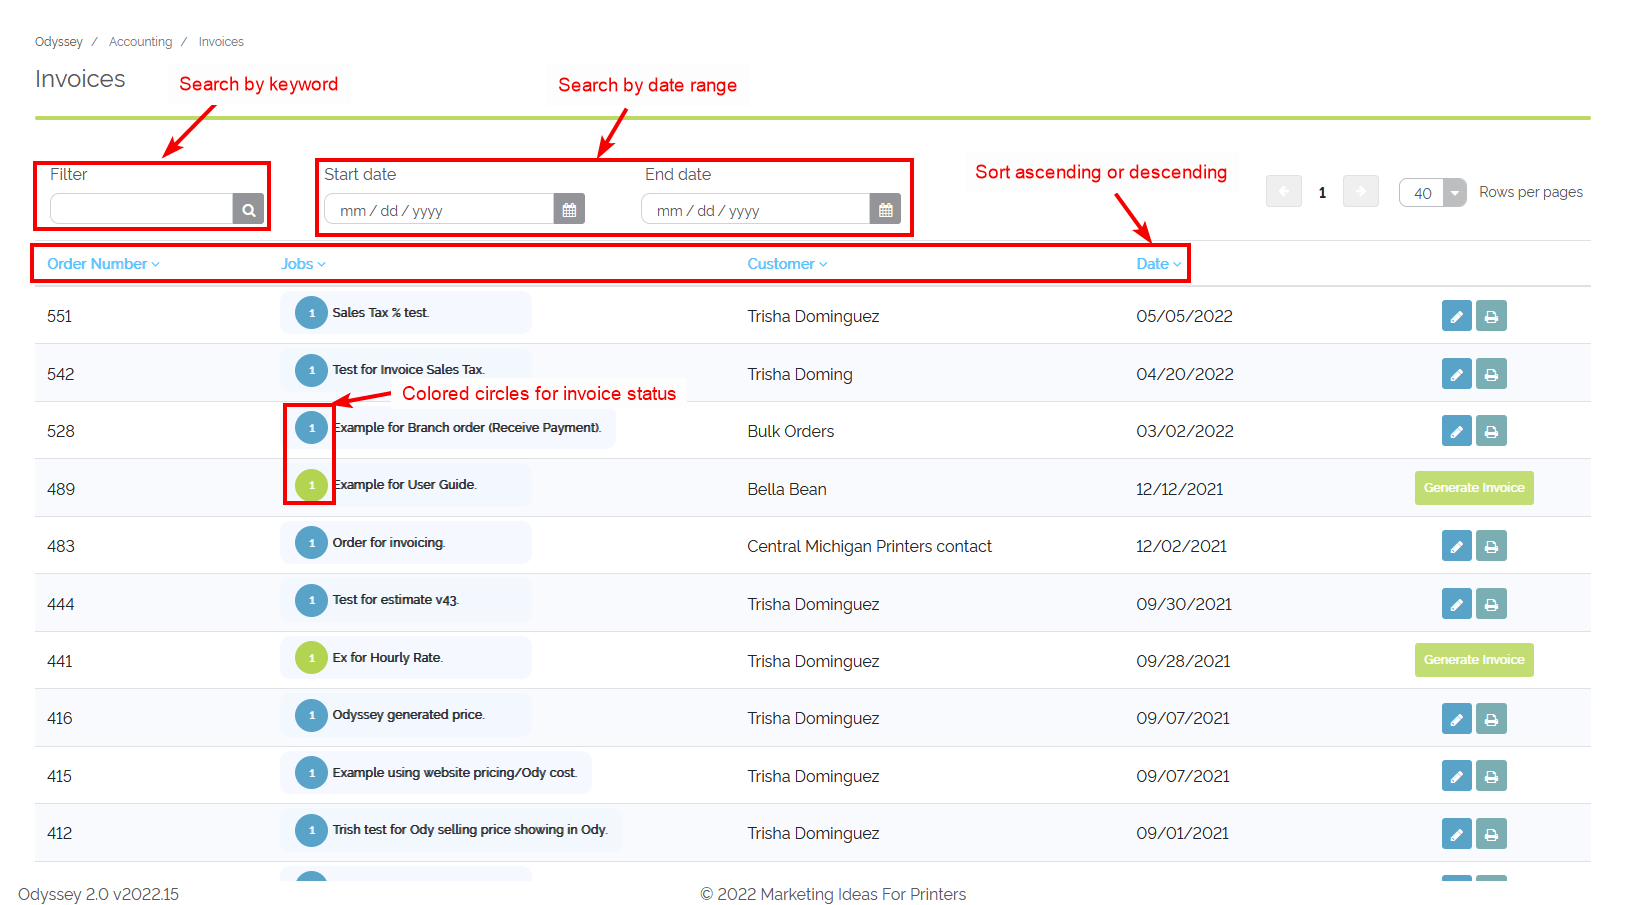
- The printer will see a new feature in the Paper Calculator, named 'Swap grain direction'
- The goal of this feature is to minimize waste and fit the maximum number out and number up on a sheet of paper
- The sheet can be with the grain direction, against the grain direction, or a combination of both
- This feature is only to be used for cut sheets of paper
- This feature is only to be used if the 'Specify grain direction' toggle is off.
- The printer will be able to set horizontal and vertical gutters
- This feature is enabled when the 'Specify grain direction' is toggled to 'on'
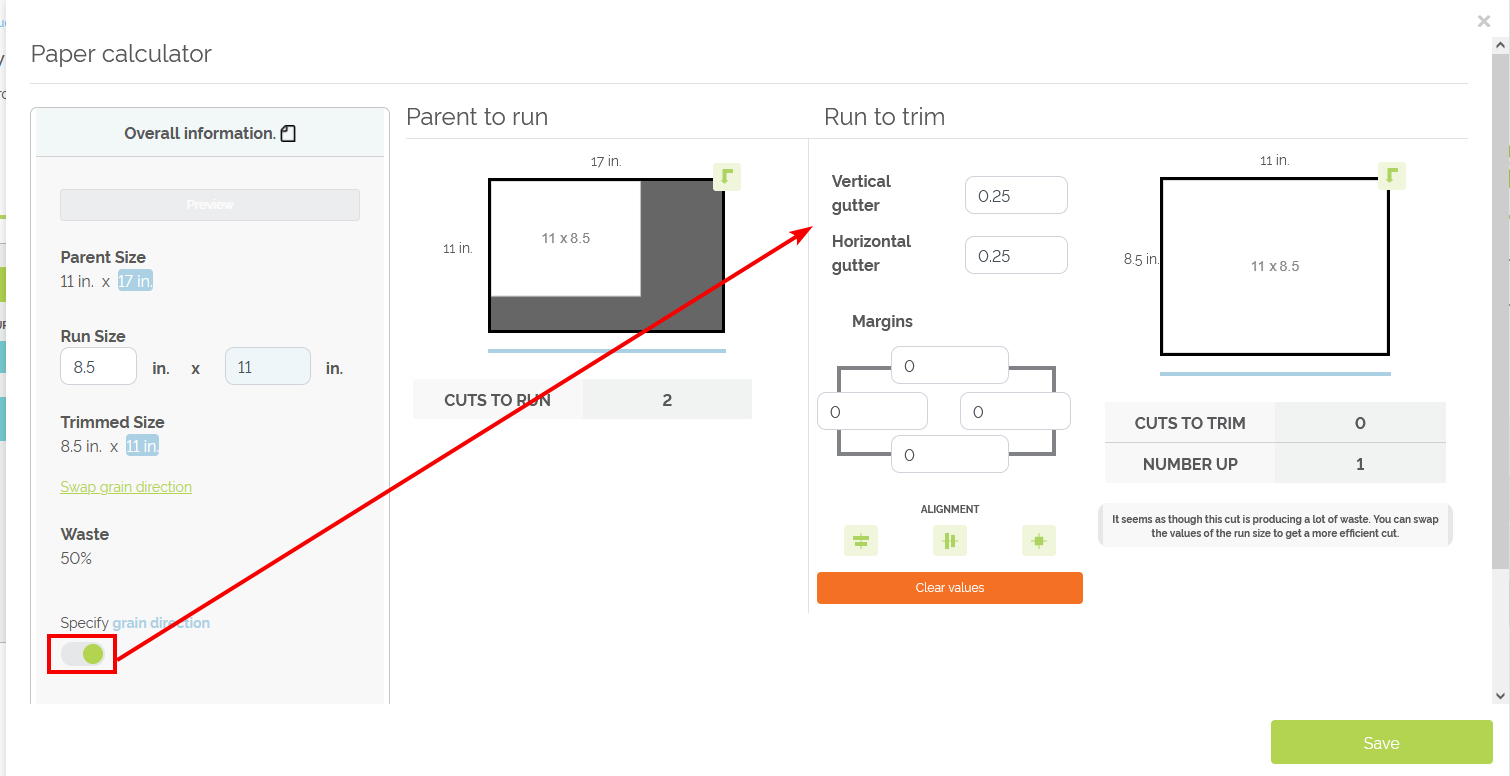
Example of Vertical and Horizontal gutters enabled
- Improvements have been introduced in the three-dot menu seen throughout Odyssey
- All icons are the same size and evenly aligned.
- When the text in the menu items is long enough to be broken into two lines, the text is aligned with the text in the row above
- There is now the ability to set a default resource within a workflow path
- The default resource will always be used when set as the default
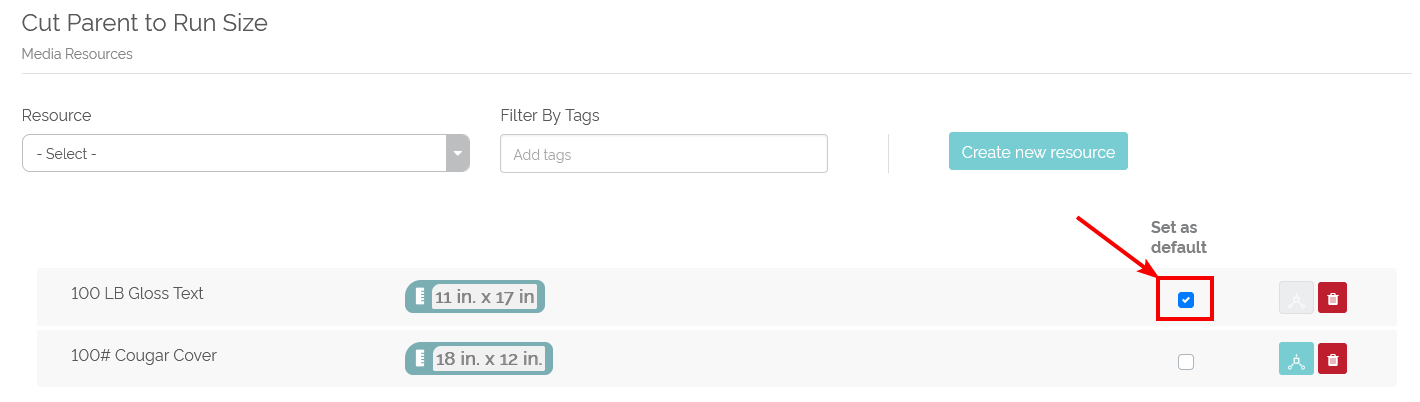
Setting '100 LB Gloss Text' as the default resource in process within a workflow path
Released: 8/19/2022
Version 2022.14
- There is an 'Import/Update papers' menu option under the 'Printshop' tab
- Upon selecting 'Import/Update papers', printers are guided to the screen used to import a list of papers or update paper prices
- In the 'Import' tab, there is a button named 'Download the Odyssey Import Template' which allows printers to download an Odyssey-specific CSV template
- This template is used to import a paper list.
- After filling out the file, printers may drag and drop the file within the 'Click here to choose or drag files to start uploading' area of the 'Import' tab.
- In the 'Update prices' tab, there is a button named 'Export existing paper list' to download a CSV file with the printer's current paper resources, including prices
- The file can be edited, saved, and then use the 'Choose files or drag them here to start upload' option to upload updated paper pricing
- In the 'Log' tab, the printer has a list of results of every failed attempt of uploading a list of papers or updating paper pricing.
- If there was an unsuccessful attempt of an upload or update, a downloadable PDF file is available which shows the line number and resource name that could not be uploaded/updated
- The printer can now set folding options at an advanced product workflow level
- Only one folding process is necessary within Odyssey
- The process named 'Folding' is the process to be used in order to configure the folding options within the Paper Calculator
- In the 'My Products' screen, printers can select 'Folding options' within the three-dots menu to the right of an advanced workflow name to access the folding options screen
- If the printer has included the folding process in a workflow path, the 'Folding options' button is accessed within the paper calculator on the 'Trimmed sizes for <workflow path name> screen
- In order to set the folding options for a workflow path, Odyssey will attempt to choose what the 'Folding' question is from the order form.
- The first option will be a question named 'Folding Options'
- If there is not a folding question named 'Folding Options', Odyssey will choose any other question that contains the word 'Folding' or 'Fold'
- The printer can change the question that Odyssey is currently reading from the order form but if the 'Reading from order form' question is changed, previous configurations from the previously used 'Folding' question will be lost.
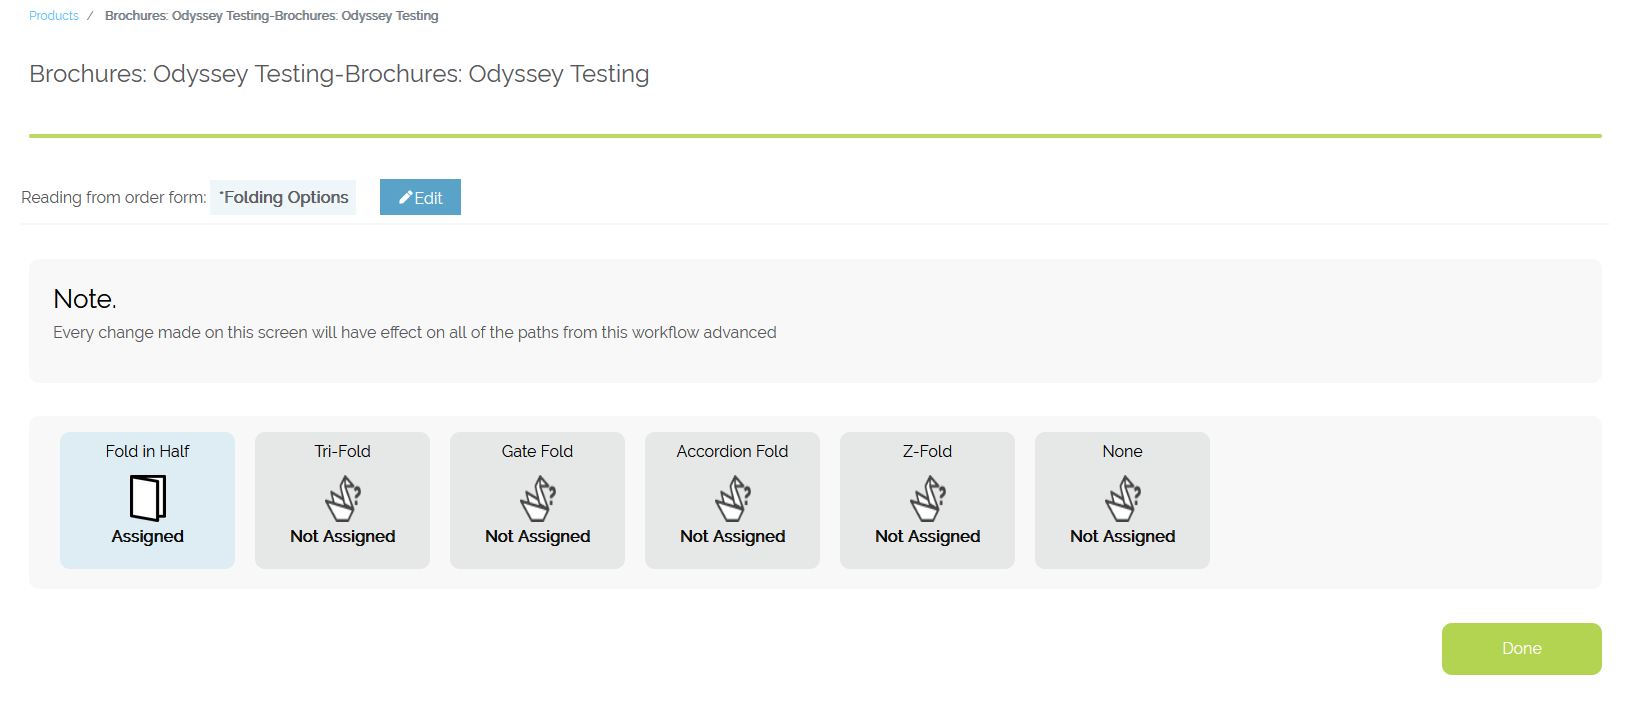
Example of 'Folding Options' for a product workflow path
- The printer will set one folding option for every order form answer in the selected 'Folding' question.
- Odyssey includes a 'Fold Library' that can be used to easily relate folding option to a specific order form answer
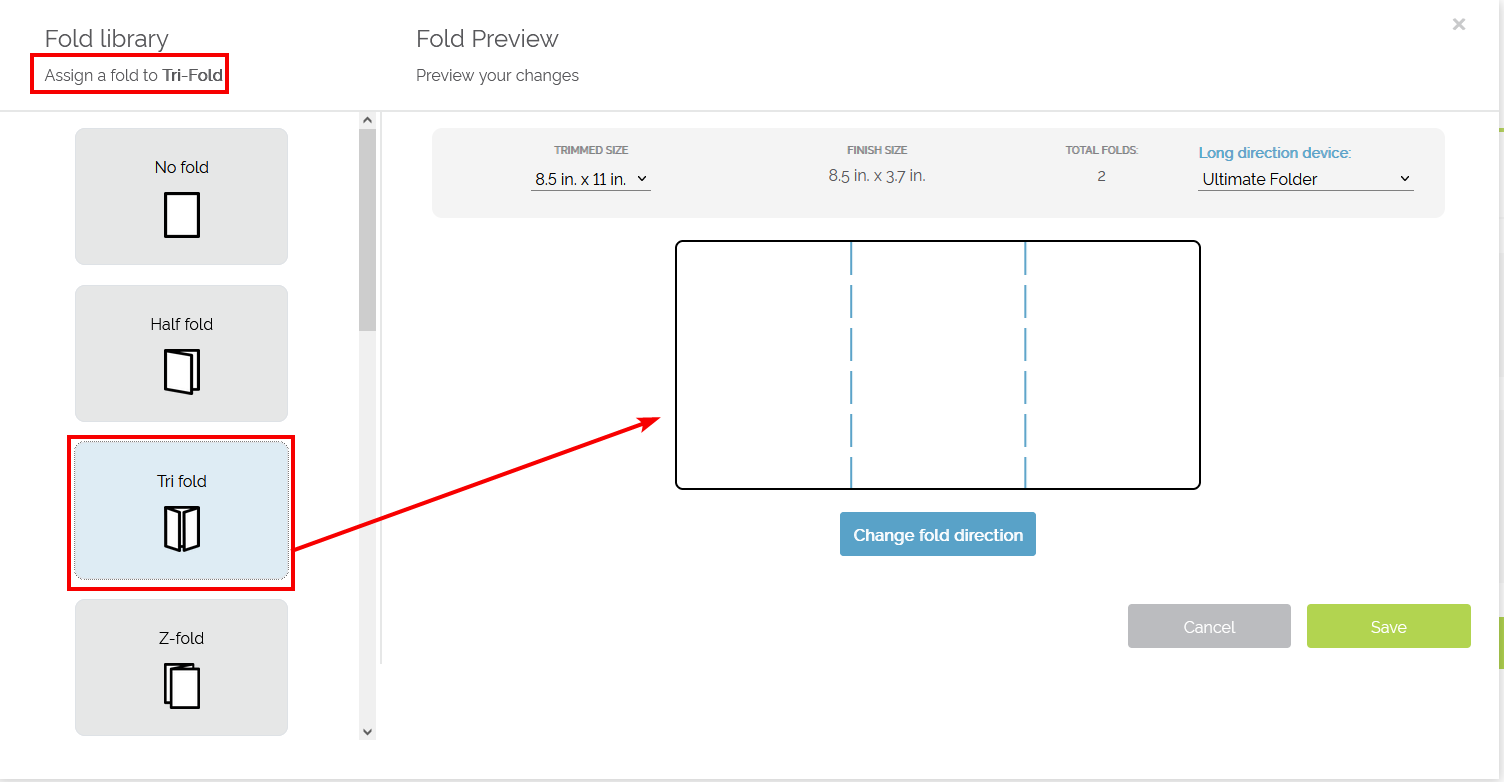 Fold library for a tri-fold order form answer
- The printer can associate a customized fold to a specific answer of the order form's fold question.
- The printer can decide where the horizontal and vertical folds will be located.
- The customized fold can be saved to the 'Folding Library' for future use.
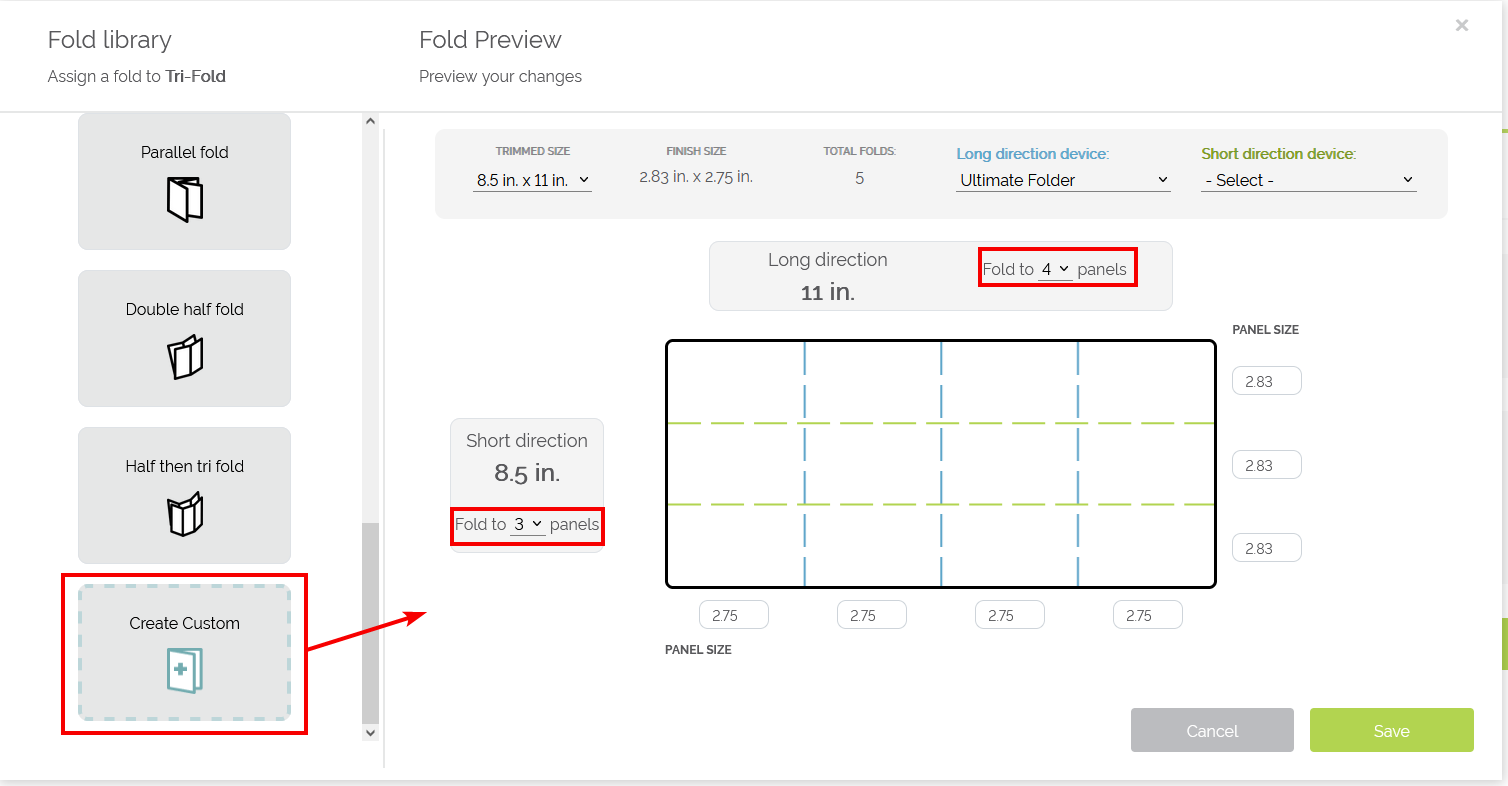
Setting up a customized fold in the Fold Library
- In a job workflow, the number of folds is calculated using the 'Folding options' setup from the workflow path
- The thickness of a product as it moves through the job workflow is taken into account in the folding process.
- Meaning a folded piece of paper is thicker than a non-folded piece, adding additional thickness to each folded sheet
- This may end up affecting how many boxes are used, how much shrinkwrap is used, and so on
- Meaning a folded piece of paper is thicker than a non-folded piece, adding additional thickness to each folded sheet
Released: 8/12/2022
Version 2022.13
- There are updated screens when creating an estimate.
- If the new estimate is related to a product, printers may select the needed workflow or they may select the workflow path to be used for the estimate
- In the far-right column named 'Processes in this workflow path', printers can view the processes that are included in the workflow that is being selected
- When filling out the order form questions, only the workflow paths that cover the answers will be shown on-screen
Released: 8/12/2022
Version 2022.12
- There are new controls related to the grain direction in the Paper Calculator modal.
- By default, the grain direction is not being considered
- Odyssey will change the direction of the paper to minimize waste.
- When roll media is used, the grain direction optimization is only taken into consideration for the second cutting process as by this time, the paper is considered a cut-sheet.
- The printer can rotate the product in the Paper Calculation modal.
- The rotation will not change values, it is just the orientation of the drawing.
- When the printer specifies the grain direction, by default this is related to the second dimension of the trimmed size
- The printer can change the grain direction to be related to the first dimension of the trimmed size by sliding the grain direction toggle
- When the printer specifies the grain direction, there is no optimization.
- The second dimension of the parent size will be used to obtain the second dimension of the run size.
- The second dimension of the run size will be used to obtain the specified grain direction of the trimmed size.
- By default, the grain direction is not being considered
- The printer can save an estimate workflow into a workflow path for a product.
- In the three-dot menu of an estimate is a new line called "Save as workflow path".
- Once this option is selected, you can specify a product's advanced workflow where you want to add the new workflow path
- The printer will need to specify the valid answers of this new workflow path in order for it to be saved as a product workflow path
- The printer can go back to the previous steps while creating an estimate and make changes.
- This includes the 'Customer Information' and 'Estimate Information' screens
- Printers may unselect resources if needed within an estimate workflow
- Printers may edit processes without deleting an estimate
- This is within any process within the list of 'My Processes'
Released: 8/12/2022
Version 2022.11
- The printer will be able to add paper calculations for roll type of media.
- In the paper calculator for roll media, there is an icon and a tooltip that indicates to the printer when the paper is a roll or cut sheets:
- When viewing the cards view of a workflow path that is using roll media, the number of cuts is calculated according to the number of cuts needed per sheet, the paper thickness, and the lift.
- This is only applicable when there is a trimming cutting process involved
- The printer will see more information while viewing a job workflow
- The paper information is shown in the left vertical column
- The printer can edit the Paper Calculator in the job workflow
- This will affect not only that specific job but you are editing the paper calculator of the product workflow path that is being used for this job.
- The 'Due Date' is shown in the upper-right below the 'Status' (below)
- The 'Estimated Cost' related to the product is shown near the top to the left of the 'Estimated Profit' (below)

Released: 6/16/2022
Version 2022.10
- The list of jobs, which includes Unsubmitted, In Estimating, Waiting for price approval, Pending, In Progress, Waiting for Payment, and Completed is now paginated.
- The printer can choose from 20, 40, or 60 jobs per page along with choosing a 'Start date' and 'End date'
- The printer can choose from 20, 40, or 60 jobs per page along with choosing a 'Start date' and 'End date'
- The printer can change the customer for estimates, which includes both new and existing estimates that have not been approved
- While creating a new estimate and on the 'Estimate Information' screen, the printer can click either the 'Previous Step' button at the bottom of the screen or select the first circle (Select a customer) to go back to the 'Customer Information' screen to change the customer if needed
- While creating a new estimate, while in the third step (Workflow details), the printer may go back to the "Customer Information" screen by clicking the first circle (Select a customer) to go back to the 'Customer Information' screen to change the customer if needed
- When the printer selects an existing estimate workflow directly from the 'Requested Estimates' screen, the printer may click the first circle (Select a customer) to go back to the 'Customer Information' screen to change the customer if needed
- While creating a new estimate and on the 'Estimate Information' screen, the printer can click either the 'Previous Step' button at the bottom of the screen or select the first circle (Select a customer) to go back to the 'Customer Information' screen to change the customer if needed
- The is now a tool to test workflow paths within any product workflow path
- There is a new button called "Test your workflow!" to test a workflow path; this button is enabled only if the workflow path has a green lightbulb
- There is a new button called "Test your workflow!" to test a workflow path; this button is enabled only if the workflow path has a green lightbulb

- When the printer selects the 'Test your workflow!' button, the order form questions and answers associated with the workflow path will pop-up in the 'Please fill out the order form in order to test this workflow path' screen
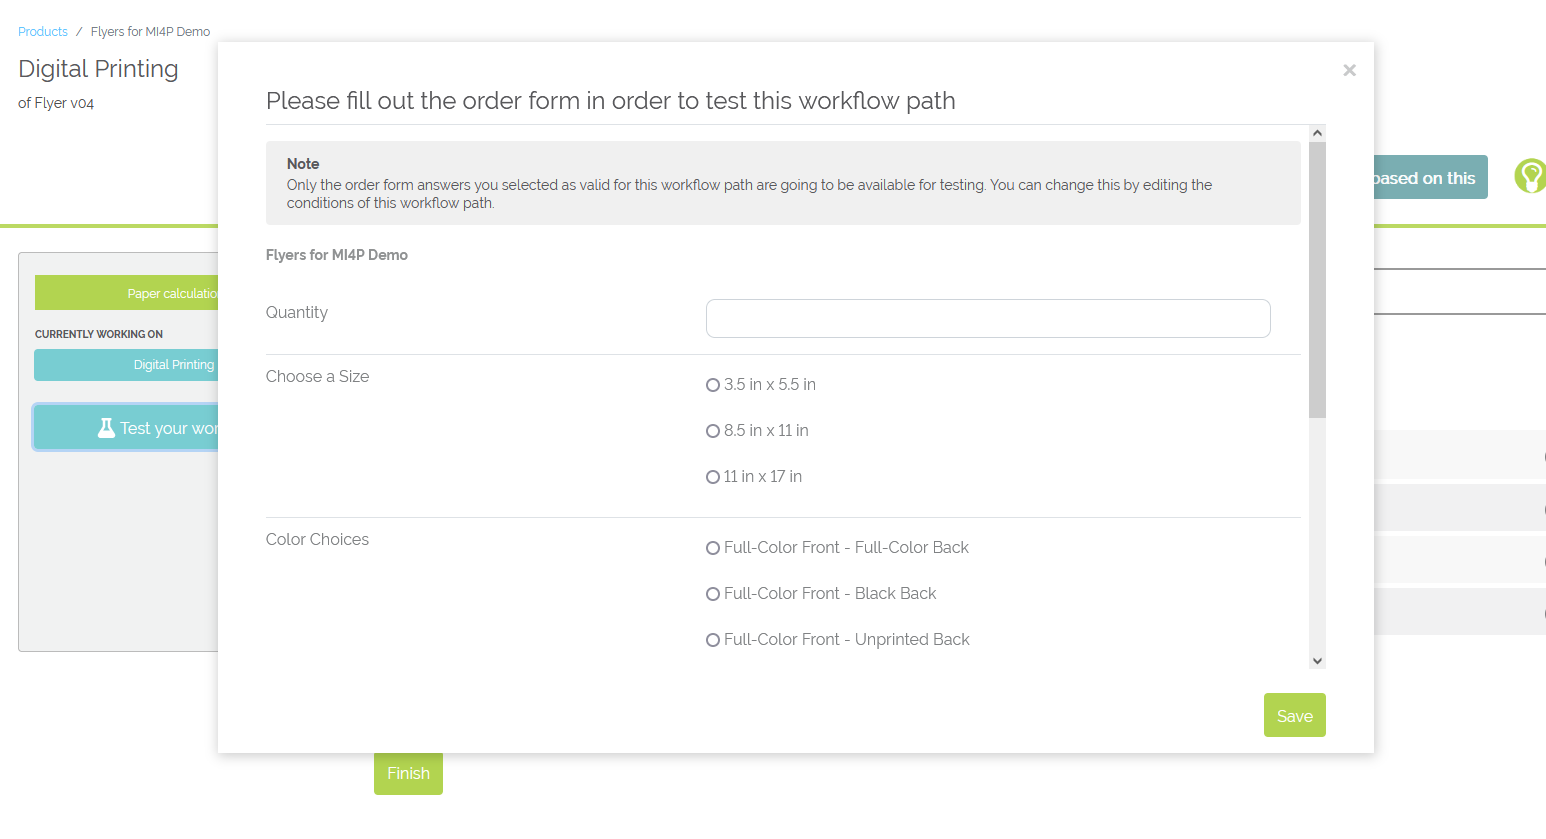
- Answers can be chosen in order to ensure the workflow path covers the selected answers
- Only the questions and answers that are covered by the particular workflow path will be presented in the pop-up
- Once the order form answers are selected, the printer will be able to see the cost and quantities in either the list view or the cards view of the workflow path
- The printer may change resources and calculations during testing to see how these changes affect the cost and profits of the job
- Adding and linking of processes cannot be modified during testing
- To stop the test, simply select 'Stop testing'

Released: 6/16/2022
Version 2022.09
- There is now a 'Paper Calculator' when adding or editing workflow paths
- When there is at least one media resource set to be used in the workflow path, and the media resource has its dimensions defined, a green button called 'Paper calculation 1' appears to the left of the workflow path:
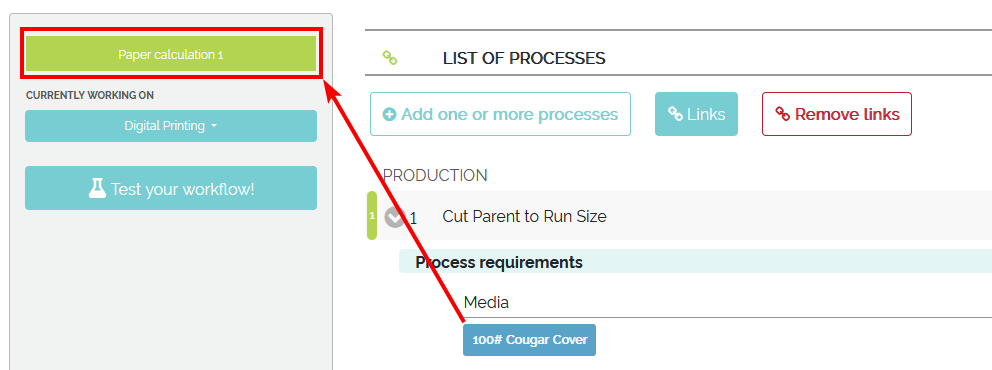
- In order for the paper calculator to work as intended within workflow paths, the following bullets must be observed:
- The workflow path must have at least one cutting or printing process
- Do not have more than two cutting processes
- Do not have more than one printing process
- Two cutting processes can not be directly linked
- A media resource must be set within the first cutting process
- The media resource being used must have dimensions set
- The parent size of the media resource to be used must be large enough according to the trimmed size
- The run size must be within the run size limits of the printing device being used
- If there is not a cutting process before the printing process, the run size must be the same as the parent size
- If there isn't a cutting process after the printing process, the run size must be the same as the trimmed size
- All media resources of the same type (sheets or rolls) and the same name will be considered the same resource, regardless of their dimensions, when they are added to a process within the workflow path
- In the pop-up modal where the printer selects the media resource to be added, the drop-down will only show the resource name without dimensions
- Upon the media resource(s) being selected, it is listed in the same pop-up modal with a ruler icon to the right of the resource name, along with the dimensions of the media
- Conditions to Apply can be added within this pop-up modal by selecting the 'Conditions to apply' button to the right of the resource's dimensions:

- This will allow Odyssey to know which media resource to use based on the paper selection from the order form
- Printers will need to add a paper calculator for every trimmed size and parent size combination for the workflow path
- To add paper calculations, printers will use the paper calculator modal, which allows for the selection of the trimmed size than the parent size to finalize the Parent to Run and Run to Trim sizes for each media used in the workflow path
- Printers can add in gutters and margins for the Run to Trim process in order to preview the paper transformation
- Odyssey will use the paper calculations to calculate the quantities and dimensions of the media in each process throughout the workflow path for a specific job
- The number of cuts needed for a cutting device will be calculated according to the lift of the device and the thickness of the paper
- If an estimate workflow does not recognize a trimmed size, there is a button called 'Select trimmed size' to add the trimmed size for the estimate:
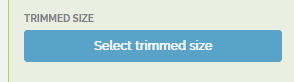
- After adding the needed processes for an estimate workflow or for a product workflow path, the green 'Link all processes' button is located above the processes.
- This is to give more prominence to this feature
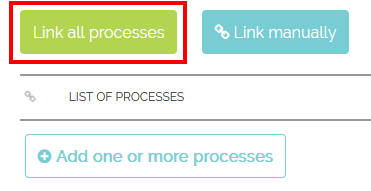
The 'Link all processes' button found above all added processes
- When the printer is using an existing product workflow for an estimate, the printer is able to see the paper calculator and change the view to the card view
- The chosen product workflow path is not editable due to it's a workflow path used to calculate the cost for the jobs of that product
- However, upon selecting 'Enable Edit', the printer may then use a copy of the product workflow path for the estimate:
The estimate name is always presented at the very top-left within the estimate workflow screen
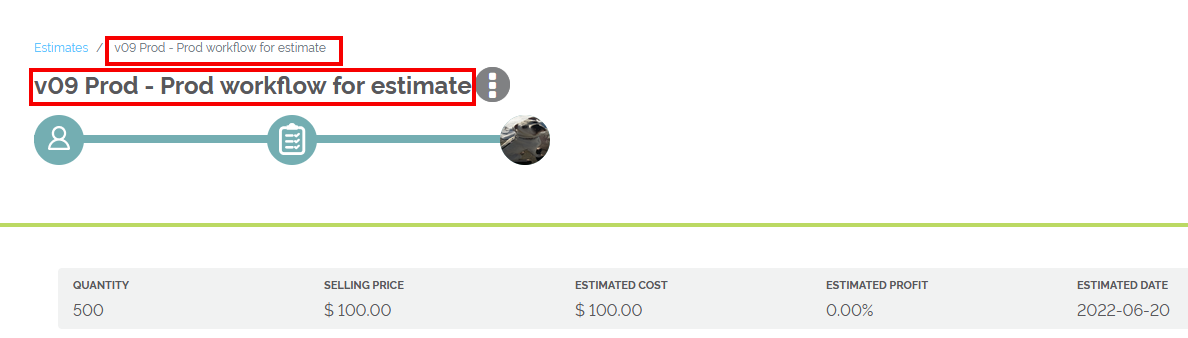
Estimate name showing at the top of the estimate workflow
- When the estimate is used for an existing product (such as Brochures or Flyers), the printer may use another product workflow path to calculate the cost of the estimate
- There is a drop-down button on the left-hand side under the heading 'Product Workflow', allowing a printer to choose a different product workflow path
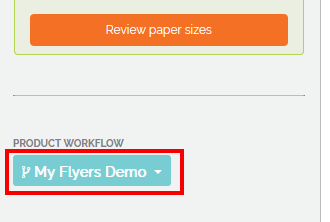
Product workflow path button
Released: 6/16/2022
Version 2022.08
- Previously created workflows are considered 'Legacy' workflows; there is a new and improved way of creating workflows, now called workflow paths
- Legacy workflows have a yellow icon to the right of the workflow name; MI4P will be assisting to update legacy workflows into an advanced workflow and their associated workflow paths
- Advanced workflows have a green icon to the right of the workflow name
- Any workflow paths associated with the advanced workflow will show below the advanced workflow name after selecting the green 'advanced workflow' icon

Above: The green workflow icon is referring to 'Advanced' workflows; the yellow icon is the previous 'Legacy' workflows
- Run size limits are available to be added to printing resources
- This is found on the 'Edit Resource' page when adding or editing a device resource
- The 'Run size limits' section will become enabled if the device is added under the 'Digital Printing' or 'Conventional Printing' process group, which implies the device is going to be used in printing processes
- If the printer edits the device and removes either the 'Digital Printing' or 'Conventional Printing' process group from the device, the run size limits will become grayed out and unused
- The Run size limits allow the paper calculator to realize if a specific paper is too small or too large to fit through printing devices
- There is now a 'Paper Calculator' when adding or editing estimates
- In order for the Paper Calculator to work as intended, the following must be adhered to:
- The workflow must have at least one cutting or printing process
- Do not have more than two cutting processes
- Do not have more than one printing process
- Two cutting processes can not be directly linked
- A media resource must be set within the first cutting process
- The media resource being used must have dimensions set
- The parent size of the media resource to be used must be large enough according to the trimmed size
- The run size must be within the run size limits of the printing device being used
- If there is not a cutting process before the printing process, the run size must be the same as the parent size
- If there isn't a cutting process after the printing process, the run size must be the same as the trimmed size
- Odyssey will automatically pick up on the parent size sheet (or roll) of paper being used along with the trimmed or final size of the product
- This combined with printers adding in the margins and gutters allows Odyssey to determine the sheet quantities, dimensions, and cost within the estimate when using the paper calculator
- The quantity of sheets of media needed is calculated based on the size and quantity of the estimate
- The number of cuts being determined for the cutting device are calculated based on the cuts calculated in the paper calculator combined with the lift of the cutting device
- In order for the Paper Calculator to work as intended, the following must be adhered to:
Released: 4/07/2022
Version 2022.07
- Printers are now able to assign a resource to more than one process group when creating a new or editing an existing resource
- There is now the ability to select the resource group when adding or editing a resource as part of a pop-up modal for ease of assigning to an 'Other' process group
- Printers can select to view a Job workflow between the 'card' view or the 'list' view of processes
- A product workflow can be viewed in the 'list' view when there are no nodes as part of the workflow
- This is accomplished by selecting the icon to the left of the lightbulb:

- This is accomplished by selecting the icon to the left of the lightbulb:
- Improvements have been made to the 'My Files' modal, including:
- The ability to sort each column
- The ability to perform a search among all file names
- Improvements have been made in the steps to creating a 'Simple' product workflow, including:
- There is a pop-up modal prior to creating a simple workflow, explaining what to do at each step
- There are now four steps instead of three: Conditions, Processes, Resources, and Resource Calculations
- There is now consistency throughout all of Odyssey for the 3-dot menu
- The icons and colors within the 3-dot menu are the same across all locations within Odyssey where the menu is available
Released: 3/24/2022
Version 2022.06
- There have been improvements made to the process modal when adding processes to a workflow
- There are now three columns in the pop-modal when adding processes to a workflow
- The first column allows a printer to determine how they want to search/find a process: By showing 'All' processes, by only viewing 'Suggested' processes which will show the recent, commonly used processes to choose from, or by selecting a specific Process Group to view processes within the group
- Upon selecting a process to be added to the workflow, the list within the second column titled 'Available Processes' is adjusted to show processes the printer has previously used being connected to the selected process
- The 'Search' functionality within the 'Available Processes' column is used to search for processes within the list of processes in that column
- The third column will present to the printer the current processes already used in the workflow as well as any processes that have been selected to add to the workflow
- The printer will see a new modal with three steps when adding new processes to Odyssey: Identify, Build, and Set Calculations
- In the 'Identify' step, printers will provide the process name, identify it as a Production or Post-Production process, and select the process group the process will belong to
- In the 'Build' step, the process requirements will be added.
- For every process requirement, the printer must set the resource group.
- Predefined resources and setting a default resource will also be available
- For post-production processes, the printer will be able to adjust the resource group for the result of the process even though the default of 'Component' is set
- In the 'Set Calculations' step, the printer will be able to set a default calculation for every predefined resource of a process requirement
- When adding a process to a workflow, the list of selectable resources will be limited to the predefined resources of a process.
- If there is a resource set as a 'default', that resource will automatically be selected to be used in the process. The printer may adjust the automatically selected resource if needed.
- The printer will now have the ability to add their own process groups
- When adding a process, the printer now has the ability to access a modal allowing the choice of a process group for the process
- The printer can choose between process groups already used or created, or the system-added process groups
- If a new process group is needed, select the 'Add new group' button to create a new process group.
- The new process group will then be associated with the new process being created
Released: 3/11/2022
Version 2022.05
- There have been improvements made to how 'Simple' workflows are created, including:
- There is an extra 'help' box at the top of the 'Define your workflow' screen to provide information depending on if a printer is editing the order form answers of an existing Simple workflow or creating a new Simple workflow based on a copy of another Simple workflow.
- Once a printer is complete with building a Simple workflow, selecting the 'Finish' button will produce a pop-up modal letting the printer know they can add it to the 'Advanced' workflow
- Selecting 'Add to Advanced Workflow' will then automatically add the Simple workflow to the Advanced workflow
- Selecting a Simple workflow name will allow printers to view and edit the workflow
- Hovering over the icons to the right of Advanced and Simple workflows will provide information as to what those icons can do
- There have been improvements in the way estimates from scratch are created, including:
- Different screens are used to define the customer, providing the estimate specifications, and building the estimate workflow
- Printers are able to select previous steps of the estimate at the top of the screen
- These are the circles labeled 'Select a customer', 'Estimate information', and 'Workflow details'
- The customer name and email is shown in the upper-right throughout the entirety of the estimate
- When selecting an existing product workflow to be used for an estimate from scratch, the following will take place:
- The printer will be able to select the order form answers in order for Odyssey to choose possible product workflows based on the answer
- The printer will then be able to select from a list of eligible product workflows based on the order form answers selected in the previous modal
- Upon ordering the processes needed for the estimate, the 'Link automatically' button will link all the processes in the order they are listed
- Upon linking the processes using the 'Link automatically' button when creating an estimate workflow, the last 'Production' process is automatically determined as the 'Finished Product' (the flat, unfolded size)
- This will also be reflected once the estimate is converted to a job
- When editing an existing Estimate workflow such as adding or removing links or adding and removing processes, the 'Final Product' is automatically reconfigured
- The result of 'Production' processes are now automatically selected
- Printers will no longer need to set 'Output' resources within each Production process result
- Odyssey will automatically fill in the result of each Production process
- The calculations that take the 'Quantity From' result of each process will be set independent of the resource
- The calculations will apply no matter the resource automatically set according to the linking with the next resource
- When selecting a process within a product's simple workflow, Odyssey will retain the list view without the need for additional pop-up modals
- When viewing Estimate or Job workflows, the result of each 'Production' process will show as a label
- Printers will no longer need to set 'Output' resources within each Production process result
Released: 2/25/2022
Version 2022.04
- Printers will see updates when accessing the 'My Products' page
- Product workflows will show existing (legacy) workflows as well as newly created 'Advanced' workflows
- Legacy workflows will have the workflow icon grayed out. This icon is meant to show these workflows were created prior to v04
- Printers may add a 'Simple' workflow as part of an 'Advanced' workflow by:
- Starting from scratch or
- Use an existing 'Simple' workflow to copy in order to edit the copied 'Simple' workflow
- Printers are now able to receive a payment at a Company or Branch level
- Invoices and credits for all customers at the Company or Branch level will be viewable based on the Company or Branch filter
- Estimates in which a price was manually overridden will show a pin icon next to the selling price
Released: 2/11/2022
Version 2022.03
- Printers will have a dashboard on the homepage of Odyssey
- Printers can pin items from the top ribbon to the middle section of the dashboard
- The left-hand vertical bar provides additional information with action buttons and recent activity
- Printers will now be able to create a 'Simple' workflow in a similar manner as to how custom estimates are created
- If processes for this simple workflow are not yet linked, they can be re-ordered by a drag-and-drop feature in the list view
- Upon processes being reordered to the correct order, they can then be automatically linked together
- There have been improvements in the 'Estimates' section, including:
- The final process of an estimate will be automatically selected when creating a custom estimate
- The printer may select post-production processes in both the list and card view of the workflow
- Once a resource is selected in the last normal process, the label indicating that this is the final product will be shown
- Additional information will be provided if a printer is not able to edit the cost of Media resources
- If the cost of a Media was never set, the 'Quick edit' feature will be disabled for Media resources without a cost
- If the Media resource has been set as 'No Cost', the 'Quick edit' feature will be disabled
- When adding a new device resource, there is now a tool-tip related to the 'Process group' drop-down under 'Base Information'
- A filter is now available related to 'Device' resources in which the printer can determine if they want to see all devices belonging to a specific process group or if the printer would rather see a list of all devices
- This will show up in a Product workflow in which a specific device has not been set
Released: 1/28/2022
Version 2022.02
- Within Accounting > Receive Payment modal, the filter to drill down to a Company, Branch, or Customer has been enhanced to mimic the Workflow tab on the website
- Typing in the 'Search' field will narrow down the Company, Branch and Customer fields to match the search
- If a Company is selected, the Branches and Customers belonging to the Company will be available to choose from
- If a Branch is selected, the Customers belonging to the branch will be available to choose from
- Device resources can belong to a 'Process Group'
- When printers are selecting a device in a Job workflow or an Estimate workflow, Odyssey will default to only show devices that belong to the process group
Released: 1/14/2022
Version 2022.01
- The printer will be able to add a 'New Estimate' from the main Estimates menu tab
- When creating an estimate from scratch, the printer will be able to pick a product order form to relate to the estimate and also choose an existing product workflow as the custom estimate workflow
- In order to pick a valid path when choosing a product order form, printers will answer the questions from the order form relating to the product.
Released: 12/30/2021
Version 2021.49
- When adding a new estimate from Odyssey, the printer will be able to see the expiration date pre-filled with the date 30 days from today
- Printers are now able to take into consideration media thickness when testing a device's speed setting
- The name of the device now shows up on the 'Run Speed' screen
- The values entered for Long Run or Fixed Speed are saved even if one of the speed settings are not being used
- Printers can now add a custom quantity calculation based on another quantity type of input question from the order form
- This feature is found within the 'Advanced Options' section of calculations
- The printer is now able to switch between two different workflow views for estimates: List view of the estimate's workflow processes or card (box) view of the estimate workflow processes
- Once the estimate workflow processes are in the needed order, the printer can now have Odyssey link the processes automatically
- The links of the estimate's workflow are marked accordingly in the 'list' view of processes
- Printers are able to add links in the 'list' workflow view of processes
- Printers are able to remove processes in the 'list' workflow view
- Printers can now link a process between two other processes and maintain the linking of the newly added process
Released: 12/17/2021
Version 2021.48
- When creating a new product workflow, there is the option to add a "Simple workflow" that will guide the printer step-by-step in setting up the simple workflow
- In the first step, the printer is able to add Production and Post-Production processes, create a new process and order the processes as needed
- In the second step, the printer is able to add resources to the inputs and outputs of the linked processes
- In the third step, the printer is able to add calculations to the resources within the processes
- When adding a new process, the printer will be able to add the processes and define the inputs and outputs in a more defined method
- When changing a Pending job's quantity, the printer will have three choices to choose from, each choice showing the price and profit change adjustment that will be set for the chosen radio button:
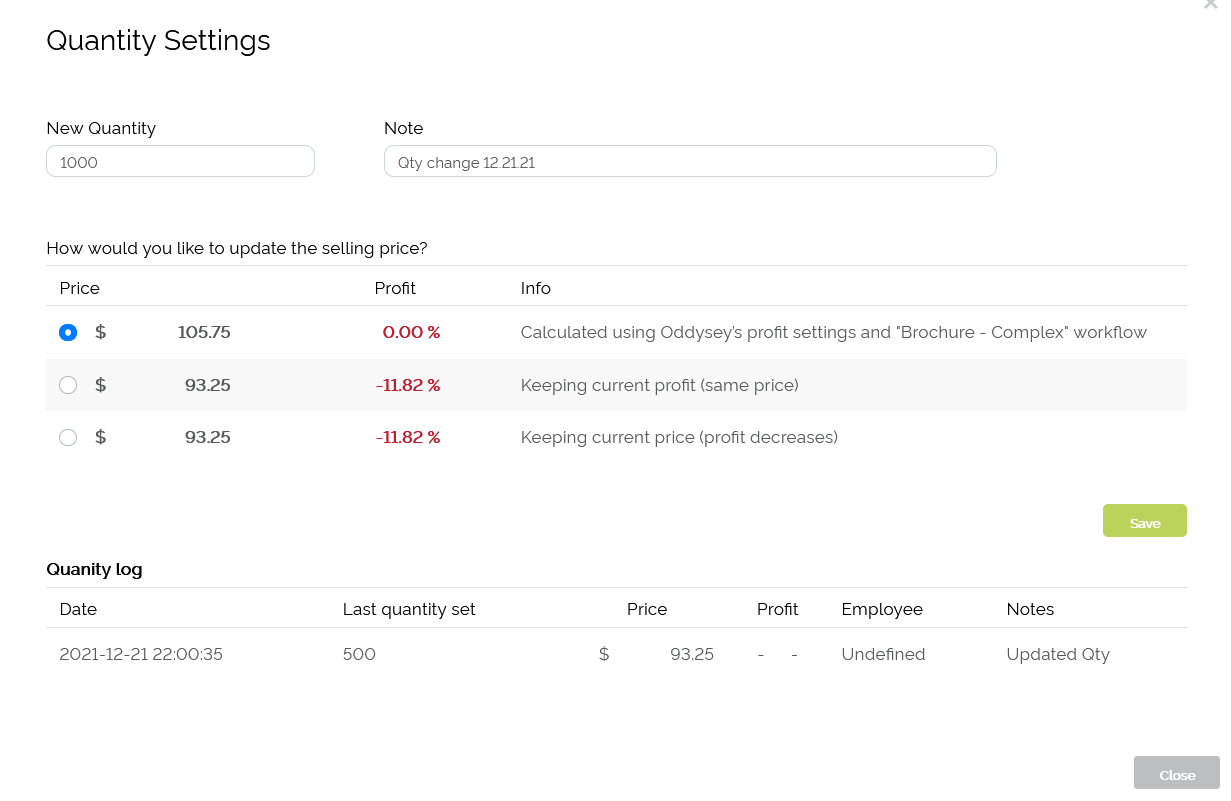
Released: 12/03/2021
Version 2021.47
- Device and Tool resources have additional speed configurations available
- While adding a new Device or Tool resource, there is a 'Run Speed' screen directly after setting up the cost for the resource
- Also, printers may select the 'clock' icon (named 'Speed Settings') to be taken directly to the 'Run Speed' screen to add/edit Run Speed settings for the resource
- Printers may now add a fixed speed or variable speed (Long Run)
- Printers may now test the run speeds added for the resource under the 'Test Your Speed' section
- Printers may now add in a 'Setup Time' that will be added to the device total time for a job
- There is now the ability to add conditions based on media thickness that may affect run speed
- Printers will now see the Selling Price within the Pending, In Progress, and Completed Jobs tabs
- The 'Selling Price' column is also sortable
- Printers will now be able to filter jobs within the Pending, In Progress, and Completed Jobs tabs by the 'Date Added' column
- Printers may now edit the 'Expiration Date' of a from-scratch estimate
Released: 11/19/2021
Version 2021.46
- Creating estimates from scratch has received many updates which includes:
- Printers are able to add a size while creating an estimate from scratch. This can be a predefined size from a list of common sizes or a custom size
- Additional configurations are now available to be set before the estimate from scratch workflow screen:
- Printers can reorder the processes into the order they choose
- Processes can be opened up to see their Inputs and Outputs
- The printer will be able to set resources for the processes
- The printer can set which process contains the finished size
- The printer will be able to add notes to processes
- Printers can now change the quantity of the first of the three estimate copies for an estimate created from scratch
- Printers are now able to add weight (in lbs) to the MiscConsumable resources when adding the resource as new or if editing the existing resource
- The changes in weight of a media resource will be reflected throughout the processes of a job workflow
- Printers can now sort the columns within 'Pending' and 'In Progress' jobs
Released: 11/5/2021
Version 2021.45
- Resources and templates now have the ability to inherit the cost from the parent template that they belong to
- Any resources and templates added under the parent template will inherit the cost from the parent template by default
- Printers can decide if when creating a new resource that is to belong under a template, if they do not want the resource to inherit the cost from the parent template
- The printer can now add in costs for a resource during the process of adding a new resource
- The cost icon ($) or 'Cost Settings' tab when selected, will take a printer directly to the 'Resource Cost' screen of the resource
- Printers will now have a 'Cost log' showing all changes made to the cost of media resources
Released: 10/22/2021
Version 2021.44
- Printers will be able to view the media resource group screen between two tabs: the first one with all their papers; the second one with all their templates
- In the 'Templates' tab (of media resources), printers will be able to select a template to see the templates under this template and its resources
- The media resources are presented in a table with the main columns defined, one of which is the cost that printers will be able to change with a 'Quick edit' button as a bulk action
- The columns in the list of media resources can now be reordered
- Printers will now be able to filter the media resources list by tags, paper type and availability
- Printers will now be able to search for a specific media resource using the 'Search' function on the main media resources page
- Printers will now be able to export the list of media resources as a CSV or PDF file
- The style of the buttons that allow printers to 'Start' and 'Complete' processes in a job have been changed to more clearly define a process has not been started, has been started and has been completed
- Printers will see a friendly and more informative error screen when a job cannot be opened for a specific workflow
- The list of 'Requested' estimates is more evenly distributed on the screen
- The cost associated with the product (set in My Products > Cost Settings) will be displayed for the estimates that comes from an order form that has the Cost Settings set up
- Printers will now be able to add waste (as a quantity or percentage) to calculations associated to post-production processes
- The omnisearch tool now searches within 'Files' and 'Tags'
Released: 10/8/2021
Version 2021.43
- For estimates that come in from an order form, printers will now be able to select from an existing Product workflow, a workflow from another estimate, or create a workflow from scratch to apply to this estimate
- For estimates that do not begin from an order form, printers are able to select a workflow from an existing estimate or create a workflow from scratch to apply to this estimate
- Within an estimate's workflow, a printer will be able to link a process to another without using the 'Link' modal that is found within Product workflows.
- In other words, a printer will simply be able to select the input and output to be linked directly on the estimate's workflow screen
- Within an estimate's workflow, printers will be able to see the estimate's cost, quantities, and estimated due date as soon as the printer makes a change to the workflow
- Within an estimate's workflow, printers will be able to create two additional quantities to compare costs and estimated delivery date between three total quantities
- Within an estimate's workflow, printers may now approve the original quantity or one of the other two quantities on behalf of the printbuyer
- Within an estimate's workflow, printers may change the price for any of the three quantities
- Within an estimate's workflow, printers may adjust the quantity for the 2nd and 3rd quantity
- In the Estimates > Requested screen, printers will now be able to open the 'Estimate' modal once they have configured a workflow for the estimate
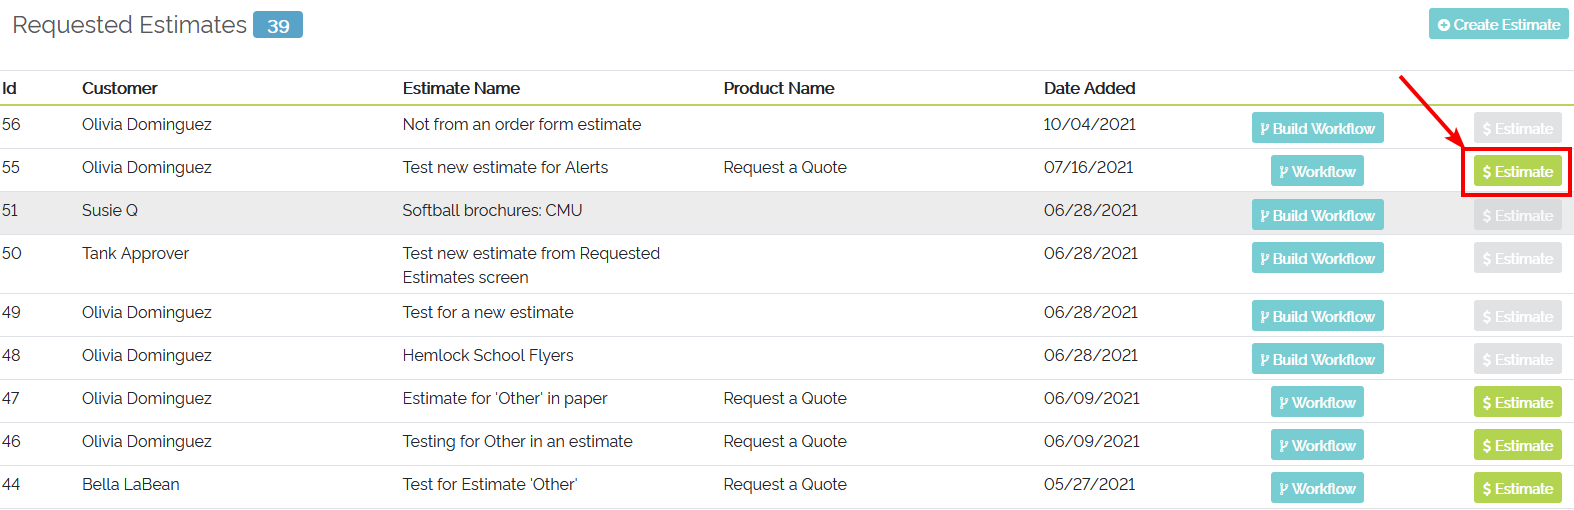
Estimate modal will be available when a workflow has been created for an estimate
Released: 9/29/2021
Version 2021.42
- Printers will see an Alert when the printbuyer answers a question from within the 'Questions that need to be answered' section of their Account
- Printers will now be able to select multiple resources at once to add tags
- Printers will have new tagging functionality to add, rename, and delete tags from resources
- When adding or editing a single resource, printers will be able to see the tag(s) that are assigned to the resource
- When selecting resources, printers will see the already added tags that can be selected to add for additional resources under 'Add tags'
- Tags added at the template level will be inherited for resources added to the same template
- When adding a unit of measurement for a resource, the printer will see a drop-down with the units available to choose from
- When opening a job workflow, an error message will be provided if the conditions to apply in the product workflow results in more than one valid path that the job can take
- This would be regarding a specific node and it's associated conditions to apply needing to be reviewed
- Odyssey will also provide a direct link to the product workflow from the error message
- Printers will now see a list of processes and nodes on the left-hand side of the screen within a product workflow
- Printers will now be able to mark a process as 'post-production' or 'process'
- This replaces printers having to mark a process considered the 'final' process
- Post-processes will show as blue
Released: 9/10/2021
Version 2021.41
- Printers will now see a 'Due Date' and 'Estimated Completion Date' column within 'Pending' and 'In Progress' Jobs tabs
- Employees that have been assigned a task for a job will now see the job's 'Due Date' and 'Estimated Completion Date' within their 'My Calendar' pop-up modal
- While in the 'Calculations' modal of a resource within a workflow, printers can now sort the 'Resource' and 'From' columns ascending or descending
- Printers may now add a 2nd question from the order form as part of the calculation
- Example: A printbuyer may order 10 sets of blueprints with 10 pages per set. The final quantity of the order is still '10' but Odyssey will be able to multiple the 10 sets x the 10 pages to come up with a total quantity for the needed calculation(s)
- Printers will see the Alert messages have been updated to the following format: "There is a new <order, estimate> with Job ID: <###> requested on <year-month-day> from <customer>. It's ready to go."