
Conditional Workflows
Conditional Workflows are similar to 'regular' workflows except you can create “conditions.” These conditions will allow Odyssey to automatically determine which process a job will use based on set conditions.
For example, if the print buyer is ordering less than 2,000 brochures (or the
quantity of choice), you can set up a conditional workflow (using 'Conditions to Apply') within Odyssey to automatically go the route of digital printing. If the quantity needed is over 2,000, you can set up 'Conditions to Apply' for Odyssey to automatically adjust to follow the path of offset printing based on the condition you set.
Let's have a look at Conditions to Apply in the below video:
Example #1: Setting up 'Conditions to Apply' for Digital Printing vs Offset Printing process
In this example, "Conditions to Apply" are set up to have the job run either Digital or Offset based on the quantity entered on the website order form.
To add a Quantity-based Conditions to Apply for the Digital Printing process:
- Ensure needed nodes are present and connected to the proper processes in the workflow
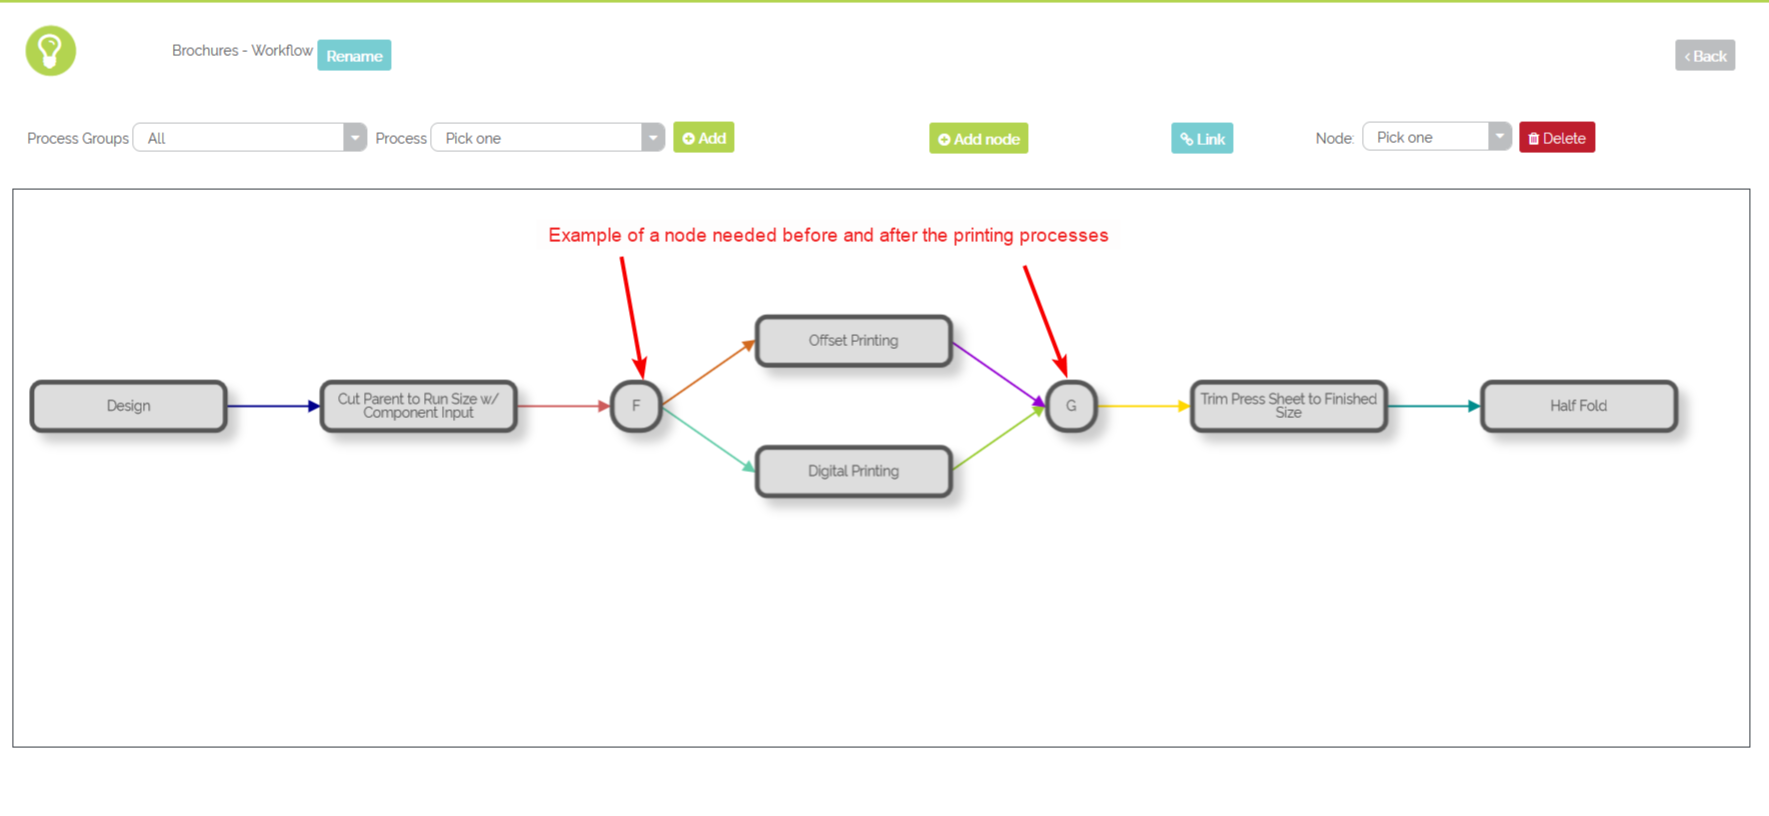
Example of a workflow with a node before and after multiple processes that could be chosen based on an order form selection/entry
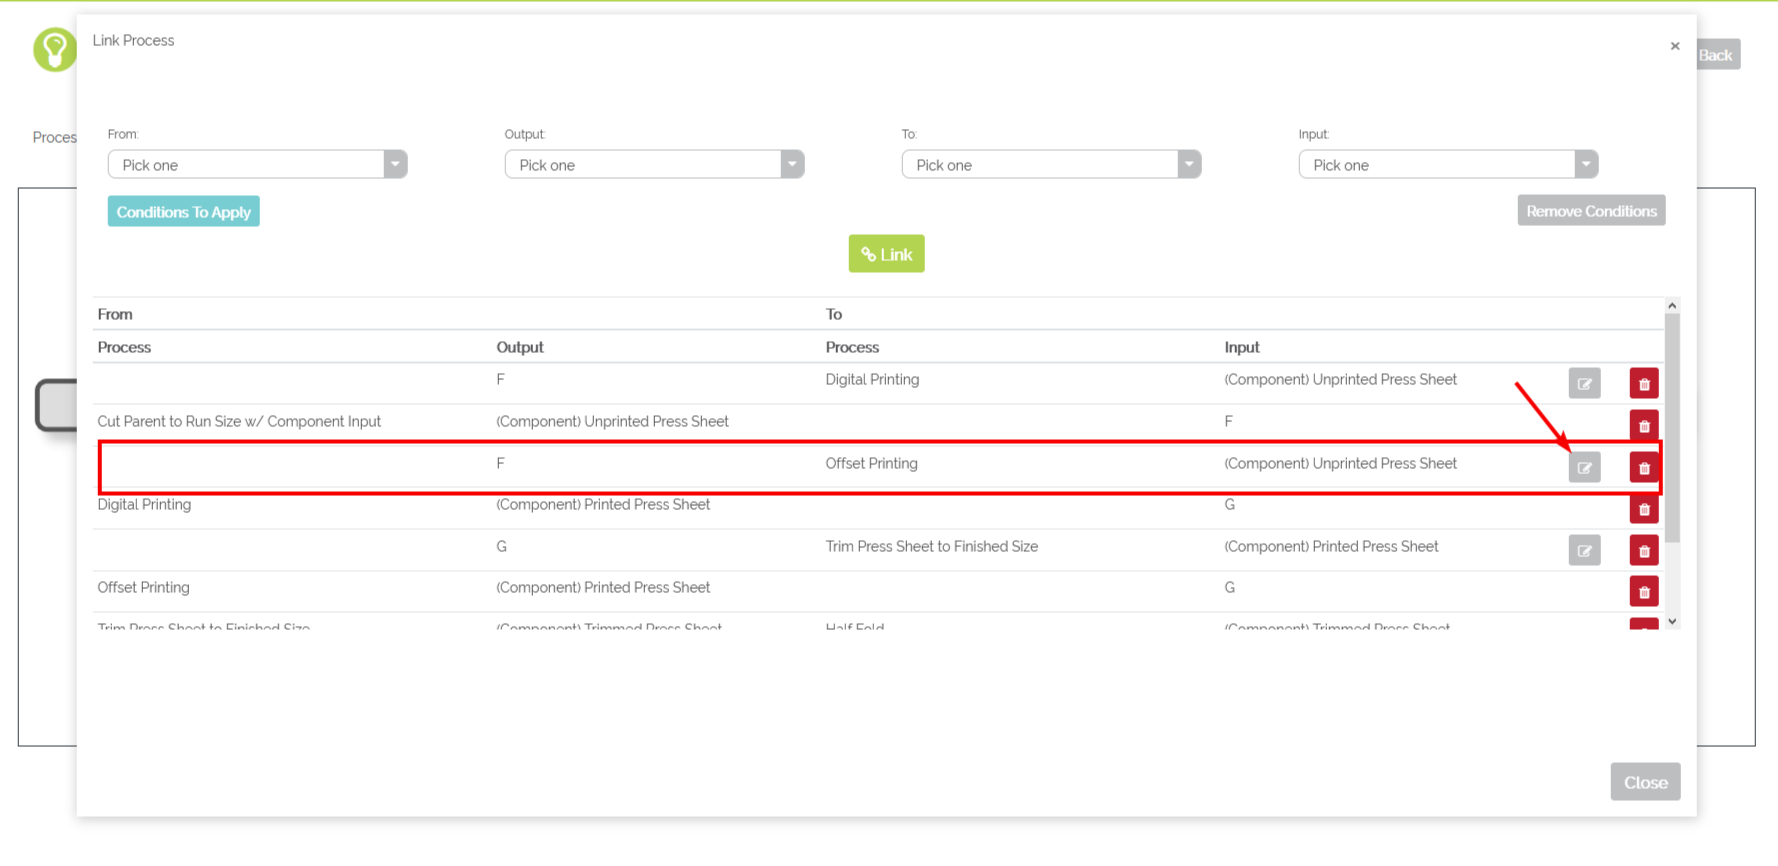
- Select the 'Link' button next to 'Add node'
- Select the edit pencil icon in the line that refers to Output <Node> to the To Process 'Digital Printing'

Edit the line related to the Digital Printing as the 'To Process'
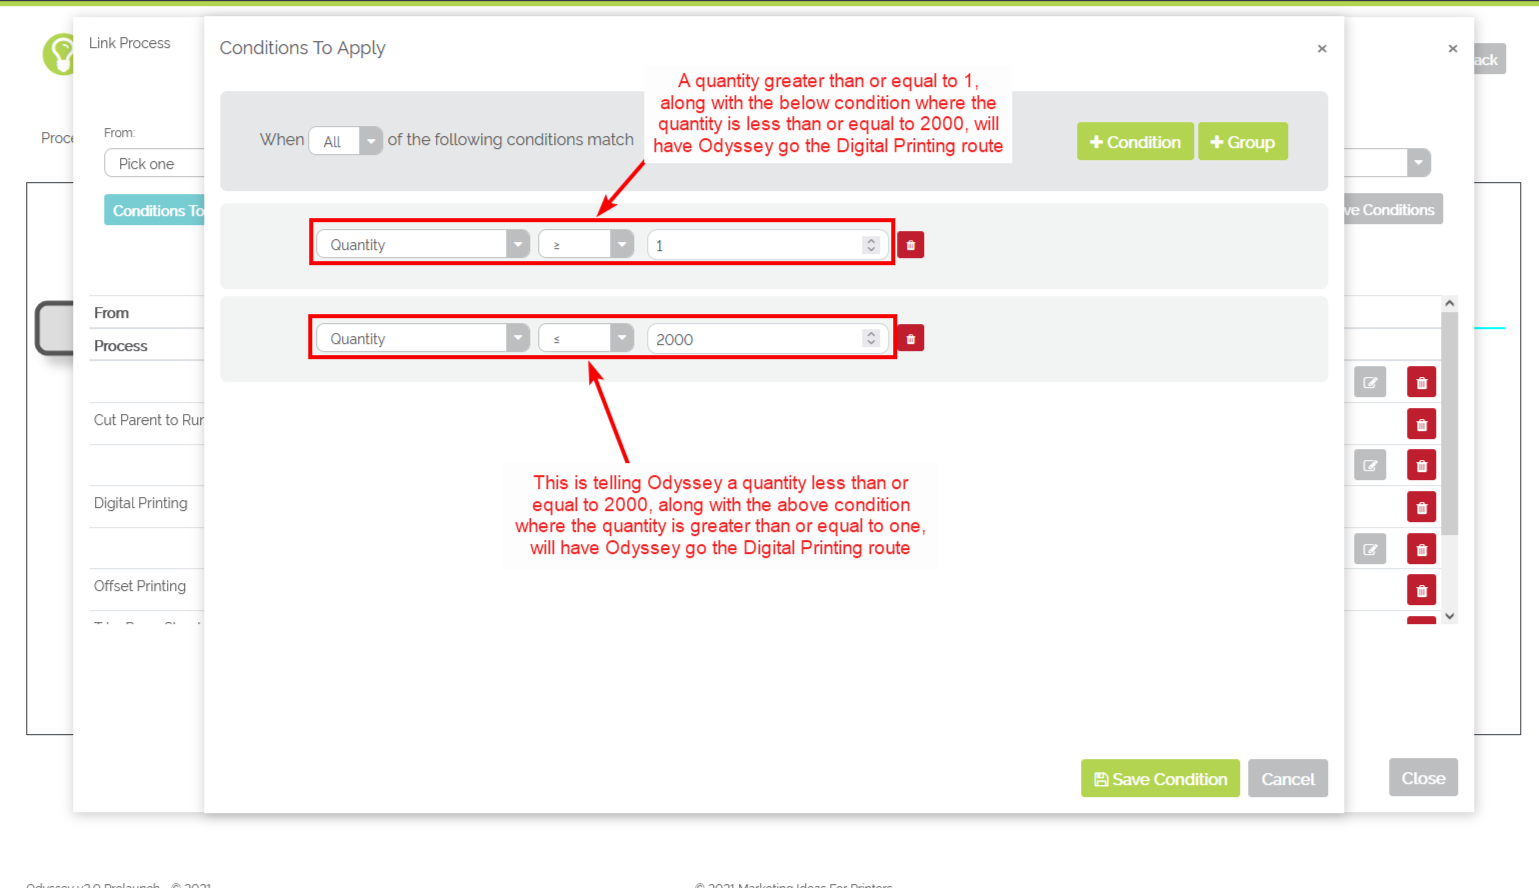
- Ensure 'When All of the following conditions match' is set to 'All'
- Select the 'Condition' icon

- Select 'Quantity' in the 1st drop-down under '-Select criteria-'
- Select the operator 'greater than or equal to'

- Set the 3rd field to 1
- Select the 'Condition' icon

- Select 'Quantity' in the 1st drop-down under '-Select criteria-'
- Select the operator 'less than or equal to'

- Set the 3rd field to 2000
- This is telling Odyssey when the Quantity on the order form is greater than or equal to 1 and less than or equal to 2000, to go the Digital Printing process route
- Select 'Save Condition'
Enter in the Min and Max Quantity that will dictate when the Digital Printing process will run
To add Conditions to Apply for the Offset Printing process:
- Ensure needed nodes are present and connected to the proper processes in the workflow
- Select the 'Link' button next to 'Add node'
- Select the edit pencil icon in the line that refers to Output <Node> to the To Process 'Offset Printing'
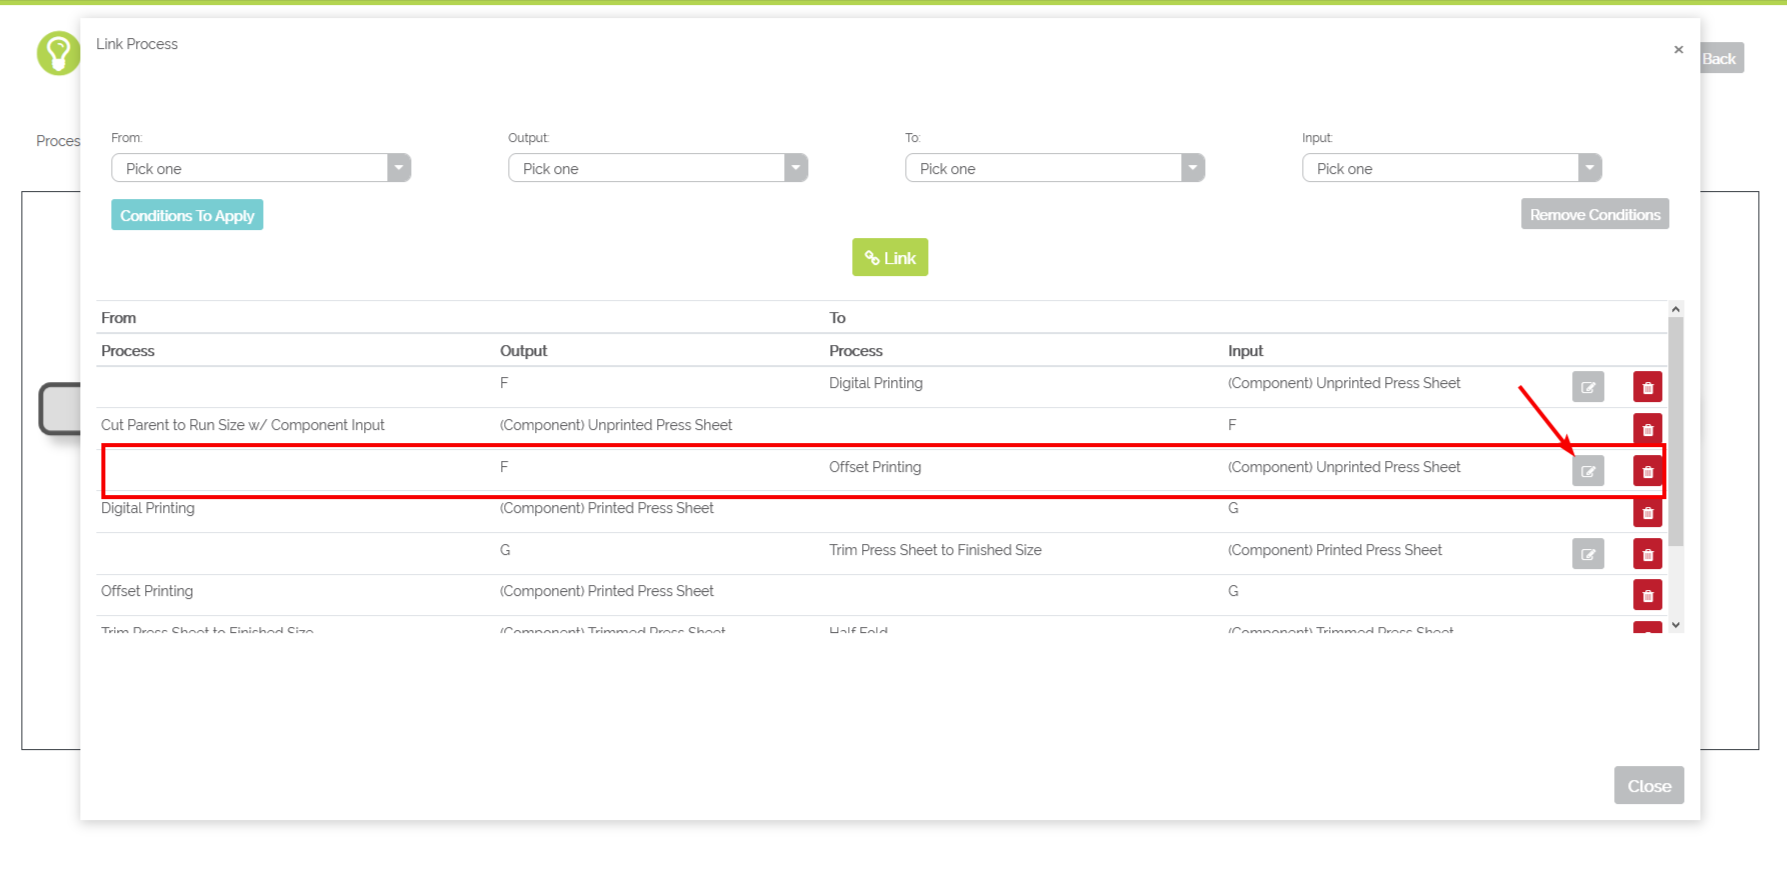
Edit the line related to the Offset Printing as the 'To Process'
- Select the 'Condition' icon

- Select 'Quantity' in the 1st drop-down under '-Select criteria-'
- Select the operator 'greater than or equal to'

- Set the 3rd field to 2000
- This is telling Odyssey when the Quantity on the order form is greater than or equal to 2000, to go the Offset Printing process route
- Select 'Save Condition'
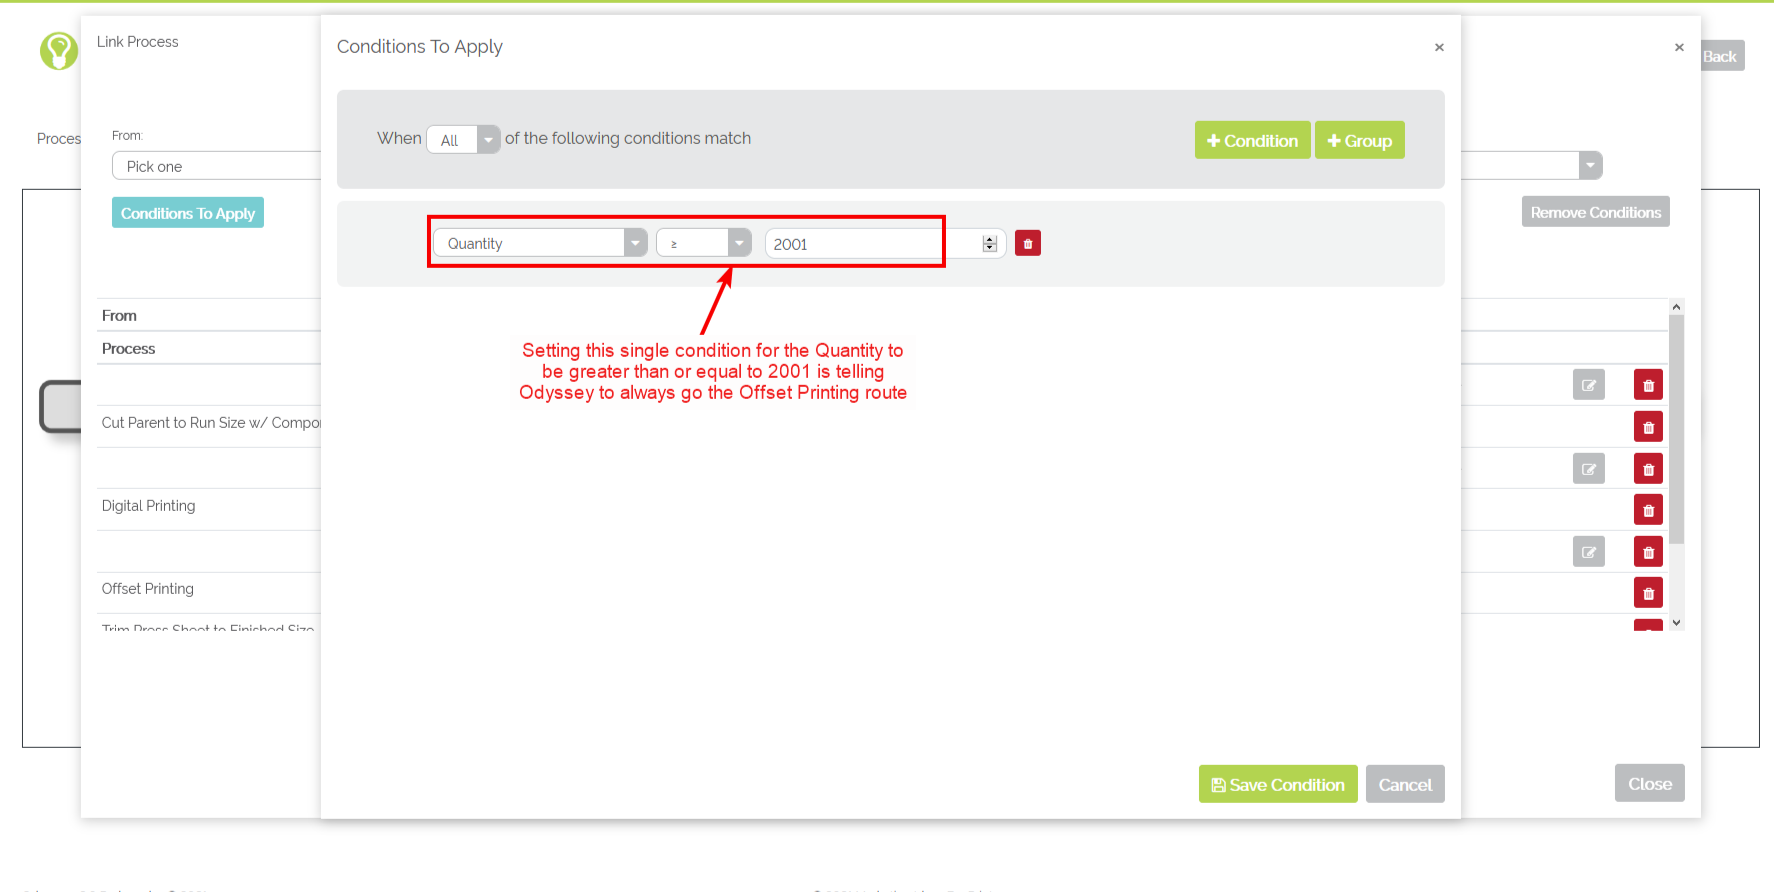
Enter in the Min and Max Quantity that will dictate when the Offset Printing process will run
Example #2: Setting up 'Conditions to Apply': Connect 'Color Options' order form answers to Odyssey
In this example, "Conditions to Apply" are set up to have the job run either Digital or Offset based on the quantity entered on the order form in addition to the color choice the print buyer chooses. The 'Color Options' question is typically based off of a 'Color Picker' type of question.

Conditions to Apply will be based on the Quantity entered, in addition to the color section (above)
the print buyer chooses on the order form
To set up Conditions to Apply for Digital Printing:
- Ensure needed nodes are present and connected to the proper processes in the workflow
- Select the 'Link' button next to 'Add node'
- Select the edit pencil icon in the line that refers to Output <Node> to the To Process 'Digital Printing'

Edit the line related to the Digital Printing as the 'To Process'
- Ensure the drop-down is set to 'All' in the sentence 'When All of the following conditions match'
- Enter in the Minimum Quantity allowed for the Digital Printing process to be used for this workflow by setting the following condition up:
- Select the 'Condition' icon

- Select 'Quantity' in the 1st drop-down under '-Select criteria-'
- Select the operator 'greater than or equal to'
- Set the 3rd field to 1
- Select the 'Condition' icon
- Enter in the Maximum Quantity allowed for the Digital Printing process to be used for this workflow by setting the following condition up:
- Select the 'Condition' icon

- Select 'Quantity' in the 1st drop-down under '-Select criteria-'
- Select the operator 'less than or equal to'
- Set the 3rd field to 2000
- Select the 'Condition' icon
- Select the
 icon
icon - Select 'Or' from the first drop-down
- Select 'Color Options' from the '-Select criteria-' drop-down
- Select 'One-Color Front - Unprinted Back' in the '-Select Value-' drop-down
- Select the green
 icon to the right of the 'One-Color Front - Unprinted Back' answer that was just assigned to the previous condition
 - Select 'Color Options' from the '-Select criteria-' drop-down
- Select 'One-Color Front - One-Color Back' in the '-Select Value-' drop-down
- Select the green icon to the right of the 'One-Color Front - One-Color Back' answer that was just assigned to the previous condition
- Select 'Color Options' from the '-Select criteria-' drop-down
- Select 'Full-Color Front - Unprinted Back' in the '-Select Value-' drop-down
- Select the green icon to the right of the 'One-Color Front - One-Color Back' answer that was just assigned to the previous condition
- Select 'Color Options' from the '-Select criteria-' drop-down
- Select 'Full-Color Front - One-Color Back' in the '-Select Value-' drop-down
- Select the green icon to the right of the 'One-Color Front - One-Color Back' answer that was just assigned to the previous condition
- Select 'Color Options' from the '-Select criteria-' drop-down
- Select 'Full-Color Front - Full-Color Back' in the '-Select Value-' drop-down
- Select 'Save Condition'

The 'Conditions to Apply' for 5 Color Options answers on the order combined with the Min and Max Quantity
To set up Conditions to Apply for Offset Printing:
- Ensure needed nodes are present and connected to the proper processes in the workflow
- Select the 'Link' button next to 'Add node'
- Select the edit pencil icon in the line that refers to Output <Node> to the To Process 'Digital Printing'
Edit the line related to the Offset Printing as the 'To Process'
- Ensure the drop-down is set to 'All' in the sentence 'When All of the following conditions match'
- Enter in the Minimum Quantity allowed for the Offset Printing process to be used for this workflow by setting the following condition up:
- Select the 'Condition' icon
- Select 'Quantity' in the 1st drop-down under '-Select criteria-'
- Select the operator 'greater than or equal to'
- Set the 3rd field to 2001
- Select the 'Condition' icon
- Select the icon
- Select 'Or' from the first drop-down
- Select 'Color Options' from the '-Select criteria-' drop-down
- Select 'Two-Color Front - Unprinted Back' in the '-Select Value-' drop-down
- Select the green icon to the right of the 'One-Color Front - Unprinted Back' answer that was just assigned to the previous condition
- Select 'Color Options' from the '-Select criteria-' drop-down
- Select 'Two-Color Front - Two-Color Back' in the '-Select Value-' drop-down
- Select the green icon to the right of the 'One-Color Front - One-Color Back' answer that was just assigned to the previous condition
- Select 'Color Options' from the '-Select criteria-' drop-down
- Select 'Two-Color Front - One-Color Back' in the '-Select Value-' drop-down
- Select the green icon to the right of the 'One-Color Front - One-Color Back' answer that was just assigned to the previous condition
- Select 'Color Options' from the '-Select criteria-' drop-down
- Select 'Full-Color Front - Two-Color Back' in the '-Select Value-' drop-down
- Select 'Save Condition'
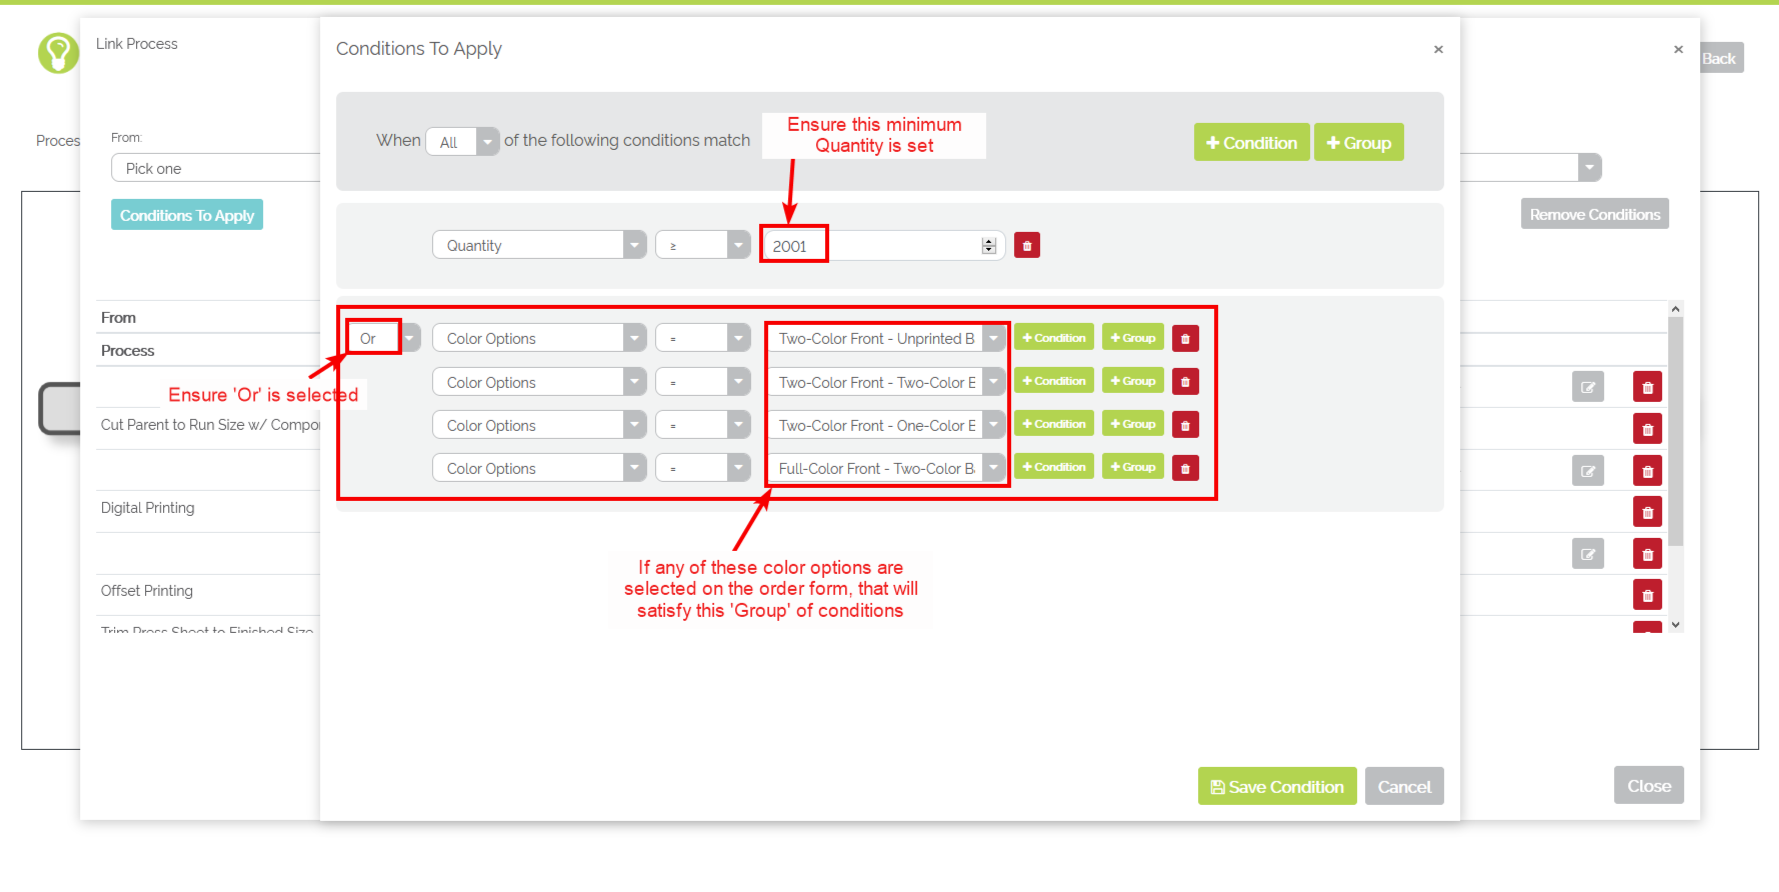
The 'Conditions to Apply' for 4 Color Options answers on the order combined with the Min and Max Quantity
Example #3: Setting up 'Conditions to Apply': Connect Folding Options order form answers to Odyssey
In this example, "Conditions to Apply" are set up to have Odyssey choose which folding process will be used depending on the 'Folding Options' answer chosen on the order form.

Folding Options question on an order form
To add Conditions to Apply for a folding process:
- Ensure needed nodes are present and connected to the proper processes in the workflow

There are 9 folding processes to connect to 9 order form answers via 'Conditions to Apply'
- Select the 'Link' button next to 'Add node'
- Select the edit pencil icon in the line that refers to Output <Node> to the To Process 'Half-Fold'
- Select the
 icon
icon - Select 'Folding Options' from the '-Select criteria-' drop-down
- Select 'Half-Fold' in the '-Select Value-' drop-down
- Select 'Save Condition'
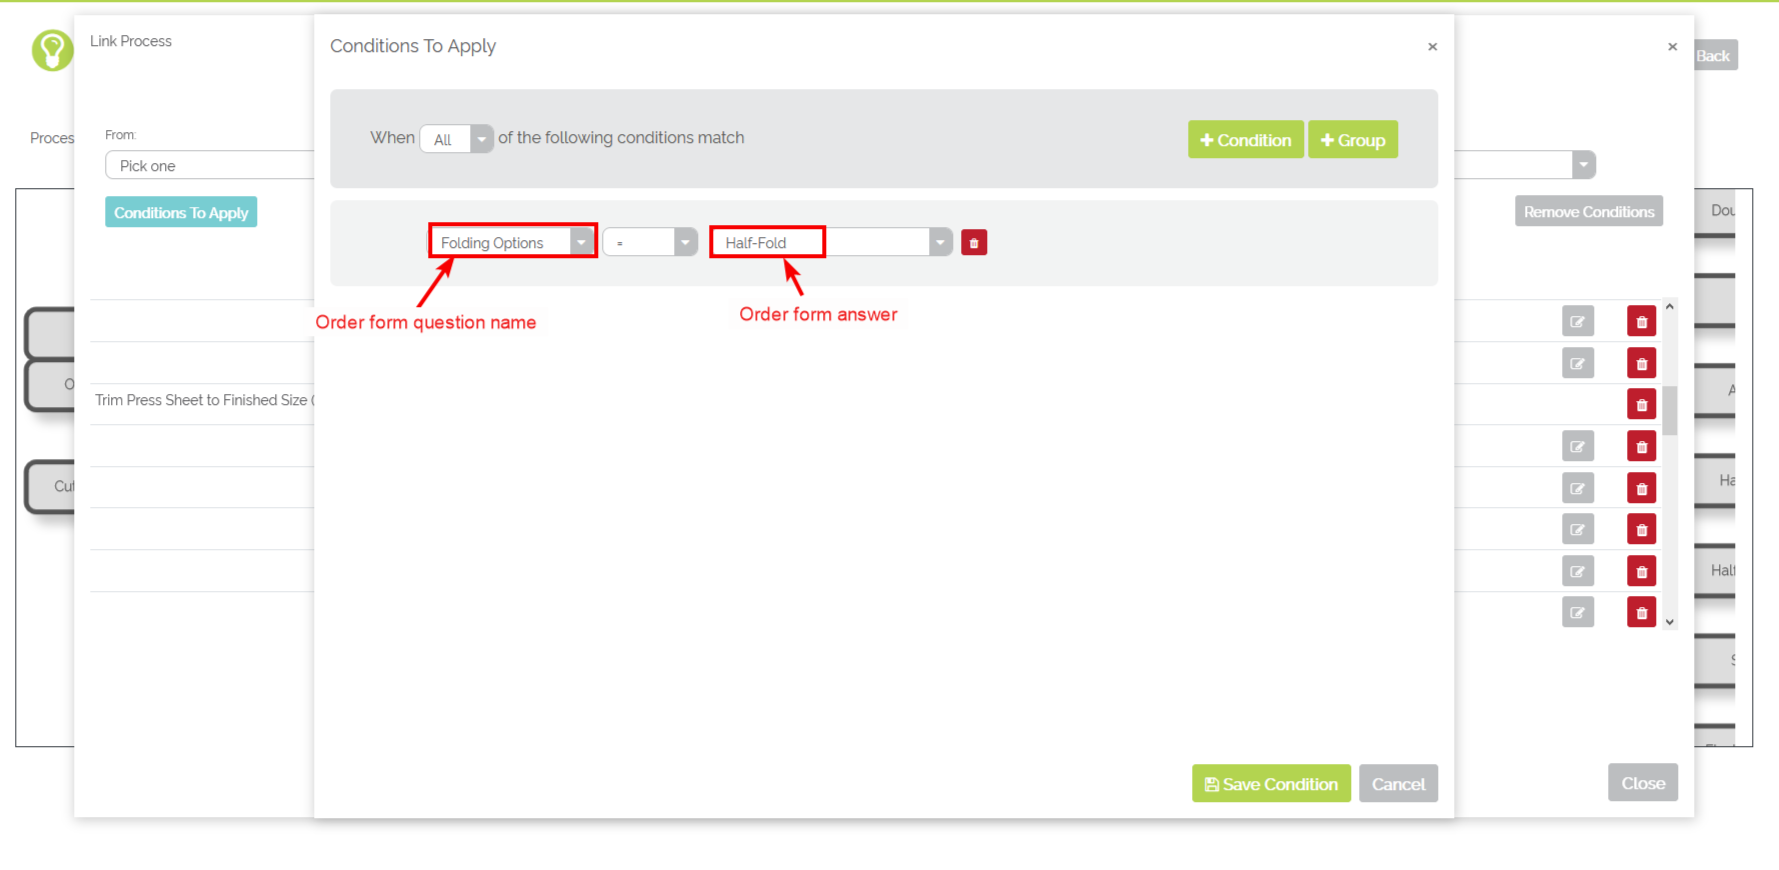
Setting the Conditions to Apply for the Half Fold process
- Repeat the above steps to set the Condition to Apply for the remaining folding processes in the workflow
Example #4: Setting up 'Conditions to Apply': Connect 'Turnaround Times' order form question to a base cost in Odyssey
In this example, "Conditions to Apply" are set up with a base cost for each 'Turnaround Times' answer selected. This will ensure your print buyers are charged the necessary cost for the 'Turnaround Times' answer they choose on the order form.

Turnaround Times question on an order form
To add Conditions to Apply for Turnaround Times answers:
- Select the 'Printshop' tab
- Select 'My Products'
- Use the filters on the left under 'My Products' to drill down to the needed order form
- Select the 'Cost Settings' tab next to the 'Workflows' tab for the order form needing conditions set for the Turnaround Times answers
- Select 'Add new cost calculation'
- Provide a name for this calculation
- Toggle it to 'Enabled'
- If you don't want to use this new calculation right away, keep it toggled to 'Disabled'
- Assign a chart of account under the 'Account' drop-down
- Select the radio button next to 'Base cost'
- Enter in a value (in $) you would like this base cost to be assessed on the order form
- This would be the amount you need to charge your print buyers when they choose the Turnaround Times answer specified below
- Select the
 icon
icon - Select 'Turnaround Times' from the '-Select criteria-' drop-down
- The Turnaround Times question may also be named such as 'How soon is this needed?'
- Select 'Rush (1 Full Business Day After Proof Approval)' in the '-Select Value-' drop-down
- Answers to this question may be altered when editing the order form
- Select 'Save Calculation'

Example of a Base Cost for a Turnaround Times type of question
- Repeat the above steps to add in additional Conditions to Apply with the amount (base cost) to be associated with each Turnaround Times answer
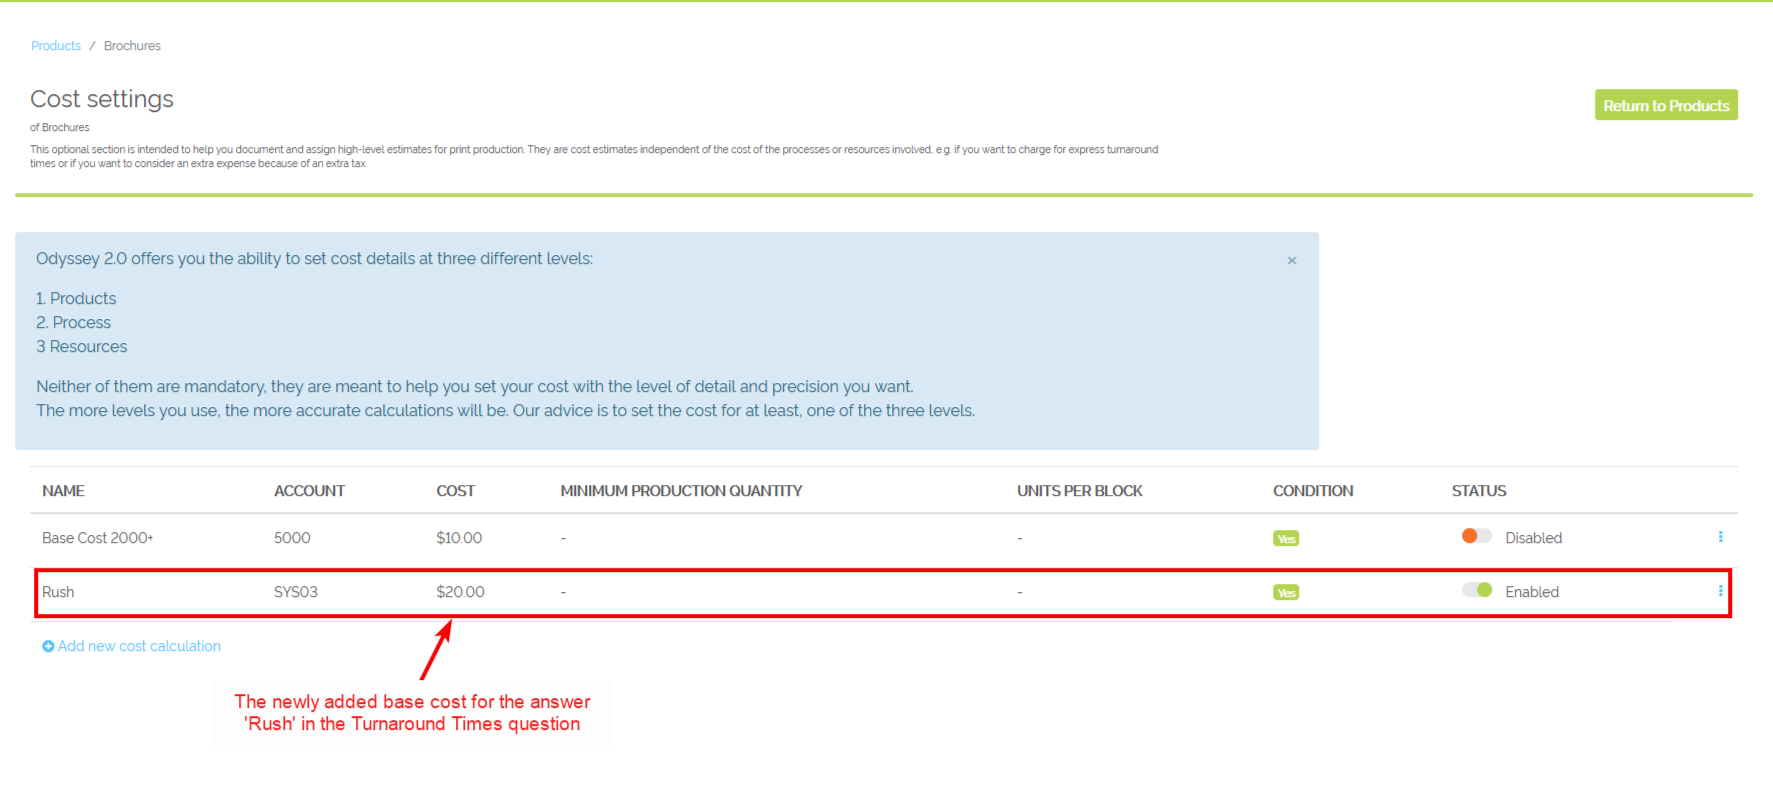
Example of a base cost for the 'Rush' Turnaround Times answers