
Step 1: Selecting or Creating a Customer
Overview: The first step in creating a new Odyssey estimate is selecting an existing customer or creating a new customer. This screen allows you to search for and select a customer or to add a new customer if they are not already in the system.
Key Features and Components
-
Select a Contact
- A list of existing contacts is displayed, from which you can choose the relevant customer.
- Search Bar: Allows you to type and search for contacts by name, email, company, or branch.
- Filter Options: Drop-down menus to filter contacts by company or branch.
-
Create New Customer Button
- A green button labeled
 to add a new contact if the desired customer is not listed.
- A green button labeled
-
Contact List
- Displays contacts with details such as name, email, phone number, company, and branch.
- Radio Button: Select the contact by clicking the radio button next to the customer’s name.
-
Navigation Controls
- Pagination controls to navigate through multiple pages of contacts.
-
Next Step Button: A green button labeled
 to proceed to the next step of the estimate creation process.
Steps to Select or Create a Customer
-
Select an Existing Customer
- Use the search bar to find the customer by typing their name, email, company, or branch.
- You can also use the filter drop-downs under 'Company' or 'Branch' to narrow down the search.
- Once the desired customer is found, click the radio button next to their name to select them.
-
Create a New Customer
- If the customer is not listed, click the
 button.
 - Fill in the required details for the new customer in the 'Add new contact' screen
- Select 'Save' to save the newly create customer
- If the customer is not listed, click the
-
Proceed to Next Step
- After selecting the existing customer or creating a new customer, click the
 button to proceed to the 'Estimate Information' screen.
- After selecting the existing customer or creating a new customer, click the

Example of the 'Select a contact' screen
Step 2: Entering Estimate Information
Overview: The next step in creating a new estimate in Odyssey involves entering detailed information about the estimate, including the estimate name, product details, and any additional information. This screen allows you to specify the product being estimated and input up top three quantities for the estimate.
Key Features and Components
-
Customer Information
- Displays the selected customer's name and contact information at the top right of the screen for reference.
-
Estimate Information Section
- Estimate Name: Enter a name for the estimate (e.g., "Summer Brochures").
- Estimate Date: Automatically populated with the current date.
- Estimate Expiration Date: Enter the date when the estimate expires; this can be adjusted if needed.
-
Product Information Section
- Product: Select the product this estimate is needed for from the drop-down list.
- Quantity 1, Quantity 2, Quantity 3: Enter different quantities for the estimate (e.g., 500, 1000, 2000).
-
Additional Information Section
- Notes: Add any additional notes or special instructions related to the estimate.
-
Navigation Controls
- Previous Step Button: A button to go back to the previous step.
-
Next Step Button: A green button labeled
 to proceed to the next step of the estimate creation process.
Steps to Enter Estimate Information
-
Enter Estimate Name
- Type a descriptive name for the estimate in the
Estimate Namefield.
- Type a descriptive name for the estimate in the
-
Specify Estimate Expiration Date
- Adjust the
Estimate Expiration Date(if needed) to specify how long the estimate is valid.
- Adjust the
-
Select a Product
- Click on the drop-down menu under
Productand select the appropriate product for the estimate (e.g., Brochures).
- Click on the drop-down menu under
-
Enter Quantities
- Input the desired quantities in the
Quantity 1,Quantity 2, andQuantity 3fields.- These can be different quantities to provide the customer with options (e.g., 500, 1000, 2000).
- Only 'Quantity 1' is required.
- Input the desired quantities in the
-
Add Additional Information
- If there are any special instructions or notes related to the estimate, enter them in the
Notessection.
- If there are any special instructions or notes related to the estimate, enter them in the
-
Proceed to Next Step
- After completing all the required fields, click the
 button to proceed to the next step in the estimate creation process.
- After completing all the required fields, click the
Tips for Efficient Use
- Ensure that all mandatory fields (marked with a red asterisk) are completed before proceeding.
- Use the
Notessection to capture any specific requirements or instructions that need to be considered.
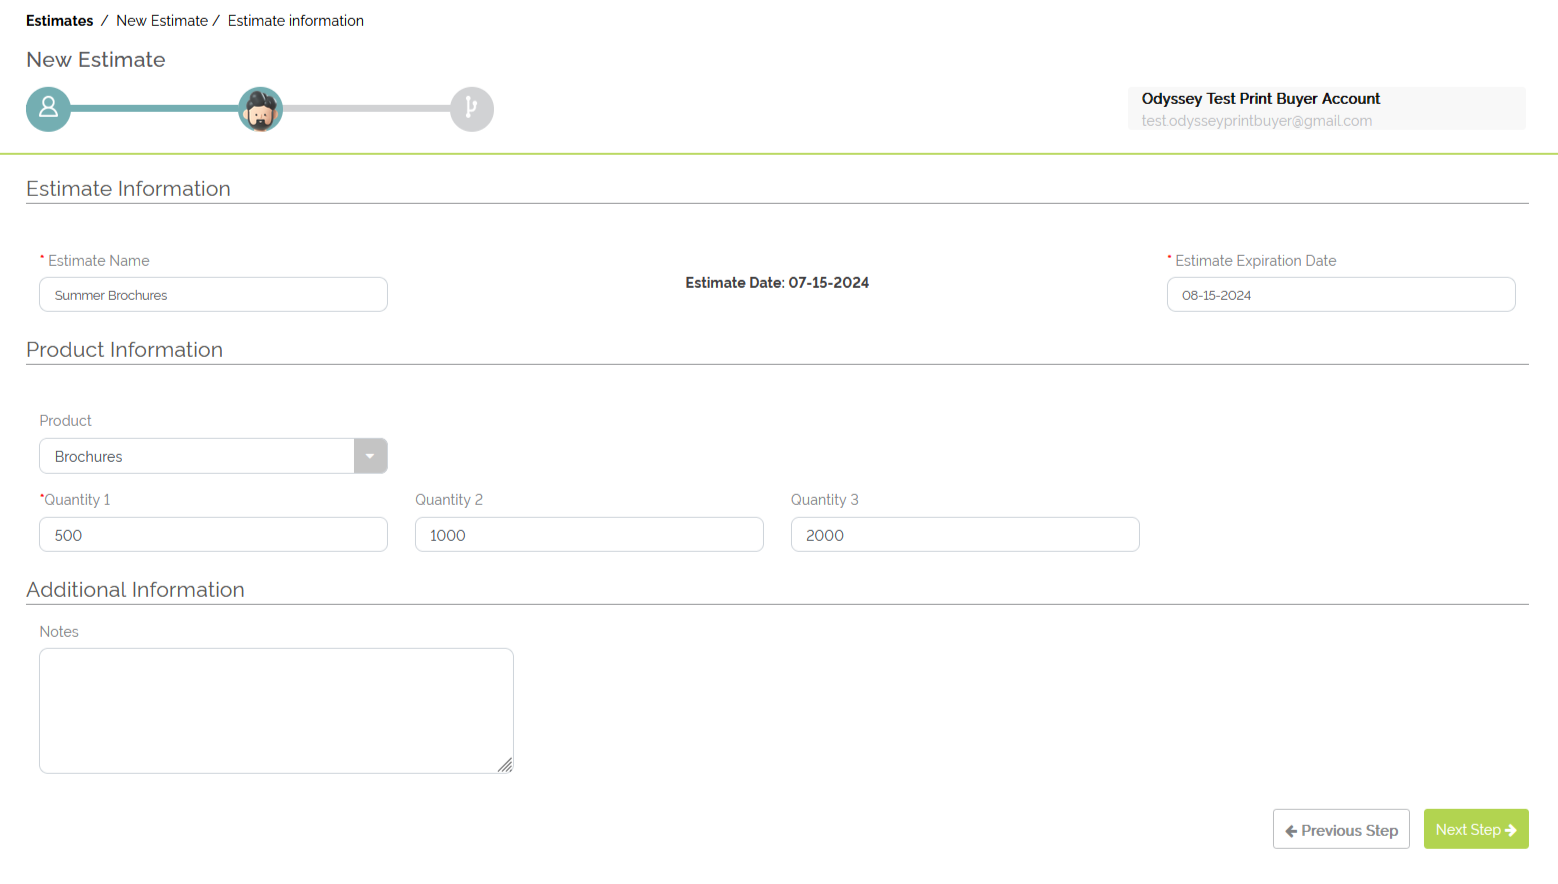
Example of choosing 'Brochures' product for an estimate workflow
Step 3: Selecting a Workflow Path
Overview: The third step in creating a new estimate in Odyssey involves selecting an appropriate workflow path for the product. This step allows you to choose from predefined workflow paths, custom workflows, or start with an empty workflow.
Key Features and Components
-
Customer Information
- Displays the selected customer's name and contact information at the top right of the screen for reference.
-
Estimate Information Section
- Displays the estimate name and quantities previously entered.
-
Workflow Path Selection
-
Select an Option to Start: Provides different options to begin the workflow selection process:
- Workflows for [Product Name]: Predefined workflows specific to the selected product (e.g., Brochures).
- All Custom Workflows: List of all available custom workflows.
- Custom Estimates Workflows: Custom workflows tailored for estimating.
- Custom Jobs Workflows: Custom workflows designed for job processing.
- Start with an Empty Workflow: Option to create a workflow from scratch without using predefined workflow paths.
-
Select an Option to Start: Provides different options to begin the workflow selection process:
-
Workflow Paths and Processes
- Workflow Paths for [Product Name]: Displays available workflow paths specific to the product (e.g., Digital Brochures workflow path).
- Processes in this Workflow Path: Lists the steps included in the selected workflow path.
Navigation Controls > Continue Button: A green button labeled
 to proceed with the selected workflow.
Steps to Select a Workflow Path
-
Select an Option to Start
- Choose one of the options to begin the workflow selection:
- Workflows for [Product Name]: Select to view and select a predefined workflow path for the product.
- All Custom Workflows: Select to view all custom workflows available.
- Custom Estimates Workflows: Select to use a custom estimate workflow.
- Custom Jobs Workflows: Select for use a custom job workflow.
- Start with an Empty Workflow: Select to create a new workflow from scratch.
- Choose one of the options to begin the workflow selection:
-
Choose a Workflow Path
- If a workflow path for the product was chosen, choose the appropriate workflow path from the list (e.g., Digital Brochures).
-
Review Processes in Workflow Path
- Review the steps listed under "Processes in this Workflow Path" to ensure it matches the requirements for the estimate.
-
Proceed with Selected Workflow
- Click the
 button to proceed with the selected workflow path.
- Click the

Example of selecting a 'Digital Brochures' workflow path to be used for a 'Brochures' estimate workflow
Tips for Efficient Use
- Select predefined workflow paths for commonly used products to save time.
- Use custom workflows if you have specific requirements that pre-made workflow paths do not cover.
- Starting with an empty workflow allows for maximum customization.
Step 4: Filling Out the Order Form
Overview: After selecting an existing workflow path (e.g., Digital Brochures), the next step involves filling out the order form questions to ensure all necessary details are captured accurately for the estimate workflow. This form collects specific information about the product to customize the estimate workflow accordingly.
Steps to Fill Out the Order Form
-
Enter Quantity
- Type the quantity needed for the product in the
Quantityfield (e.g., 500).
- Type the quantity needed for the product in the
-
Select Product Specifications (varies per workflow path selected per product)
- Size: Choose the size from the available options (e.g., 8.5 in. x 11 in.).
- Color Options: Select the color configuration (e.g., Full-Color Front - Full-Color Back).
- Paper Options: Pick the paper type from the drop-down menu (e.g., 100# Gloss Cover).
- Bleeds: Indicate whether the product has bleeds by selecting the appropriate option (e.g., No).
- Folding: Choose the folding option if needed (e.g., None).
- Shrink Wrapping: Specify if shrink wrapping is required (e.g., None).
- Aqueous Coating: Select the aqueous coating option if applicable (e.g., None).
- How Soon Is This Needed?: Choose the desired turnaround time (e.g., Economy).
-
Proceed with Order Form
- After completing all the required fields, click the
Continuebutton to proceed.
- After completing all the required fields, click the
Tips for Efficient Use
- Ensure all mandatory fields (marked with a red asterisk) are filled out accurately before proceeding.
- Review each selection carefully to ensure it matches the customer's requirements.
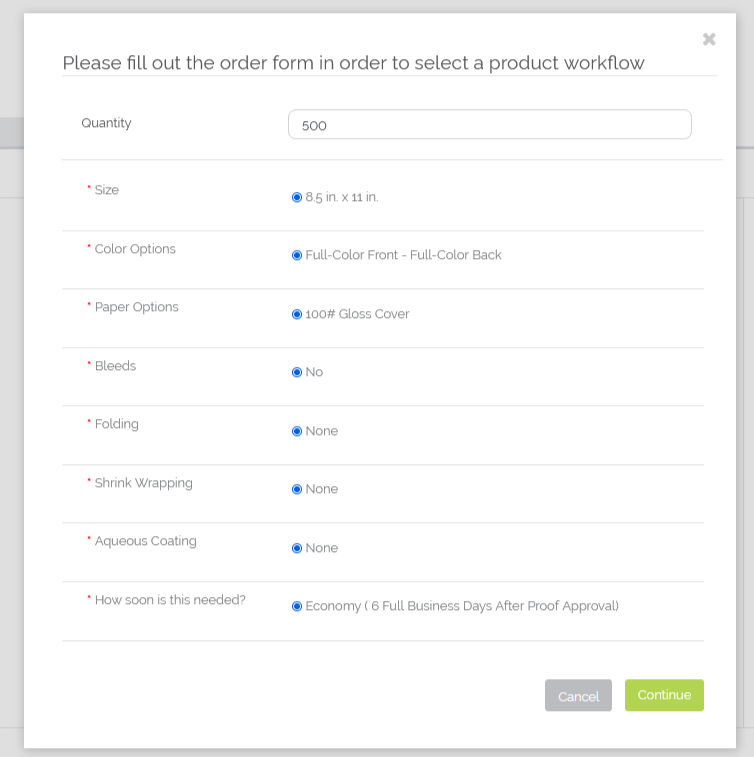
Example of a filled out order form pop-up
Step 5: Reviewing and Editing the Estimate Workflow
Overview: The final step in creating an estimate in Odyssey involves reviewing the generated estimate workflow. At this stage, you can edit the workflow, accept or reject the estimate on behalf of the customer, or send the estimate to the customer for approval.
Key Features and Components
-
Estimate Information Section
- Displays the estimate name, customer information, and key details such as quantities, selling price, cost, and profit margin.
-
Action Buttons
- Reject Button: Red button to reject the estimate on behalf of the customer.
- Accept Button: Green button to accept the estimate on behalf of the customer.
- Print/Send Button: Option to print the estimate PDF or send the estimate to the customer.
-
Product Information
- Details the product specifications, including total weight, paper information, product dimensions, and more.
-
Processes Section
- Lists the processes involved in the workflow path with options to add, remove, or edit each process.
-
Edit Workflow Controls
- Change View Button: Switch to a 'grid' view of the estimate workflow processes.
- Enable Edit Button: Allows editing of the workflow details.
- Add Process Button: Option to add more processes to the workflow.
-
Navigation Controls
- Review Paper Sizes Button: Option to review and adjust the paper calculator if needed.
Steps to Review and Edit the Estimate Workflow
-
Review Estimate Information
- Check the details displayed, including quantities, selling price, cost, and profit margin, to ensure accuracy.
-
Review Workflow Path Information
- Verify the product details, such as paper type and dimensions.
-
Edit Workflow if Necessary
- Click the
 button to make changes to the workflow.
 - Add, remove, or edit processes as needed by opening each process and/or using the icons to the right of each process.
- Click the
-
Review Paper Sizes
- If required, click the
 button to adjust the paper calculator.
- If required, click the
-
Decide on the Estimate
- Use the
 or
or  buttons to make a decision on behalf of the customer if needed.
 - Alternatively, proceed to send the estimate to the customer for their review via the button.
- Use the
-
Print/Send the Estimate
- Click the
 button to print the estimate PDF or send it to the customer.
- Click the
Tips for Efficient Use
- Double-check all details before sending the estimate to ensure accuracy.
- Use the
 button to tailor the workflow to specific customer needs.
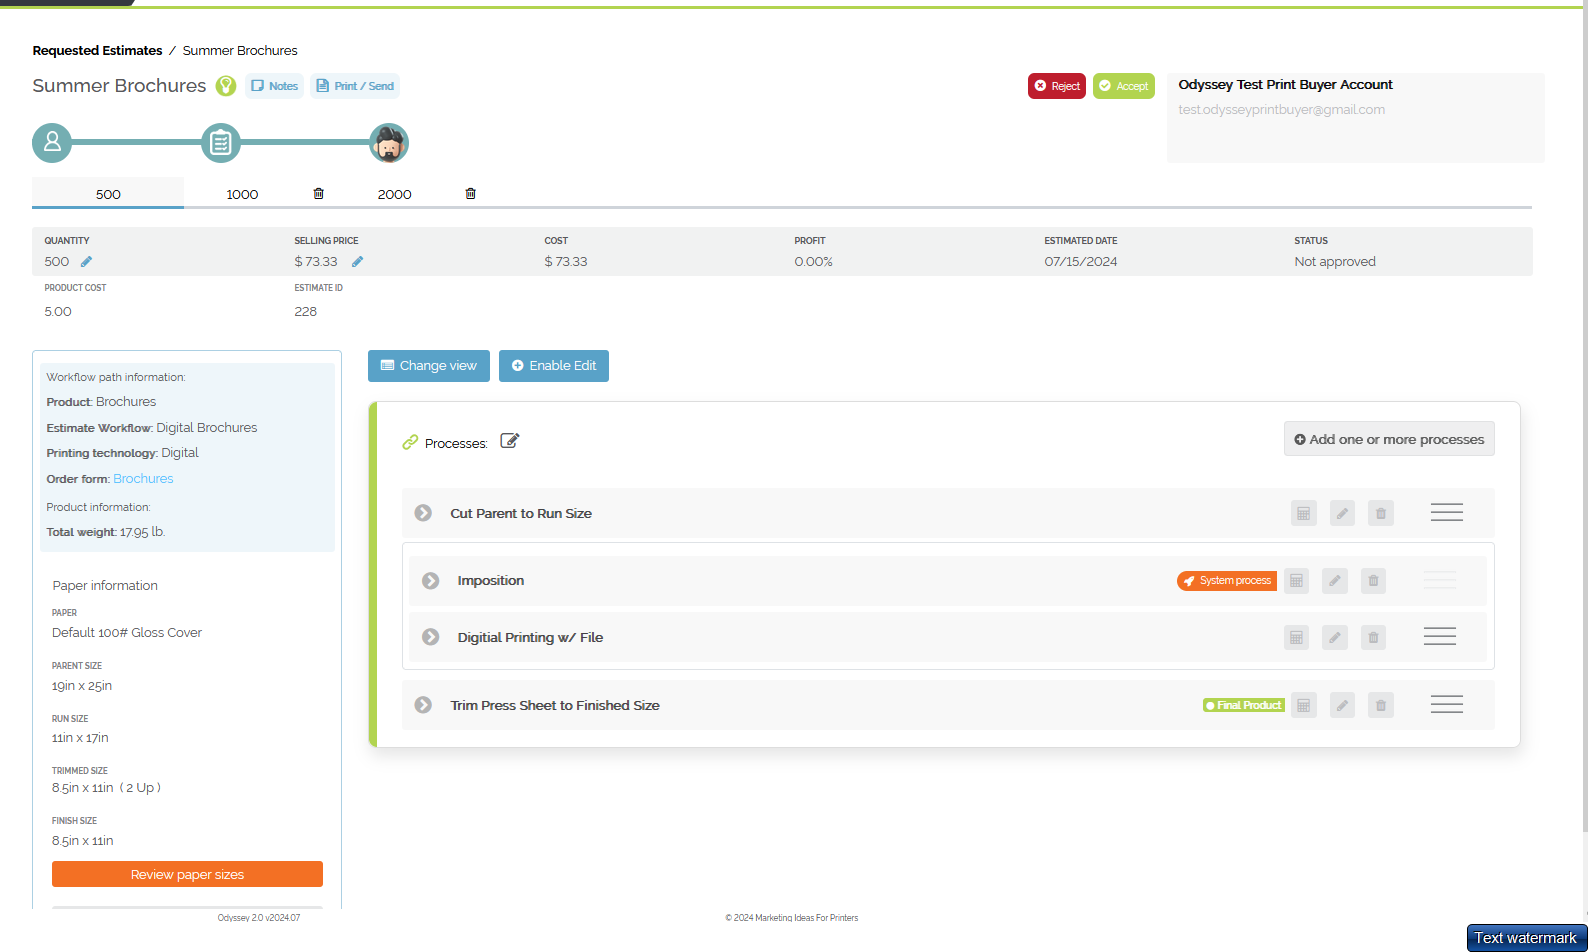
Example of an estimate workflow in the 'list' view of processes
Step 6: Sending the Estimate to the Customer
Overview: The 'Estimate ticket' screen is the final step in the estimate creation process where you can review the estimate details, send the estimate to the customer, print the estimate, or perform other actions such as approving or rejecting the estimate on behalf of the customer.
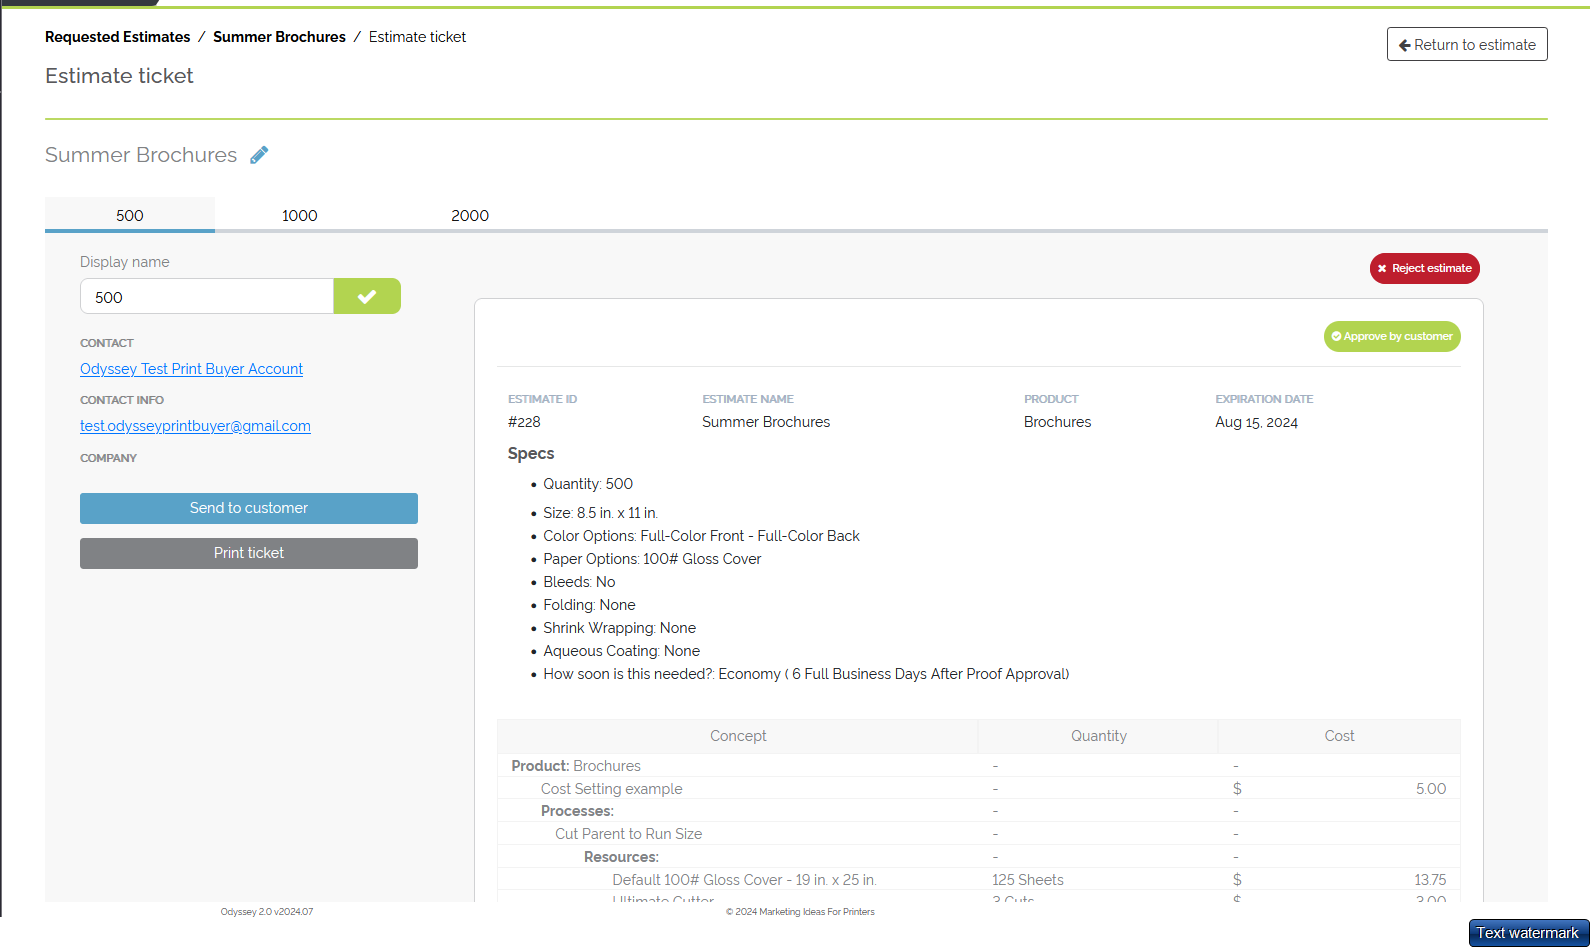
Example of an 'Estimate ticket' screen
Key Features and Components
-
Estimate Summary
- Displays the estimate name and customer information.
- Shows different quantity tabs and their respective details.
-
Contact Information
- Displays the contact name and email address.
- Shows the company name associated with the contact.
-
Action Buttons
- Send to Customer Button: Blue button to send the estimate to the customer.
- Print Ticket Button: Button to print the PDF estimate ticket.
- Reject Estimate Button: Red button to reject the estimate.
- Approve by Customer Button: Green button to mark the estimate as approved by the customer.
-
Estimate Specs
- Provides detailed specifications of the estimate, including quantity, size, color options, paper options, bleeds, folding, shrink wrapping, aqueous coating - all examples - and more.
-
Cost Breakdown
- Shows a detailed cost breakdown for the estimate, including processes and resources used.
-
Navigation Controls
- Return to Estimate Button: Button to go back to the previous estimate review screen.
Steps to Send the Estimate to the Customer
-
Review Estimate Summary
- Verify the details displayed, including the estimate name, customer information, and different quantities.
-
Review Contact Information
- Ensure that the contact information, including the name, email, and company, is correct.
-
Check Estimate Details
- Review the specifications and cost breakdown to confirm accuracy.
-
Send Estimate to Customer
- Click the
 button.
- This will open the Estimates Summary' window to review the quantities and the price for each quantity and send the estimate to the customer via the
 button.
- This will open the Estimates Summary' window to review the quantities and the price for each quantity and send the estimate to the customer via the
- Click the
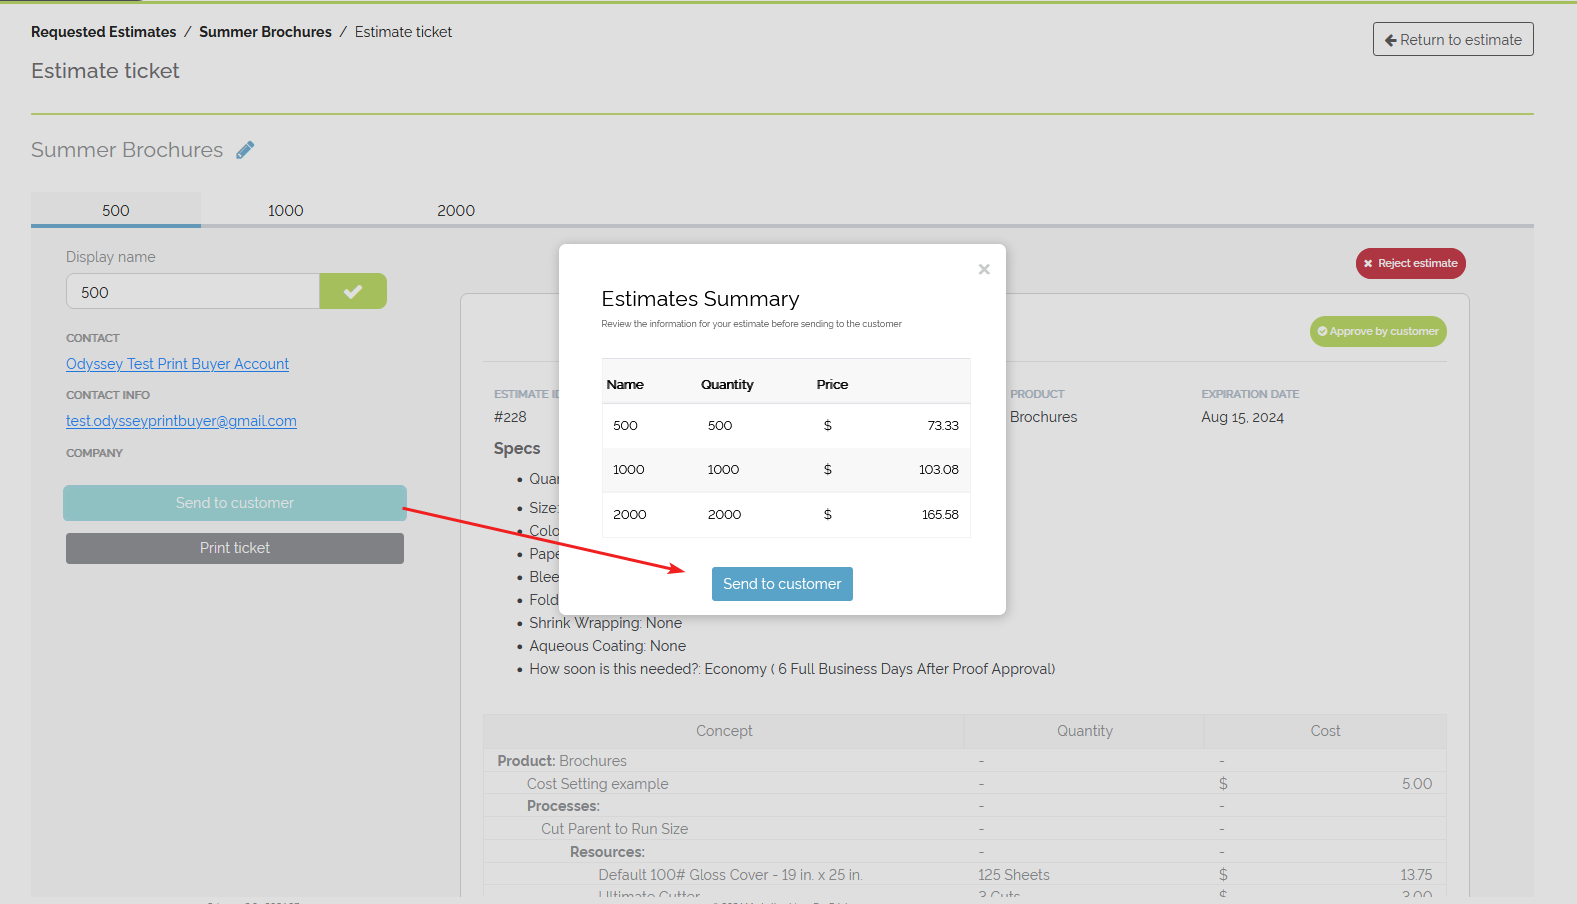
Example 'Estimates Summary' pop-up
5. Print Estimate Ticket
- If needed, click the
 button to generate an estimate PDF.

Example of the Estimate PDF ticket
6. Approve or Reject Estimate
- Use the
 button if the estimate needs to be rejected on behalf of the customer for any reason.
 - Click the
 button to approve the estimate on behalf of the customer.
7. Return to Previous Screen
- Click the
 button to go back to the previous estimate review screen if further edits or reviews are necessary.
Tips for Efficient Use
- Double-check all details before sending the estimate to ensure there are no errors.
- Use the
 function to provide a hard copy or PDF version of the estimate for record-keeping or customer reference.