
Odyssey allows a user to generate invoices for completed jobs, perform various functions on created invoices, and be able to create an invoice in Odyssey without needing a previously completed job.
Invoices to generate tab
Overview: This section of Odyssey is designed to manage and oversee the completed orders that are ready to be invoiced. It displays detailed information about each order including order number, job completion status, customer, job name, price, and date of the completed job.
Key Features:
-
Order View:
- Selection Checkbox: Allows for the selection of individual or multiple orders for which invoices can be generated.
- Job Status Indicator: Each job has a status indicator next to it (colored circles), which shows whether all jobs related to an order are completed (green circle), facilitating quick visual confirmation before generating an invoice.
-
Generate Invoice Options:
- Generate Invoice Button: This button appears next to each order, enabling quick action to generate invoices for specific orders without having to select multiple entries if not needed.
-
Filters:
- Keyword Search: Allows for searches for specific orders using keywords.
- Filter by Date: Orders can be filtered by specifying a date range, helping in narrowing down to specific order periods.
- View Completed Orders: A toggle to filter and view only those orders where all associated jobs have been completed.
Functionality:
- To generate an invoice for completed orders, you can either select the invoices individually or in bulk using the checkboxes provided, and then click the "Generate Invoice" button corresponding to each order.
- The system will automatically create invoices based on the selected orders.
- If only wanting to view orders in which all jobs in the orders are 'Completed', toggle the 'See only completed orders' option to refine the table view.
- Generated invoices are contained within the 'Invoices' tab
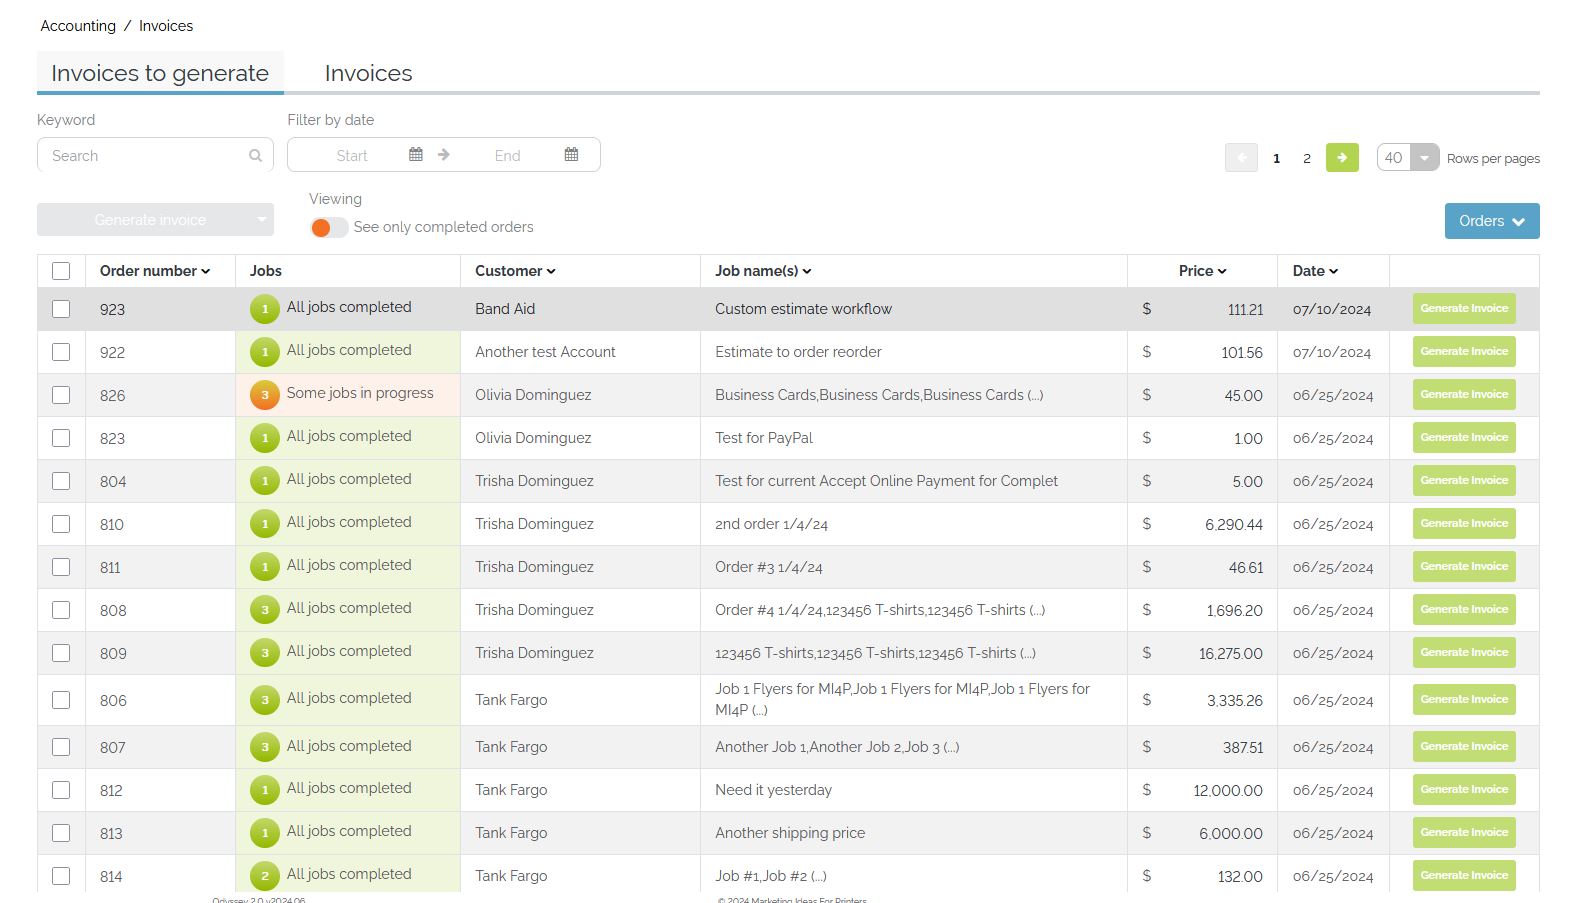
Example of the 'Invoices to generate' tab under Accounting
Invoices tab
Overview: This section of Odyssey focuses on the management and processing of invoices. It provides a detailed view of all invoices generated, with information such as invoice ID, website order number, date, customer name, number of jobs & items, invoice amount, status, and email status.
Key Features:
-
Invoices Overview:
- Selection Checkbox: Enables the selection of multiple invoices for batch actions such as sending or printing.
- Detailed Columns: Each column provides specific details about the invoice, including the invoice ID, associated website order number, invoice creation date, customer, total number of jobs in the order, invoice amount, and the current status of the invoice.
-
Invoice Actions:
- Print, Edit, Send, Void, Delete: Each invoice can be managed individually through dropdown options next to it, allowing for actions like printing, editing, or sending the invoice.
- Email Status Indicator: Shows whether the invoice has been sent to the customer with an icon indicating a 'Sent' status.
-
Search and Filters:
- Keyword Search: Users can search for specific invoices using relevant keywords.
- Status Filter: Invoices can be filtered by their status (e.g., Open, Paid) to streamline the viewing process.
- Filter by Date: Allows filtering invoices based on their creation dates.
-
Batch Actions and Invoice Creation:
- Batch Actions Dropdown: Allows for actions to print or email multiple invoices at once.
- Create Invoice Button: Enables users to initiate the creation of new invoices
Functionality:
- To manage invoices, use the checkboxes to select the invoices you want to manipulate.
- You can then either perform batch actions to print or email or use the dropdown menus next to each invoice to print, edit, send, void, or delete them as needed.
- Filters can help in quickly finding the invoices you are looking for by 'Status' or 'Filter by date'.
- To receive a payment, select the blue 'Receive payment' button.
- Refer to Odyssey's Accounting: Receive Payments section on how to receive a payment in Odyssey.

Example of the 'Invoices' tab under Accounting
Editing an invoice
Overview: The "Edit invoice" page allows users to modify various details of an invoice after its creation. This feature is crucial for updating invoice details, adjusting billing information, and ensuring accurate financial records.
Key Features:
-
Customer Information:
- Customer: Select the customer for whom the invoice is issued. This field may be pre-filled based on the initial invoice creation.
- Invoice Date: Set or change the date when the invoice was or will be issued.
- Due Date: Specify the date by which the payment should be received.
- Terms: Select from predefined payment terms, which will determine the due date if not manually set.
-
Billing and Shipping Information:
- Billed To: Update the address information where the invoice will be sent.
- Shipped To: Adjust the shipping address if different from the billing address.
- Shipping Method: Choose a method for how the goods or services were or will be delivered.
-
Items on the Invoice:
- Add or remove products or services by clicking on ‘Add a product’ or deleting an existing item.
- For each item, specify the
Job Number,Product, whether it isTaxable, theAccountit impacts, aDescription,Quantity,Rate, and the totalAmount.
-
Additional Invoice Information:
- Input any additional details such as
Invoice Phone,Invoice Email Address,Invoice Website Address, and a generalInvoice Messagethat will appear on the invoice.
- Input any additional details such as
-
Shipping Information:
- Review or input details about the shipping including the
Date Shipped,Quantity, andTracking Numberif applicable.
- Review or input details about the shipping including the
How to Use:
-
Navigating to Invoice Editing:
- Access this page by selecting an existing invoice from the invoices list and clicking on the ‘Edit’ option.
-
Updating Invoice Details:
- Make necessary changes to the invoice date, terms, and billing and shipping information as needed.
- Line items can also be added to invoices by selecting the 'Add a product' button
-
Modifying Invoice Items:
- Adjust the quantities, descriptions, or prices of the items listed on the invoice.
- Add relevant information to be shown on the invoice under 'Additional invoice information'.
-
Finalizing the Invoice:
- After making all necessary adjustments, review the entire invoice to ensure all information is correct.
- Click ‘Save’ to update the invoice with the new details.
Tips for Effective Invoice Management:
- Accuracy is Key: Ensure all changes are accurate to maintain reliable financial records.
- Review Before Saving: Review the entire invoice for accuracy and completeness before saving the changes.
Void/Delete an invoice
- Void
- Delete
Steps to Void an Invoice
-
Locate the Invoice
- Navigate to the invoice you wish to void under the 'Invoices' tab.
-
Access the Print Dropdown Menu
- Click on the "Print" button to reveal a dropdown menu.
-
Select the Void Option
- From the dropdown, select the "Void" option.
-
Confirmation Modal
- A confirmation modal will appear to ensure you want to proceed.
- The modal provides two options:
- Cancel: Returns to the previous screen without making changes.
- Void invoice: Voids the invoice.
-
Invoice Status Update
- The invoice remains in the records with all other data unchanged.
- The status of the invoice changes immediately to "Voided".
-
Editing a Voided Invoice
- If you attempt to edit a voided invoice, the edit screen will open.
- All data fields will be disabled to prevent any changes.
- The amount in the lower black bar will indicate "Transaction status: VOIDED".
Steps to Delete an Invoice
-
Locate the Invoice
- Navigate to the invoice you wish to void under the 'Invoices' tab.
-
Access the Print Dropdown Menu
- Click on the "Print" button to reveal a dropdown menu.
-
Select the Delete Option
- From the dropdown, select the "Delete" option.
-
Confirmation Modal
- A confirmation modal will appear to ensure you want to proceed.
- The modal provides two options:
- Cancel: Returns to the previous screen without making changes.
- Delete invoice: Odyssey will completely delete the invoice from the system.
-
Invoice Status Update
- The invoice and all of its data is deleted from all records
- The invoice is no longer listed in the list of 'Invoices'.
- An open credit equivalent to the value of the invoice is created.
Notes on Functionality
-
Void Functionality:
- The status of the invoice changes to "Voided" immediately upon selection.
- The original amount remains visible; it is not changed to $0.
-
Delete Functionality:
- When "Delete" is selected, the invoice is completely deleted along with all its data.
- An open credit equivalent to the value of the invoice is created.
-
Additional Options:
- When editing an existing invoice, a three-dot menu is available in the lower black bar with the "Void" and "Delete" options.