
Step 1: Selecting or Creating a Customer
Overview: The first step in creating a new Odyssey estimate from scratch is selecting an existing customer or creating a new customer. This screen allows you to search for and select a customer or to add a new customer if they are not already in the system.
Key Features and Components
Select a Contact
- A list of existing contacts is displayed, from which you can choose the relevant customer.
- Search Bar: Allows you to type and search for contacts by name, email, company, or branch.
- Filter Options: Drop-down menus to filter contacts by company or branch.
Create New Customer Button
- A green button labeled
 to add a new contact if the desired customer is not listed.
Contact List
- Displays contacts with details such as name, email, phone number, company, and branch.
- Radio Button: Select the contact by clicking the radio button next to the customer’s name.
Navigation Controls
- Pagination controls to navigate through multiple pages of contacts.
- Next Step Button: A green button labeled
 to proceed to the next step of the estimate creation process.
Steps to Select or Create a Customer
Select an Existing Customer
- Use the search bar to find the customer by typing their name, email, company, or branch.
- You can also use the filter drop-downs under 'Company' or 'Branch' to narrow down the search.
- Once the desired customer is found, click the radio button next to their name to select them.
Create a New Customer
- If the customer is not listed, click the
 button.
 - Fill in the required details for the new customer in the 'Add new contact' screen
- Select 'Save' to save the newly create customer
Proceed to Next Step
- After selecting the existing customer or creating a new customer, click the
 button to proceed to the 'Estimate Information' screen.

Example of the 'Select a contact' screen
Step 2: Entering Estimate Information
Overview: The next step in creating a new estimate in Odyssey involves entering detailed information about the estimate, including the estimate name, product details, and any additional information. This screen allows you to specify the product being estimated and input up top three quantities for the estimate.
Key Features and Components
Customer Information
- Displays the selected customer's name and contact information at the top right of the screen for reference.
Estimate Information Section
- Estimate Name: Enter a name for the estimate (e.g., "Tri-City Bank Business Cards").
- Estimate Date: Automatically populated with the current date.
- Estimate Expiration Date: Enter the date when the estimate expires; this can be adjusted if needed.
Product Information Section
-
Product: Select the product this estimate is needed for from the drop-down list.
- The printer may also select ‘Custom Product(s)’; refer to the section ‘Estimates: Creating a New Estimate for Custom Products’
- Quantity 1, Quantity 2, Quantity 3: Enter different quantities for the estimate (e.g., 500, 1000, 2000).
Additional Information Section
- Notes: Add any additional notes or special instructions related to the estimate.
Navigation Controls
- Previous Step Button: A button to go back to the previous step.
- Next Step Button: A green button labeled
 to proceed to the next step of the estimate creation process.
Steps to Enter Estimate Information
Enter Estimate Name
- Type a descriptive name for the estimate in the
Estimate Namefield.
Specify Estimate Expiration Date
- Adjust the
Estimate Expiration Date(if needed) to specify how long the estimate is valid.
Select a Product
-
Click on the drop-down menu under
Productand select the appropriate product for the estimate (e.g., Brochures).- The printer may also select ‘Custom Product(s)’; refer to the section ‘Estimates: Creating a New Estimate for Custom Products’
Enter Quantities
-
Input the desired quantities in the
Quantity 1,Quantity 2, andQuantity 3fields.- These can be different quantities to provide the customer with options (e.g., 500, 1000, 2000).
- Only 'Quantity 1' is required.
Add Additional Information
- If there are any special instructions or notes related to the estimate, enter them in the
Notessection.
Proceed to Next Step
- After completing all the required fields, click the
 button to proceed to the next step in the estimate creation process.
Tips for Efficient Use
- Ensure that all mandatory fields (marked with a red asterisk) are completed before proceeding.
- Use the
Notessection to capture any specific requirements or instructions that need to be considered.
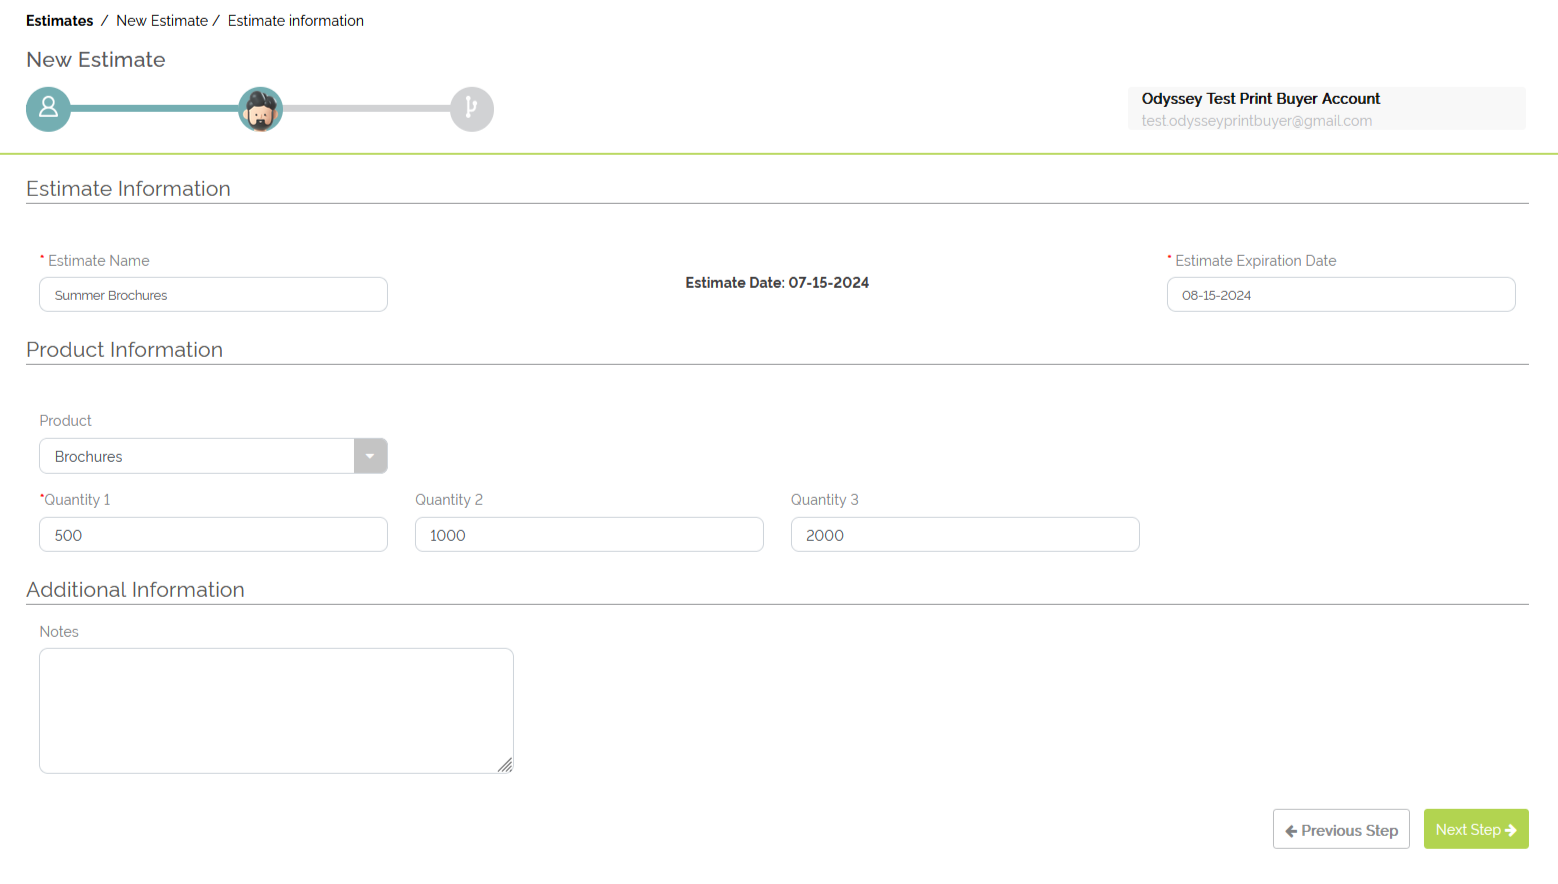
Example of choosing 'Brochures' product for an estimate workflow
Step 3: Starting with an Empty Workflow
Overview
When creating an estimate from scratch, Odyssey allows you to start with an empty workflow. This option provides flexibility to customize the workflow path according to specific requirements without using predefined or custom workflows.
Key Features and Components
Estimate Information
- Displays the estimate name and customer information.
- Shows different quantities.
Workflow Path Options
- Workflows for [Product Name]: Predefined workflows specific to the selected product.
- All Custom Workflows: List of all available custom workflows.
- Custom Estimates Workflows: Custom workflows tailored for estimating.
- Custom Jobs Workflows: Custom workflows designed for job processing.
- Start with an Empty Workflow: Option to create a workflow from scratch without using predefined paths.
Processes in Workflow Path
- This section will be populated as you add processes to the empty workflow.
Action Buttons
- Continue Button: Greyed out until processes are added to the workflow.
- Start with an Empty Workflow Button: Blue button to begin creating a custom workflow from scratch.
Steps to Start with an Empty Workflow
Select Start with an Empty Workflow
- Click the
Start with an Empty Workflowbutton to begin creating a custom workflow from scratch.
Example of the ‘Select an option to start’ screen
Step 4: Selecting the Printing Technology
Overview: After starting with an empty workflow, the next step in creating an estimate in Odyssey involves selecting the printing technology to be used. This step ensures that the correct printing method is applied to the estimate.
Key Features and Components
Select Printing Technology Section
-
Click on the appropriate button to select the printing technology:
- Digital: Choose this option for digital printing. This is suitable for quick turnarounds and short runs.
- Offset: Choose this option for offset printing. This is ideal for larger runs and projects requiring specific ink types and paper options.
- No Printing: Select this option if the estimate does not involve any printing process.
Action Buttons
- Cancel Button: A grey button to cancel the current operation and return to the previous screen.
- Continue Button: A green button to proceed to the next step after selecting the printing technology.
Proceed with Selected Technology
- After selecting the printing technology, click the
 button to proceed to the next step in the estimate creation process.
Cancel if Necessary
- If you need to stop or go back to the previous screen, click the
 button.
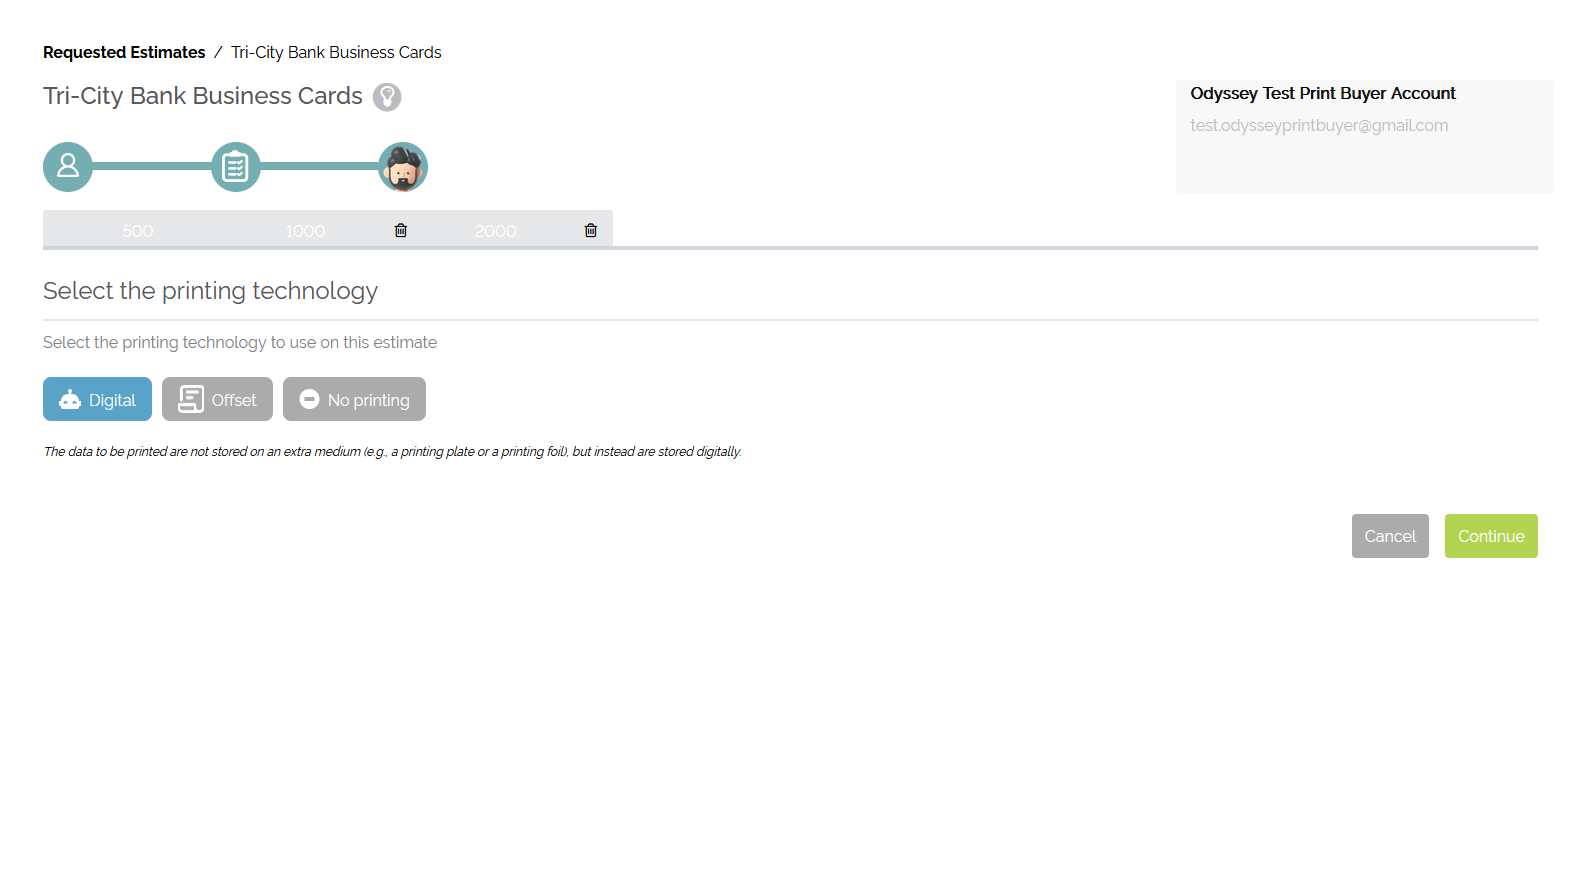
Example of printing technology screen
Step 5: Configuring Workflow Details
Overview: After selecting the printing technology, the next step in creating an estimate involves configuring the workflow details. This includes setting up subsections, choosing paper, specifying printing options, and adding any necessary folding options.
Key Features and Components
Printing Technology
- Displays the chosen printing technology (e.g., Digital).
Subsection Configuration
- Subsections: Allows the creation of different parts of a product (e.g., cover and interior pages for a booklet).
- Add New Subsection: Option to add additional subsections as needed.
Paper Choice
- Paper to Use: Select the type of paper for the subsection.
- Parent Size: Odyssey will show the size of the parent sheet.
-
Trimmed Size: Enter the trimmed size dimensions (width and height) from the drop-down.
- There is also the option to enter in a custom size under ‘Width’ and ‘Height’.
Printing Options
- Press to Use: Select the press for printing.
-
Color Combination Selected: Set the color combination for printing
- Refer to ‘Estimates: Selecting the Color Combination’ for more information.
Folding Options
- Add Folding: Option to add folding if needed.
Action Buttons
- Continue Button: A green button to proceed after configuring the workflow details.
Steps to Configure Workflow Details
Add or Configure Subsections
- Click
Add newto create additional subsections if the product has multiple parts. - Edit existing subsections by clicking on their tabbed name.
Select Paper Choice
- Choose the paper type from the
Paper to usedrop-down menu. - Enter the
Parent sizeandTrimmed sizedimensions to specify the paper size. - Fill in the width and height for the trimmed size if the product is needing a custom trimmed size.
Set Printing Options
- Select the printing press from the
Press to usedrop-down menu. -
Click
Set color combinationto choose the color options for the printing process.- Refer to ‘Estimates: Selecting the Color Combination’ for more information.
Add Folding Options (if needed)
- Click
 to specify a specific fold (if needed) for the product.
Review and Continue
- Review all the configured details to ensure accuracy.
- Click the
 button to proceed to the next step in the estimate creation process.

Example of workflow details filled out
Step 6: Adding Needed Processes
Overview: After setting up the color combination, the next step in creating an estimate from scratch in Odyssey involves adding the necessary processes to the workflow. This step ensures that all the production steps required for the estimate are included and configured correctly.
Key Features and Components
Process Groups
- Suggested: Recommended processes based on the product type.
- Booklet Making, Box Packing, Conventional Printing, Custom Processes, Cutting, Delivery, Digital Printing, Embossing, etc.: Various categories of processes that can be added.
Available Processes
- A list of processes available under the selected process group.
- Search bar to find specific processes.
Selected Processes
- Displays the processes that have been added to the workflow.
- Option to remove processes if needed.
Action Buttons
- Create New Process Button: Allows you to create a new process if the needed one is not listed.
- Cancel Button: A grey button to cancel the current operation and return to the previous screen.
- Add Processes Button: A green button to add the selected processes to the workflow.
Steps to Add Needed Processes
Select a Process Group
- Choose a relevant process group from the list on the left (e.g., Digital Printing, Cutting).
Browse Available Processes
- Scroll through the available processes in the selected group.
- Use the search bar to quickly find a specific process.
Add Processes to Workflow
- Click on the process name to add it to the
Selected Processeslist. - Repeat the steps to add all necessary processes to the workflow.
Review Selected Processes
- Ensure that all required processes are listed under
Selected Processes. - Remove any unnecessary processes by clicking the red delete button next to the process name.
- Reorder the processes by selecting the 3 gray line to the right of the red trash can icon.
Create Custom Processes (if needed)
- If a required process is not listed, click the
 button.
 - Follow the prompts in creating the process and save it.
Add Processes to Workflow
- After selecting and reviewing all processes, click the
 button to add them to the workflow.
Cancel if Necessary
- If you need to stop or go back to the previous screen, click the
 button.
Tips for Efficient Use
- Carefully select processes that are essential for the production of the product to avoid unnecessary steps.
- Regularly update the list of available processes to reflect any changes in production capabilities or standards.
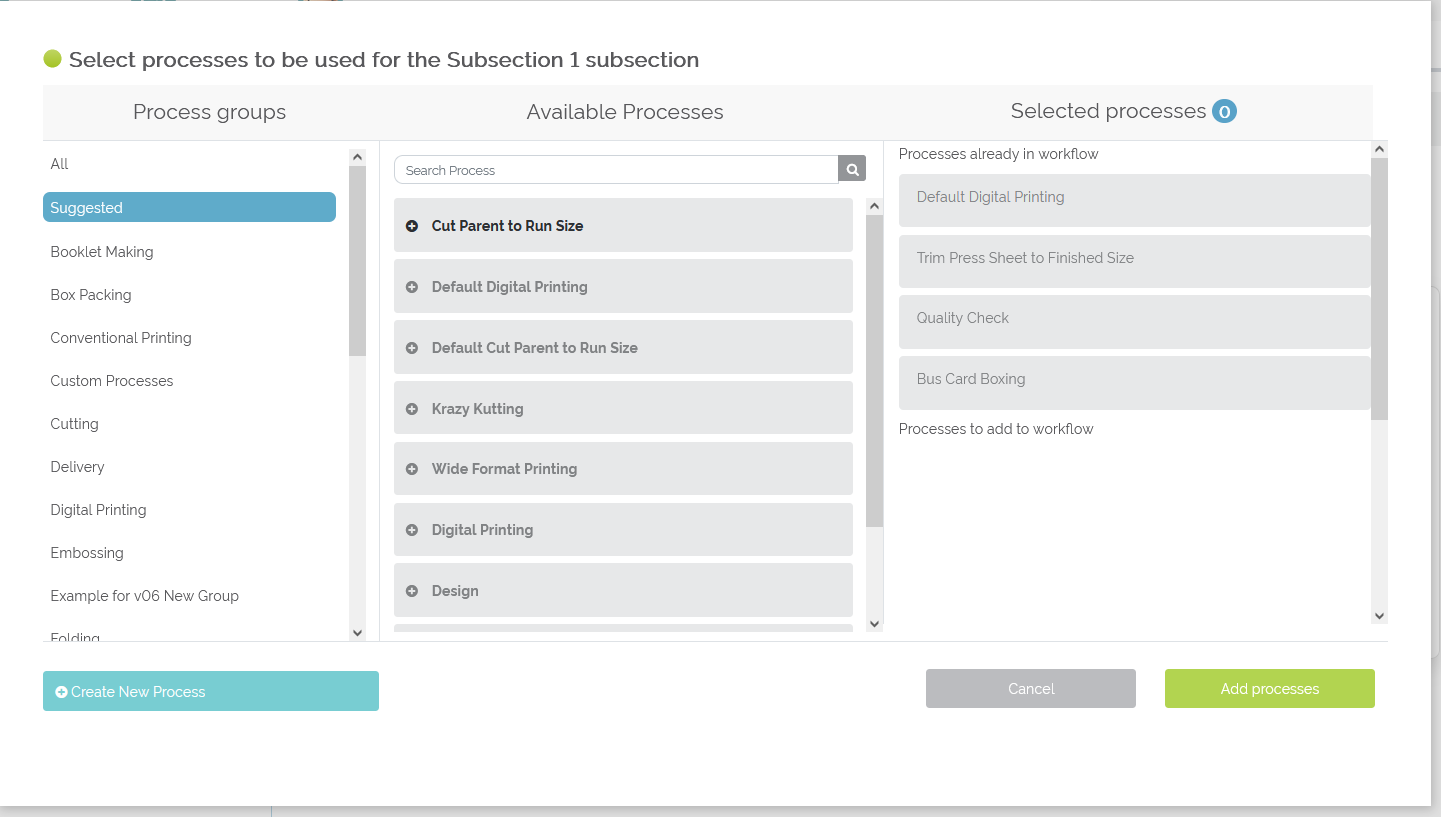
Example processes selected for a business card estimate from scratch
Step 7: Reviewing the Run Size
Overview: After adding the necessary processes, the next step in creating an estimate involves adding in a run size.
Steps to Fill in the Run Size
Click on Review Paper Sizes
- Click the
 button to open the ‘Paper calculator’ configuration window.
Enter the Run Size
- In the configuration window, find the field labeled
Run Size. -
Enter the appropriate dimensions for the run size (width and height).
- Example: If the run size (printed paper size) is 11 inches by 17 inches, enter 11 in the width field and 17 in the height field.
Run to trim
- Make any necessary adjustments to the margins and gutters under the ‘Run to trim’ section.
- Select
 to have Odyssey automatically center the ‘Number Up’
 - Select
 to have Odyssey remove all margins and gutters
 - Review the ‘Run to trim’ cutting/number up display to ensure accuracy.
Save the Changes
- After entering the run size and verifying margins and gutters, click the
 button to apply the changes.
Tips for Efficient Use
- Ensure all dimensions are accurate to avoid errors in production.
- Double-check all sizes to ensure they match the requirements of the job.
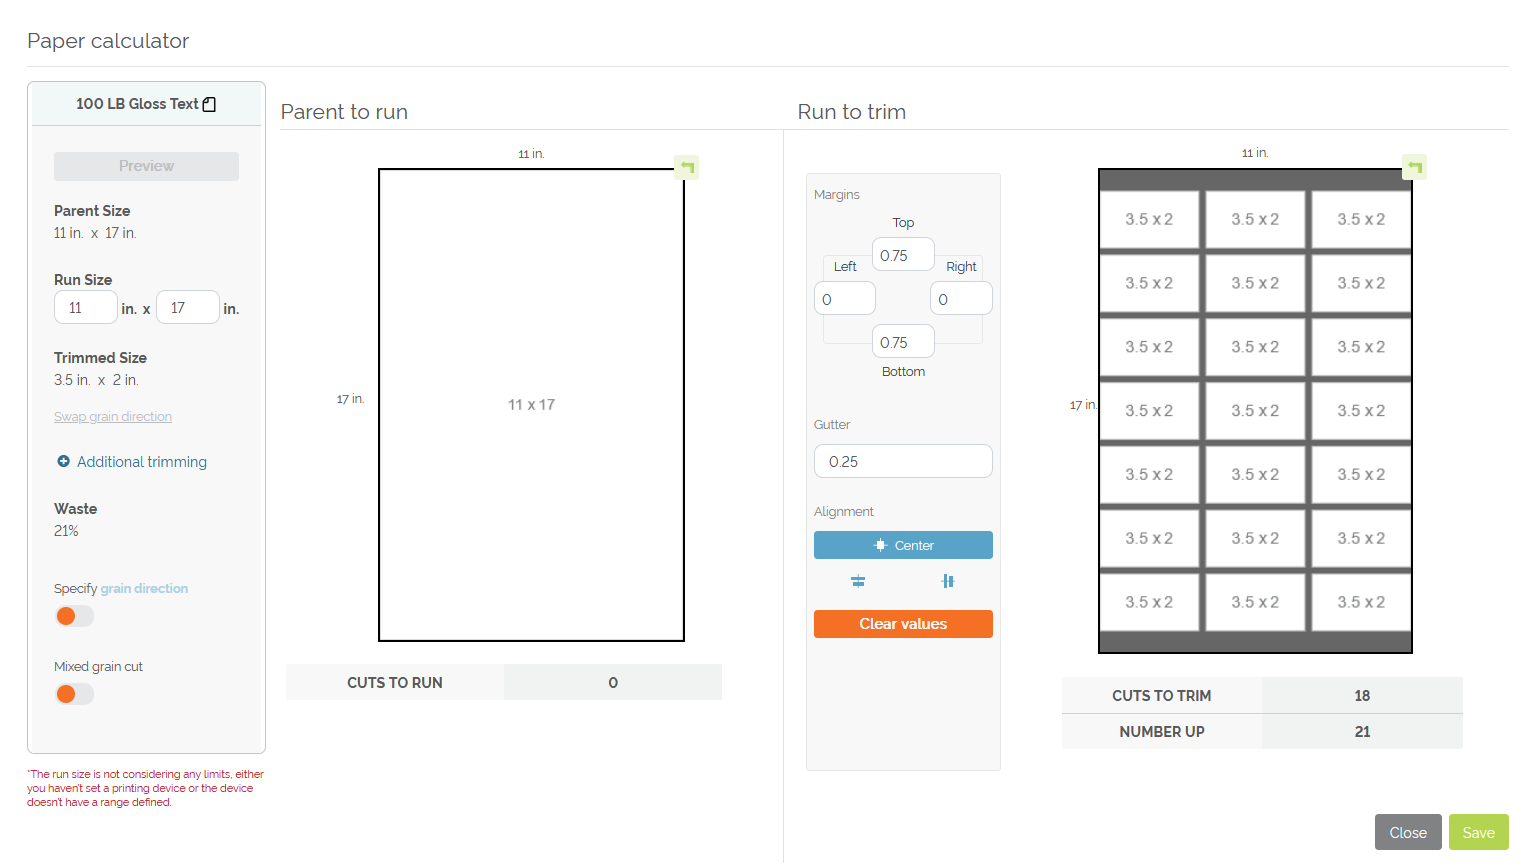
Example of a filled-out ‘Paper calculator’ screen
Step 8: Reviewing the Estimate Workflow for Final Adjustments
Overview: After setting the run size, the next step in creating an estimate from scratch involves reviewing the entire workflow for any missing calculations, required changes, or additional processes. This ensures the estimate is complete and accurate before final approval or sending to the customer.
Key Features and Components
Estimate Information
- Displays the estimate name, customer information, selected quantities, selling price, cost, and profit margin.
- Shows the estimated date and current status of the estimate.
Workflow Path Information
- Product: Type of product (e.g., Business Card).
- Estimate Workflow: Name of the workflow.
- Printing Technology: Chosen printing method (e.g., Digital).
- Order Form: Specific order form used.
- Product Information: Details about the product, including weight and paper information.
Processes (Grid View)
- Displays each process involved in the workflow in a grid layout.
- Highlights any missing resources or calculations with an alert.
- Options to add, edit, or remove processes.
Action Buttons
- Change View Button: Allows switching between different process views for easier navigation.
- Add One or More Processes Button: Add additional processes if needed.
- Review Paper Sizes Button: Adjust paper sizes if required.
- Review Estimate Specs Button: Review and edit estimate specifications.
Missing Calculations and Resources
- Identifies sections where resources or calculations are missing.
- Allows for the addition of custom calculations and missing resources.
Steps to Review the Estimate Workflow for Final Adjustments
Switch to Grid View
- Click the
Change Viewbutton to switch to the grid view for a different overview of the estimate workflow processes.
Identify Missing Calculations and Resources
- Review each process in the grid to identify any alerts indicating missing resources or calculations.
- Examples in the provided screenshot include missing resources and their calculations in the
Quality CheckandBus Card Boxingprocesses.
Add Missing Resources and Calculations
- Click on the
Resourcebutton in the highlighted processes to add the required resources. - Enter any missing custom calculations to ensure all components and consumables are accounted for.
Verify All Processes
- Ensure that each process has the necessary components, devices, and resources listed.
- Make any additional edits to processes if required by clicking the respective icons next to each process name.
Review Overall Workflow
- Conduct a final review of the workflow path information, ensuring all details are accurate and complete.
Tips for Efficient Use
- Pay attention to alerts indicating missing resources or calculations to avoid errors in the estimate.
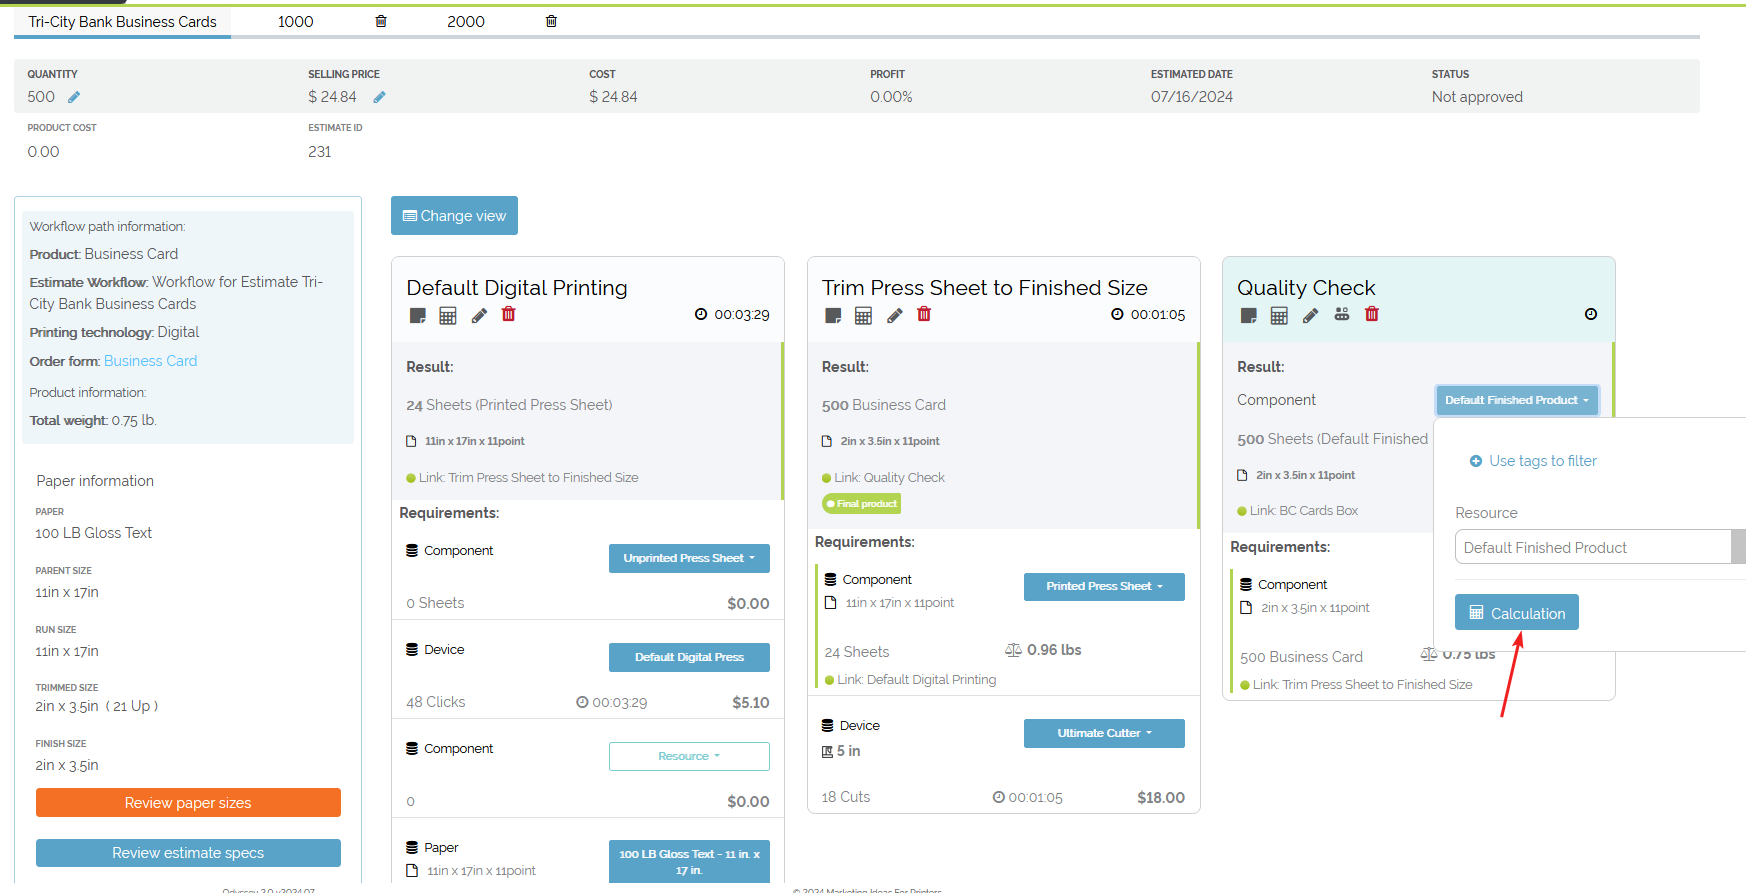
Example of selecting the ‘Calculation’ button to add a needed custom calculation for a component
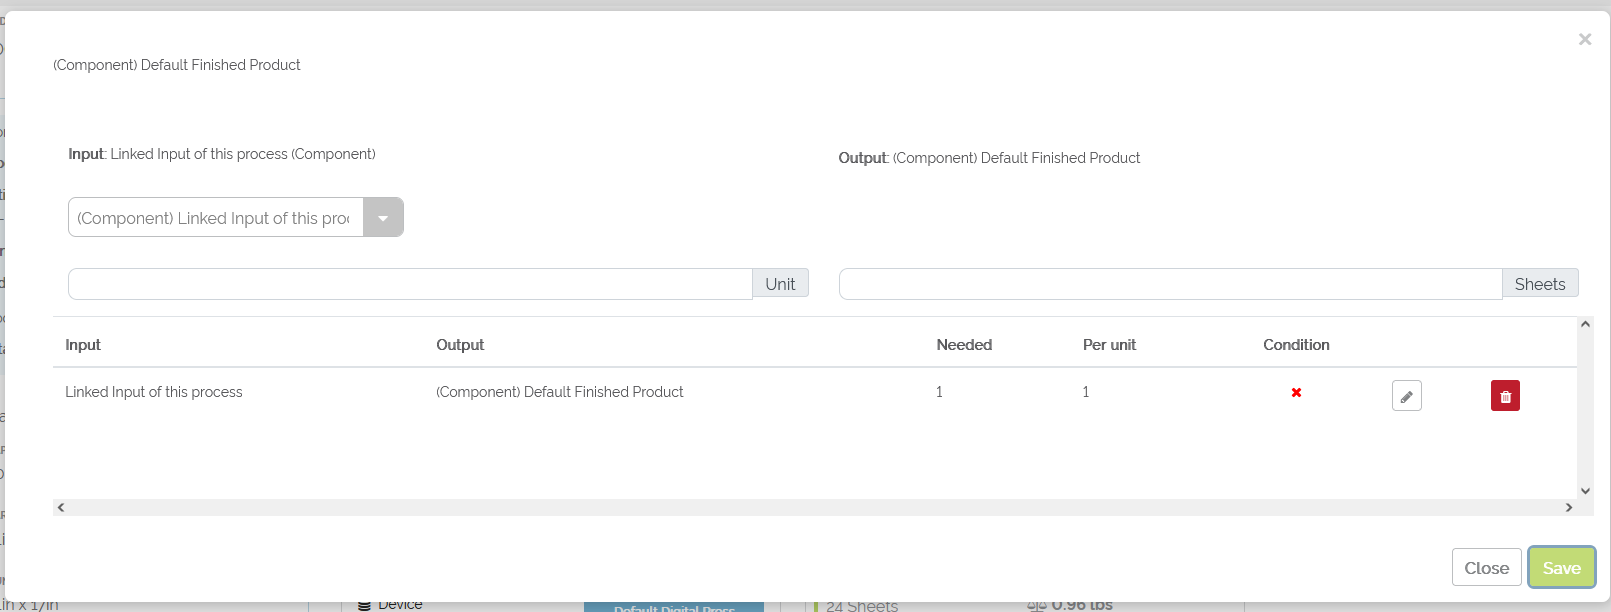
Example of add a 1-1 calculation for the ‘Default Finished Product’ component in the ‘Quality Check’ process
Step 9: Updating Selling Price and Reviewing Profit
Overview: In this step of creating an estimate from scratch in Odyssey, printers may want to update the selling price to ensure profitability and then review the updated profit to make sure it meets the business's financial goals. This step is crucial for ensuring the estimate is accurate, profitable, and ready for approval or sending to the customer.
Key Features and Components
Estimate Information
- Displays the estimate name, customer information, selected quantities, and current selling price.
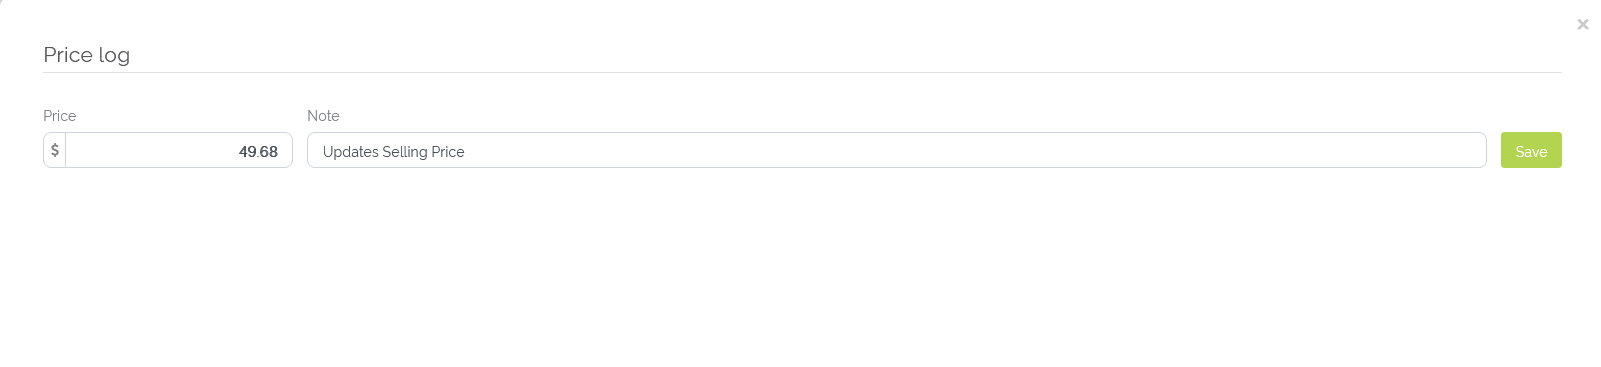
Selling ‘Price Log’ modal
- Price Field: Allows you to enter the updated selling price.
- Note Field: Option to add a note explaining the price update.
- Log Date: Indicates the date and time when the price was updated.
- Employee: Displays the name of the employee who made the update.
Financial Summary
- Quantity: Shows the quantity for the estimate.
- Selling Price: Displays the updated selling price.
- Cost: Displays the cost associated with the estimate.
- Profit: Shows the updated profit percentage.
- Estimated Date: Shows the estimate creation date.
- Status: Indicates the current status of the estimate (e.g., Not approved).
Action Buttons
- Reject Button: Red button to reject the estimate.
- Accept Button: Green button to approve the estimate.
- Print/Send Button: Option to print the estimate PDF or send the estimate to the customer.
Steps to Update Selling Price and Review Profit
Navigate to the Selling Price Section
- On the main estimate screen, locate the
Selling Pricefield.
Select the Pencil Icon
- Click the pencil icon next to the
Selling Priceto open the price log for editing.
Example of entering in a selling price in the ‘Price log’
Enter the Updated Selling Price
-
In the
Pricefield, enter the new selling price that ensures the estimate is profitable.- Example: Enter $49.68 if this is the desired selling price.
Add a Note (Optional)
- In the
Notefield, add a brief note explaining the reason for the price update (e.g., "Updated Selling Price").
Save the Updated Price
- Click the
Savebutton to apply the changes and update the selling price.
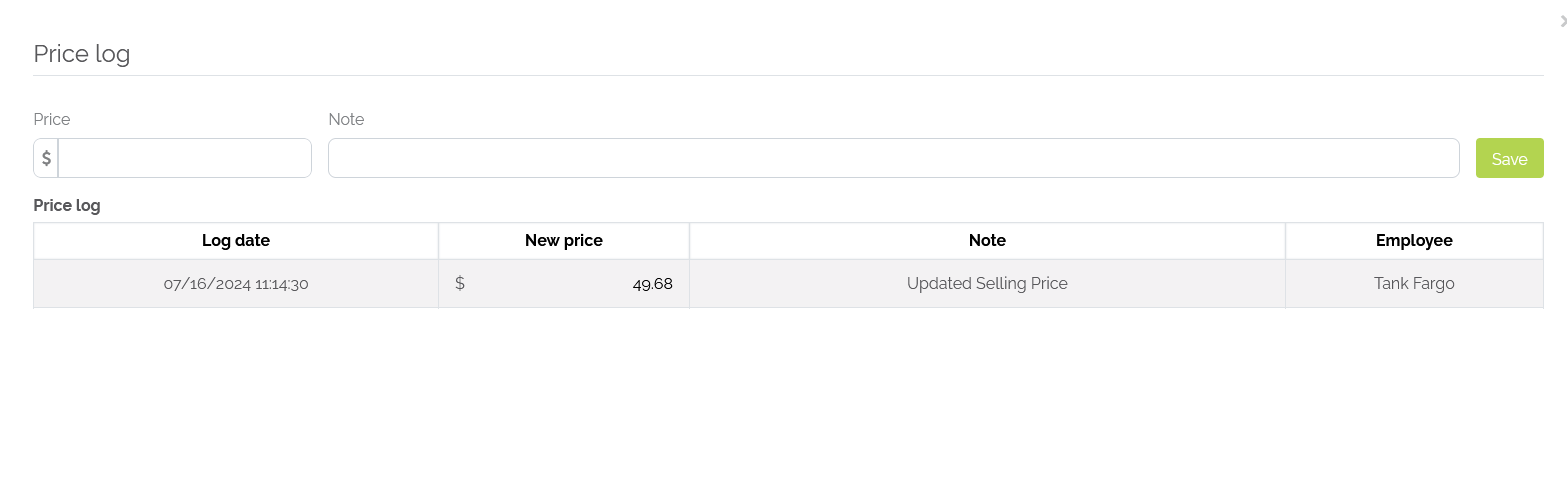
Example of the ‘Price log’ with a new price entry
Verify the Updated Selling Price
- Ensure that the
New pricefield shows the correct updated selling price. - Verify that the note field accurately describes the reason for the price update.
- Confirm that the log date reflects the correct date and time of the update.
- Check that the employee name listed is correct.
Return to Main Estimate Screen
- Close the price log view and return to the main estimate screen.
- Verify that the updated selling price is now correctly displayed in the estimate summary.
Review Updated Financial Information
- Check the updated
Selling Priceto ensure it reflects the new amount. - Verify the
Costassociated with the estimate. - Confirm the
Profitpercentage is now updated and reflects the profit based on the new selling price.
Evaluate Profit Margin
-
Ensure that the profit percentage meets the financial goals and expectations.
- Example: If the profit is 100.00%, this indicates the selling price is double the cost.
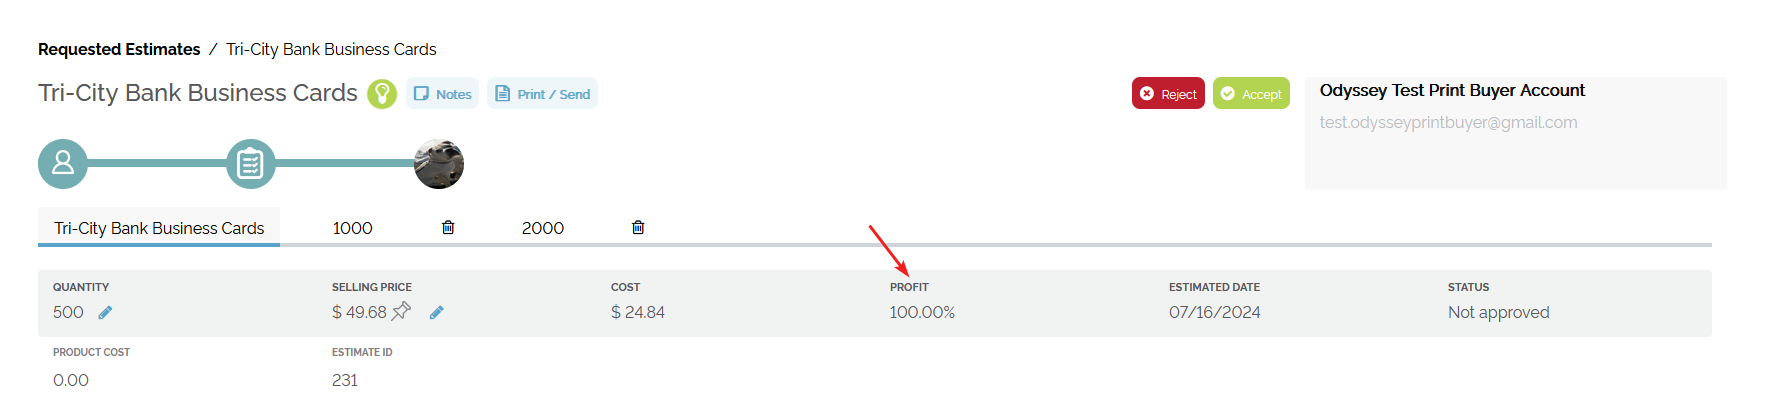
Example of a 100% profit on an estimate created from scratch
Tips for Efficient Use
- Ensure all price changes are well-documented with clear notes to maintain transparency.
- Regularly review pricing strategies to stay competitive while ensuring your printshop maintains profitability.
Step 10: Sending the Estimate to the Customer
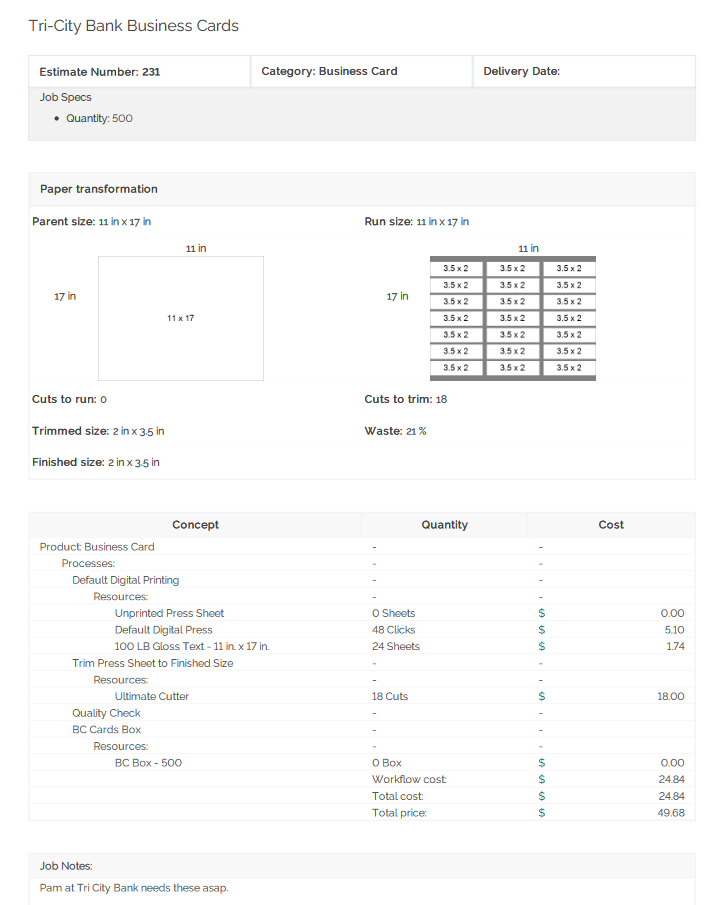
Overview: The ‘Estimate ticket’ screen is the final step in the estimate creation process where the printer can review the estimate details, send the estimate to the customer, print the estimate, or perform other actions such as approving or rejecting the estimate on behalf of the customer.
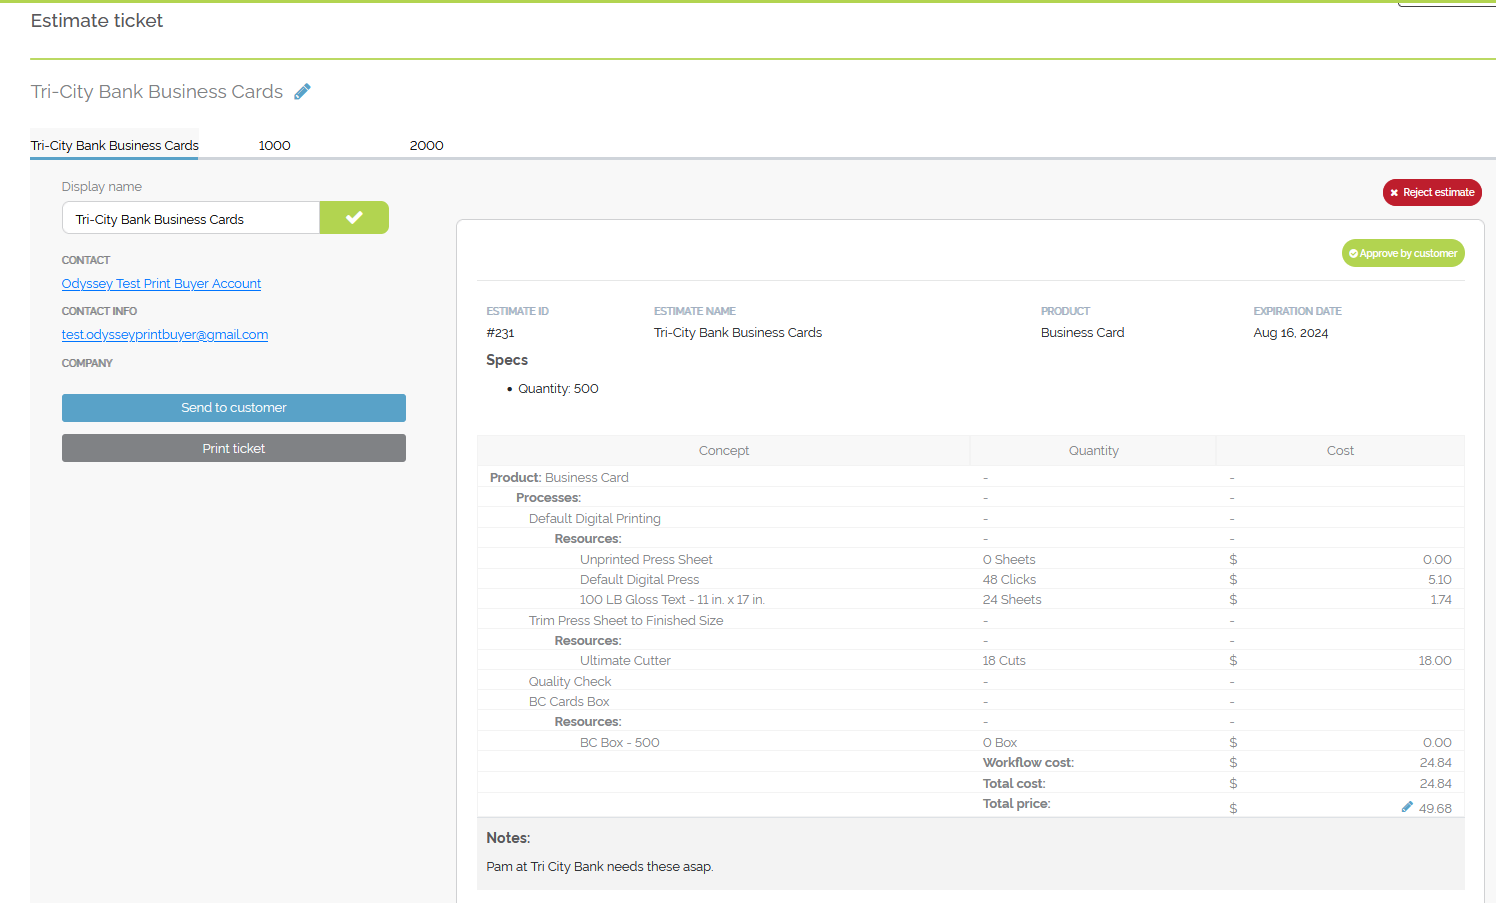
Example of an 'Estimate ticket' screen
Key Features and Components
Estimate Summary
- Displays the estimate name and customer information.
- Shows different quantity tabs and their respective details.
Contact Information
- Displays the contact name and email address.
- Shows the company name (if applicable) associated with the contact.
Action Buttons
- Send to Customer Button: Blue button to send the estimate to the customer.
- Print Ticket Button: Button to print the PDF estimate ticket.
- Reject Estimate Button: Red button to reject the estimate.
- Approve by Customer Button: Green button to mark the estimate as approved on behalf of the customer.
Estimate Specs
- Provides detailed specifications of the estimate, including quantity, size, color options, paper options, bleeds, folding, shrink wrapping, aqueous coating - all examples - and more.
Cost Breakdown
- Shows a detailed cost breakdown for the estimate, including processes and resources used.
Navigation Controls
- Return to Estimate Button: Button to go back to the previous estimate review screen.
Steps to Send the Estimate to the Customer
Review Estimate Ticket
- Verify the details displayed, including the estimate name, customer information, and different quantities.
Review Contact Information
- Ensure that the contact information, including the name, email, and company, is correct.
Check Estimate Details
- Review the specifications and cost breakdown to confirm accuracy.
Send Estimate to Customer
-
Click the
 button.
- This will open the Estimates Summary' window to review the quantities and the price for each quantity and send the estimate to the customer via the
 button.
- This will open the Estimates Summary' window to review the quantities and the price for each quantity and send the estimate to the customer via the
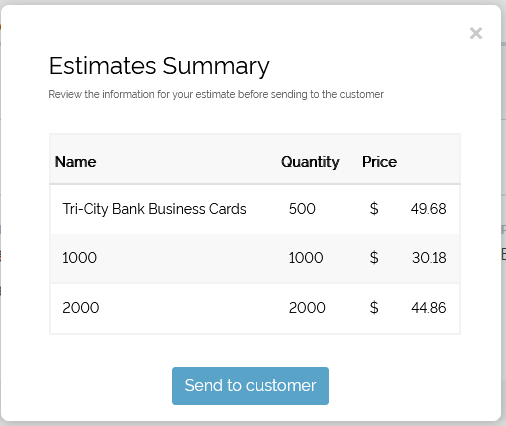
Example 'Estimates Summary' pop-up
5. Print Estimate Ticket
- If needed, click the
 button to generate an estimate PDF, which is for internal printshop view only. The printbuyer will not receive this PDF.
Example of the Estimate PDF ticket
6. Approve or Reject Estimate
- Use the
 button if the estimate needs to be rejected for any reason.
 - Click the
 button to approve the estimate on behalf of the customer.
7. Return to Previous Screen
- Click the
 button to go back to the previous estimate review screen if further edits or reviews are necessary.
Tips for Efficient Use
- Double-check all details before sending the estimate to ensure there are no errors.
- Use the
 function to provide a hard copy or PDF version of the estimate for record-keeping or customer reference.